> ## Documentation Index
> Fetch the complete documentation index at: https://docs.unstructured.io/llms.txt
> Use this file to discover all available pages before exploring further.
# Unstructured API on AWS
> Follow these steps to deploy the Unstructured API service into your AWS account.
The Unstructured API on AWS is deprecated. It is no longer supported and is not being actively updated.
Unstructured is now available on the AWS Marketplace as a private offering. To explore supported options
for running Unstructured within your virtual private cloud (VPC), email Unstructured Sales at
[sales@unstructured.io](mailto:sales@unstructured.io).
This page is not being actively updated. It might contain out-of-date information. This page is provided for legacy reference purposes only.
This article describes how to create several interrelated resources in your AWS account.
Your AWS account will be charged on an ongoing basis for these resources, even if you are not actively using them.
Manually stopping or terminating the associated Amazon EC2 instances alone will not reduce these ongoing charges.
To stop accruing all related ongoing charges, you must delete all of the associated AWS resources.
To do this, see [Manage related AWS account costs](#manage-related-aws-account-costs).
*Estimated time to complete: 30 minutes*
The requirements are as follows.
1. **An AWS account**:
* If you have an existing account, log in: [https://aws.amazon.com/](https://aws.amazon.com) > **Sign In to the Console**.
* If you do not have an existing account, create one: [https://aws.amazon.com/free](https://aws.amazon.com/free) > **Create a Free Account**.
2. **IAM permissions**: In a later step, AWS CloudFormation creates required infrastructure in your account. To learn how to create the associated role, see [Creating IAM Roles with AWS CloudFormation](https://blog.awsfundamentals.com/aws-iam-roles-with-aws-cloudformation#heading-creating-iam-roles-with-aws-cloudformation).
3. **SSH key pair**: For secure access to the Amazon EC2 instance that CloudFormation creates in a later step, create an SSH key pair. To learn how, see [Create a key pair for your Amazon EC2 instance](https://docs.aws.amazon.com/AWSEC2/latest/UserGuide/create-key-pairs.html).
## Part I: Setting up the Virtual Private Cloud (VPC)
*Note: If you have already configured a Virtual Private Cloud (VPC) for your organization that meets the requirements for deploying the Unstructured API, you may skip this part and proceed to the Part II. Ensure that your existing VPC setup includes the necessary subnets, internet gateway, and route tables as outlined in this guide.*
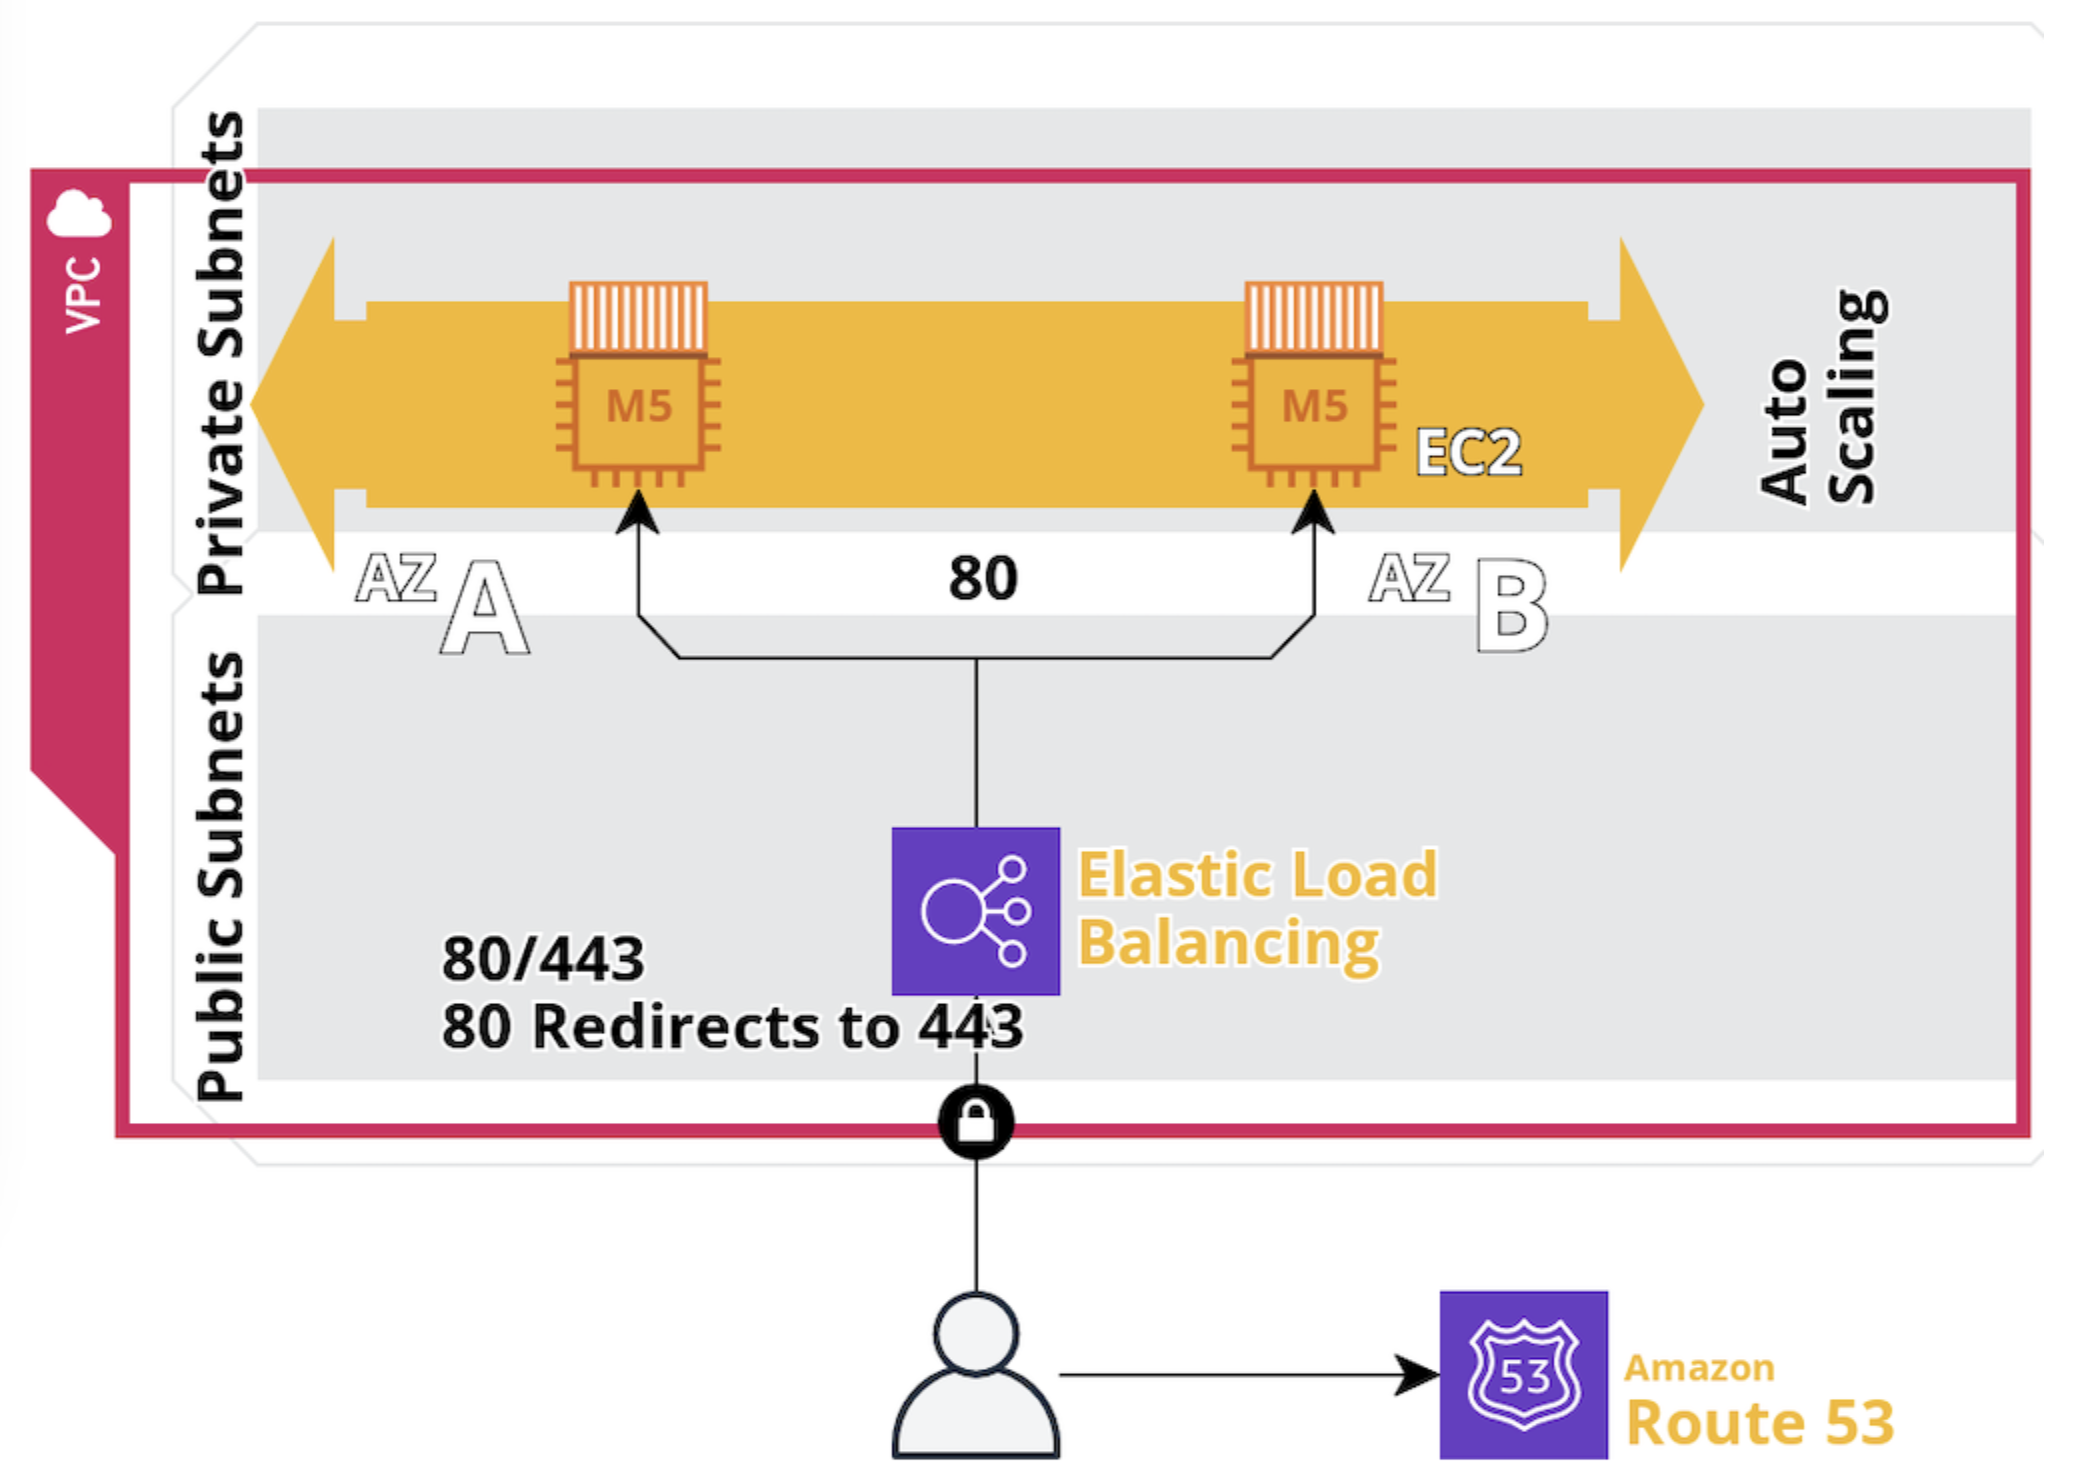
In Part I, you will construct a resilient and secure infrastructure within AWS by setting up a Virtual Private Cloud (VPC). Your VPC will encompass a dual-tiered subnet model consisting of both **public** and **private** subnets across multiple Availability Zones (AZs).
You will establish the foundational network structure for deploying the Unstructured API by creating two public subnets and one private subnet within your VPC. The public subnets will host resources that require direct access to the internet, such as a load balancer, enabling them to communicate with external users. The private subnet is designed for resources that should not be directly accessible from the internet, like EC2 Compute Engine.
 1. **Access the VPC dashboard**:
a. In the AWS Management Console, in the top menu bar, click **Services > Networking & Content Delivery > VPC**.
1. **Access the VPC dashboard**:
a. In the AWS Management Console, in the top menu bar, click **Services > Networking & Content Delivery > VPC**.
b. In the sidebar, click **Your VPCs**, and then click **Create VPC**.
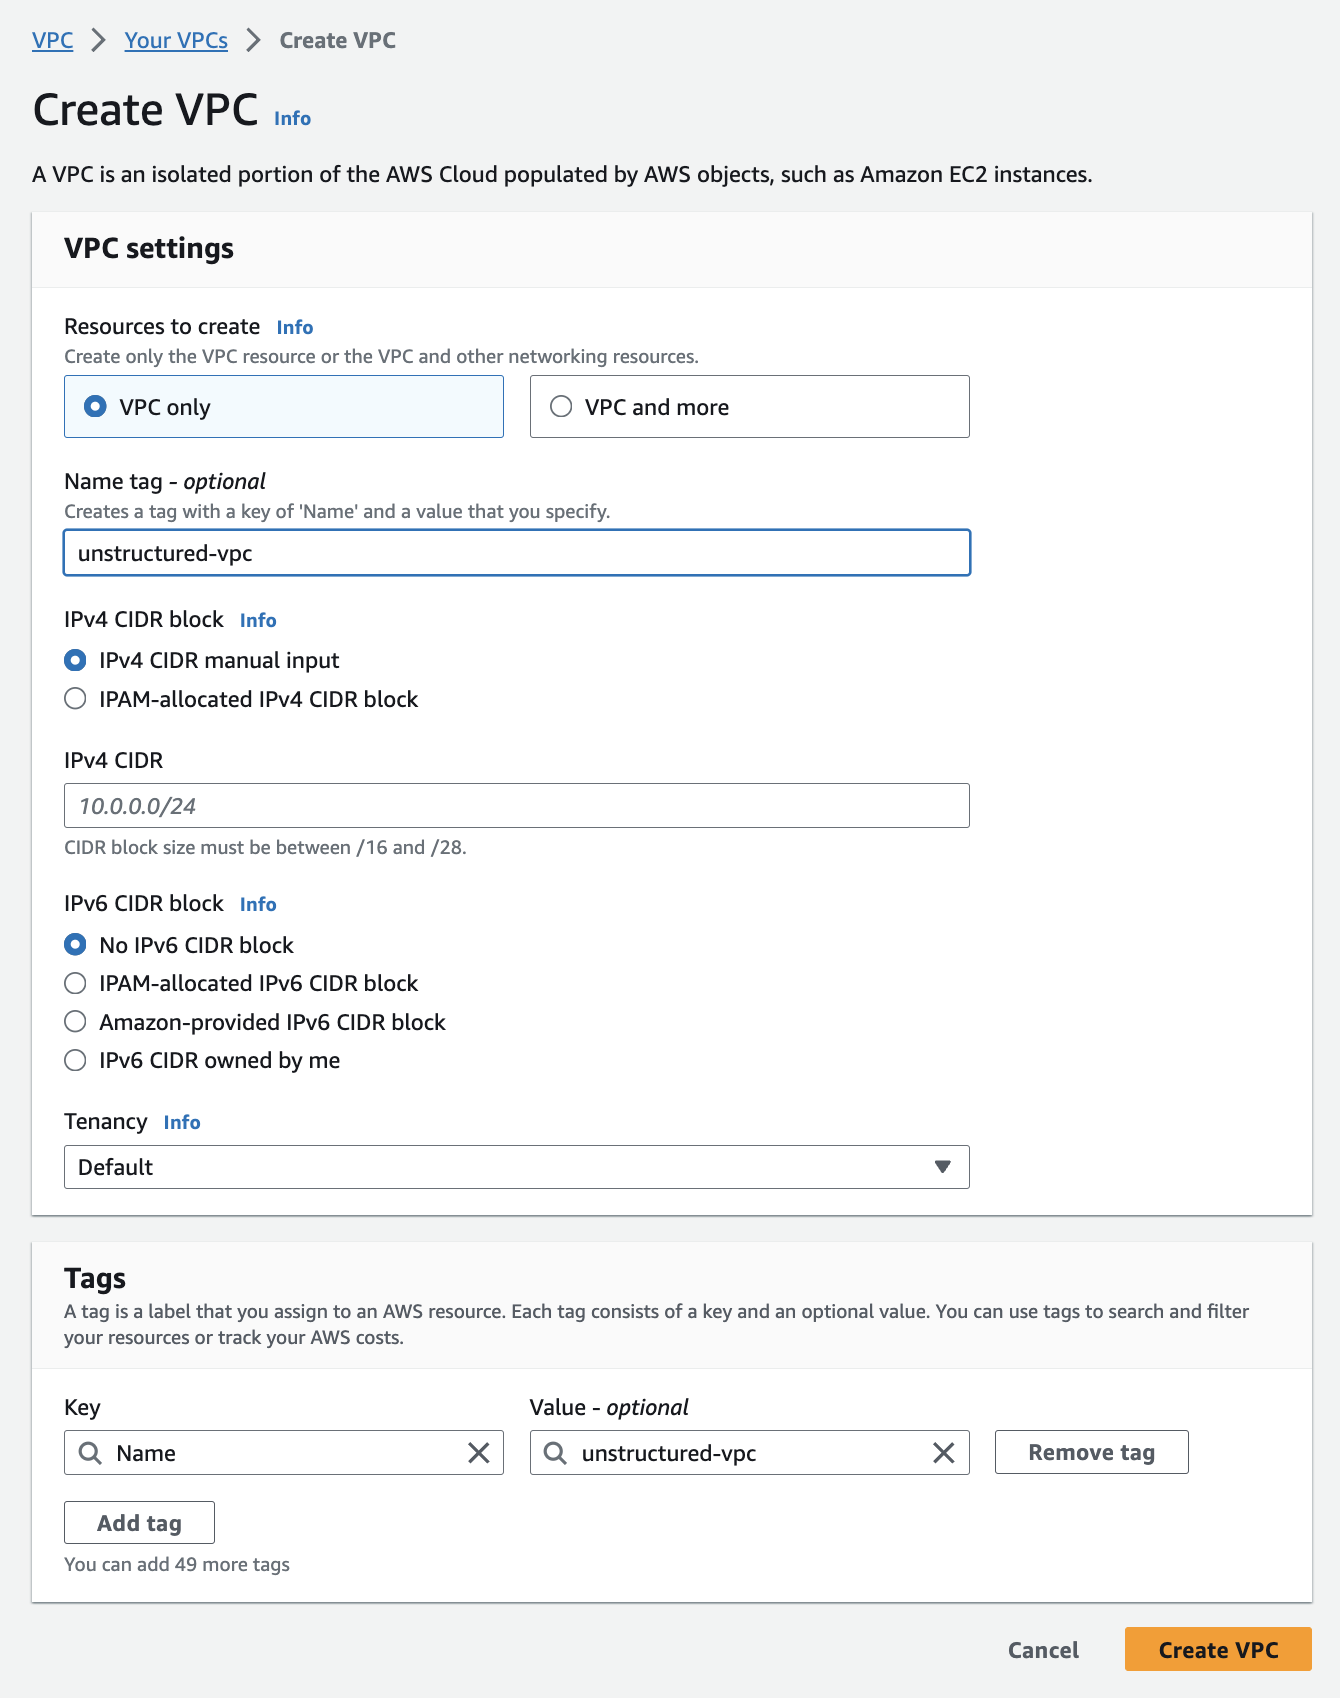
2. **Create the VPC**:
a. Select **VPC only**.
b. Enter a **Name tag** for your VPC.
c. Specify the **IPv4 CIDR block** (for example, `10.0.0.0/16`).
d. You may leave **IPv6 CIDR block**, **Tenancy**, and **Tags** settings at their defaults.
e. Click **Create VPC**.
 3. **Create the subnets**:
a. After creating the VPC, in the sidebar, click **Subnets**.
3. **Create the subnets**:
a. After creating the VPC, in the sidebar, click **Subnets**.
b. Click **Create subnet**.
c. In the **VPC ID** dropdown menu. select the VPC that you just created.
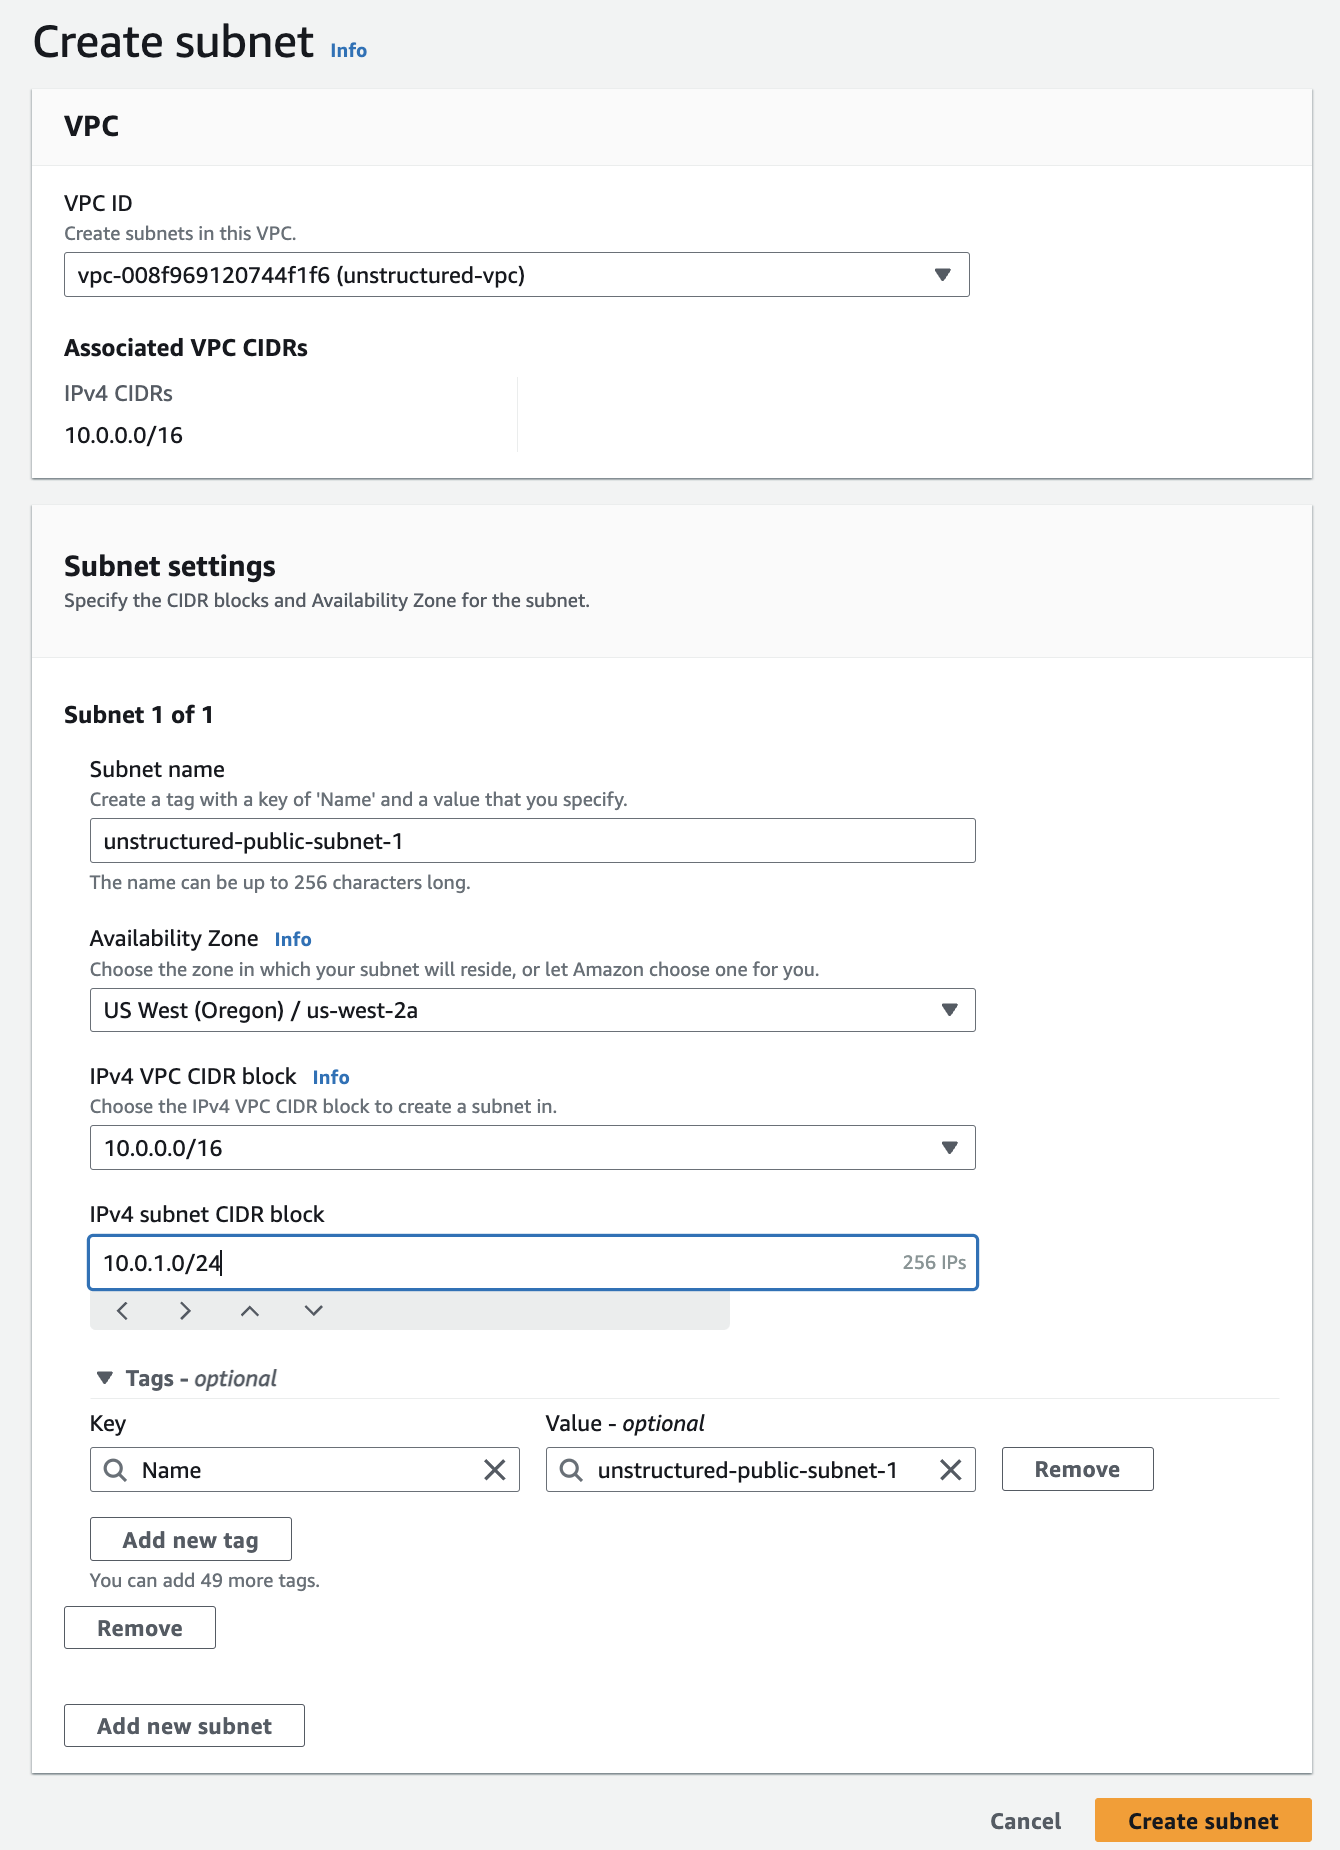
d. For the first public subnet:
* Enter a **Subnet name**.
* Select an **Availability Zone**.
* Specify the **IPv4 CIDR block** (for example, `10.0.0.0/16`).
* Specify the **IPv4 subnet CIDR block** (for example, `10.0.1.0/24`).
* You may leave the **Tags** setting at its default.
* Click **Add new subnet**. (Do not click **Create subnet** yet.)
e. Repeat the process for the second public subnet with a different **Availability Zone** and **IPv4 subnet CIDR block** (for example, `10.0.2.0/24`).
* *Note: Each subnet must reside entirely within one Availability Zone and cannot span zones. If you specify the same Availability Zone or IPv4 subnet CIDR block as the first public subnet, AWS CloudFormation might fail in a later step*.
* To learn more, see [Subnet basics](https://docs.aws.amazon.com/vpc/latest/userguide/configure-subnets.html#subnet-basics).
* Click **Add new subnet**. (Do not click **Create subnet** yet.)
f. Repeat the process for the private subnet with a different **Availability Zone** and **IPv4 subnet CIDR block** (for example, `10.0.3.0/24`).
* *Note: Each subnet must reside entirely within one Availability Zone and cannot span zones. If you specify the same Availability Zone or IPv4 subnet CIDR block as the first or second public subnets, AWS CloudFormation might fail in a later step*.
g. Click **Create subnet**.
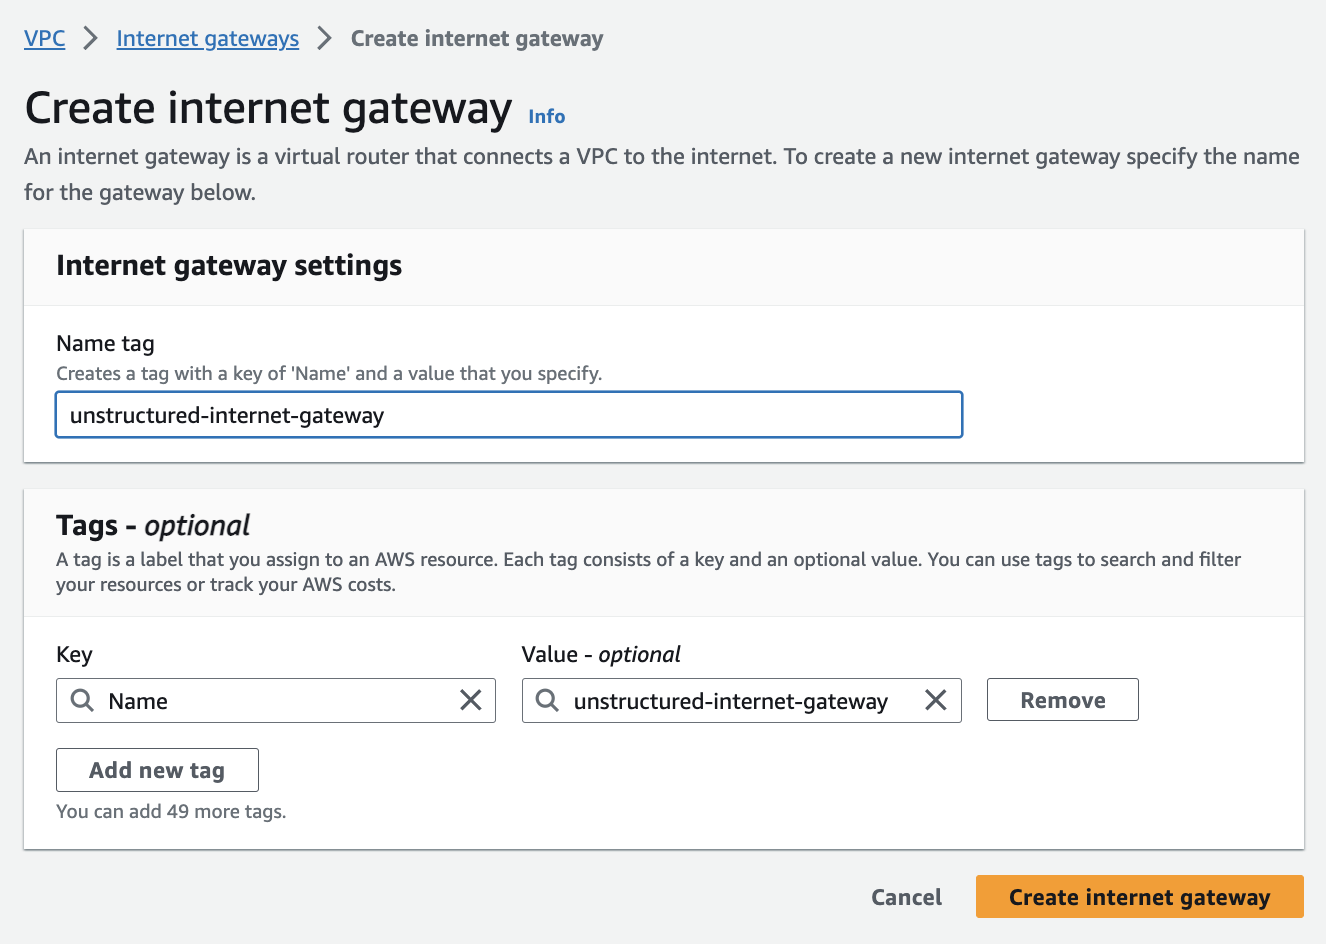
 4. **Create the internet gateway (for the public subnets)**:
a. In the sidebar, click **Internet gateways**.
4. **Create the internet gateway (for the public subnets)**:
a. In the sidebar, click **Internet gateways**.
b. Click **Create internet gateway**, enter a **Name tag**, and click **Create internet gateway**.
c. In the sidebar, click **Internet gateways** again.
d. Click the **Internet gateway ID** for the internet gateway that you just created.
e. Click **Actions > Attach to VPC**.
f. In the **Available VPCs** dropdown list, select the VPC from *Step 2 - Create the VPC*.
g. Click **Attach internet gateway**.
 5. **Set up route tables (for the public subnets)**:
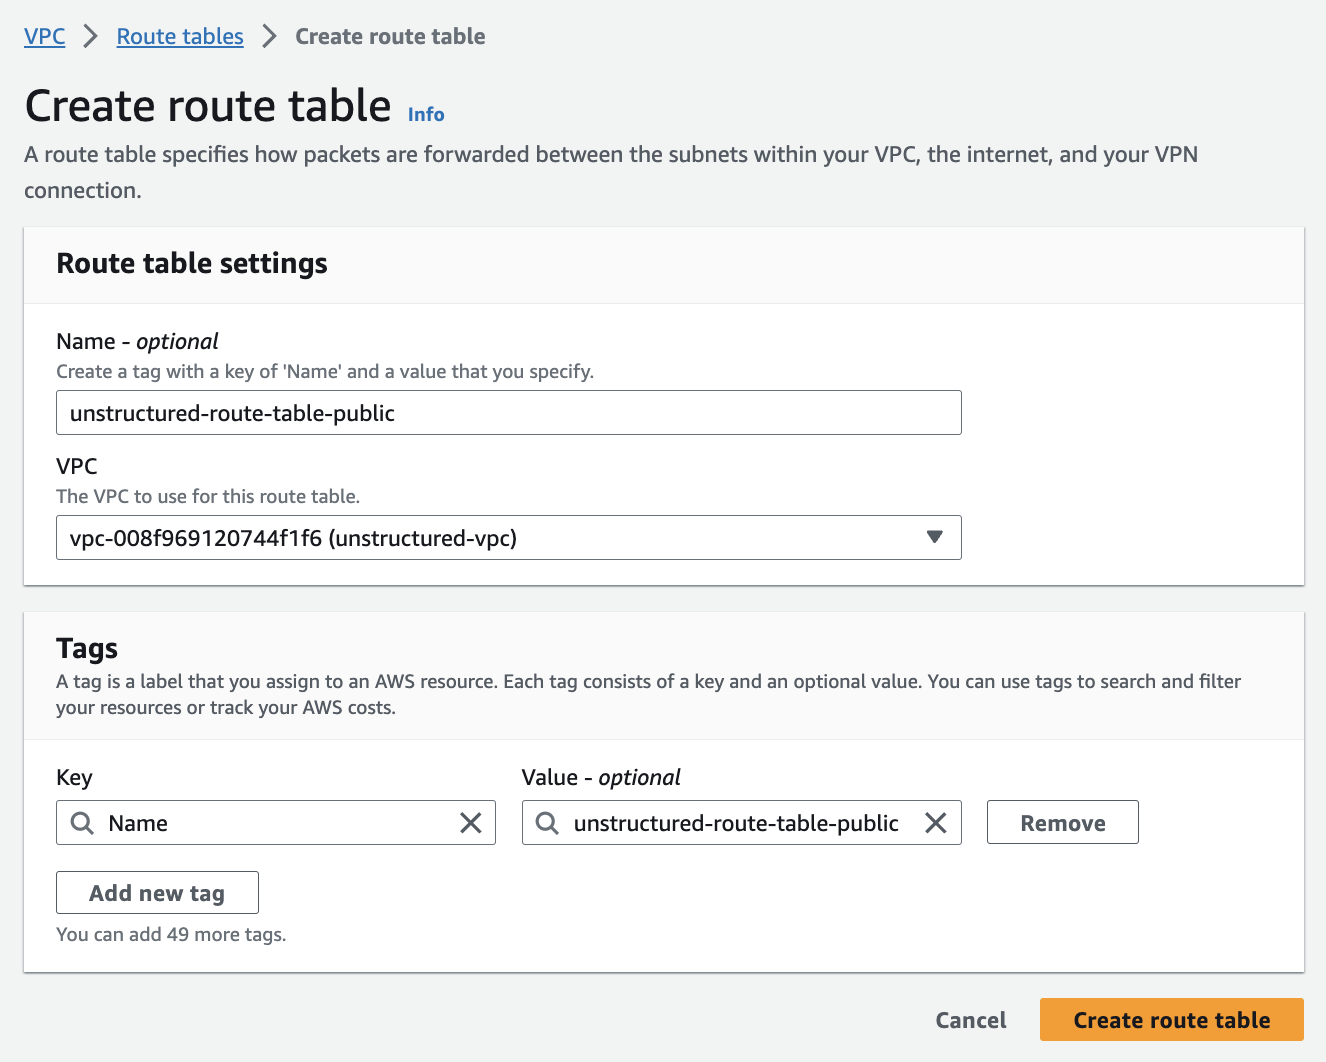
AWS automatically created a default route table in *Step 3 - Create the subnets*. To tailor your network architecture, you will create a new route table specifically for your public subnets, which will include a route to the internet gateway from *Step 4 - Create the internet gateway (for the public subnets)*.
a. In the sidebar, click *Route tables*.
b. Click **Create route table**.
c. Enter a **Name**.
d. Select the **VPC** from *Step 2 - Create the VPC*.
e. Click **Create route table**.
5. **Set up route tables (for the public subnets)**:
AWS automatically created a default route table in *Step 3 - Create the subnets*. To tailor your network architecture, you will create a new route table specifically for your public subnets, which will include a route to the internet gateway from *Step 4 - Create the internet gateway (for the public subnets)*.
a. In the sidebar, click *Route tables*.
b. Click **Create route table**.
c. Enter a **Name**.
d. Select the **VPC** from *Step 2 - Create the VPC*.
e. Click **Create route table**.
 6. **Associate public subnets to the route table and internet gateway**:
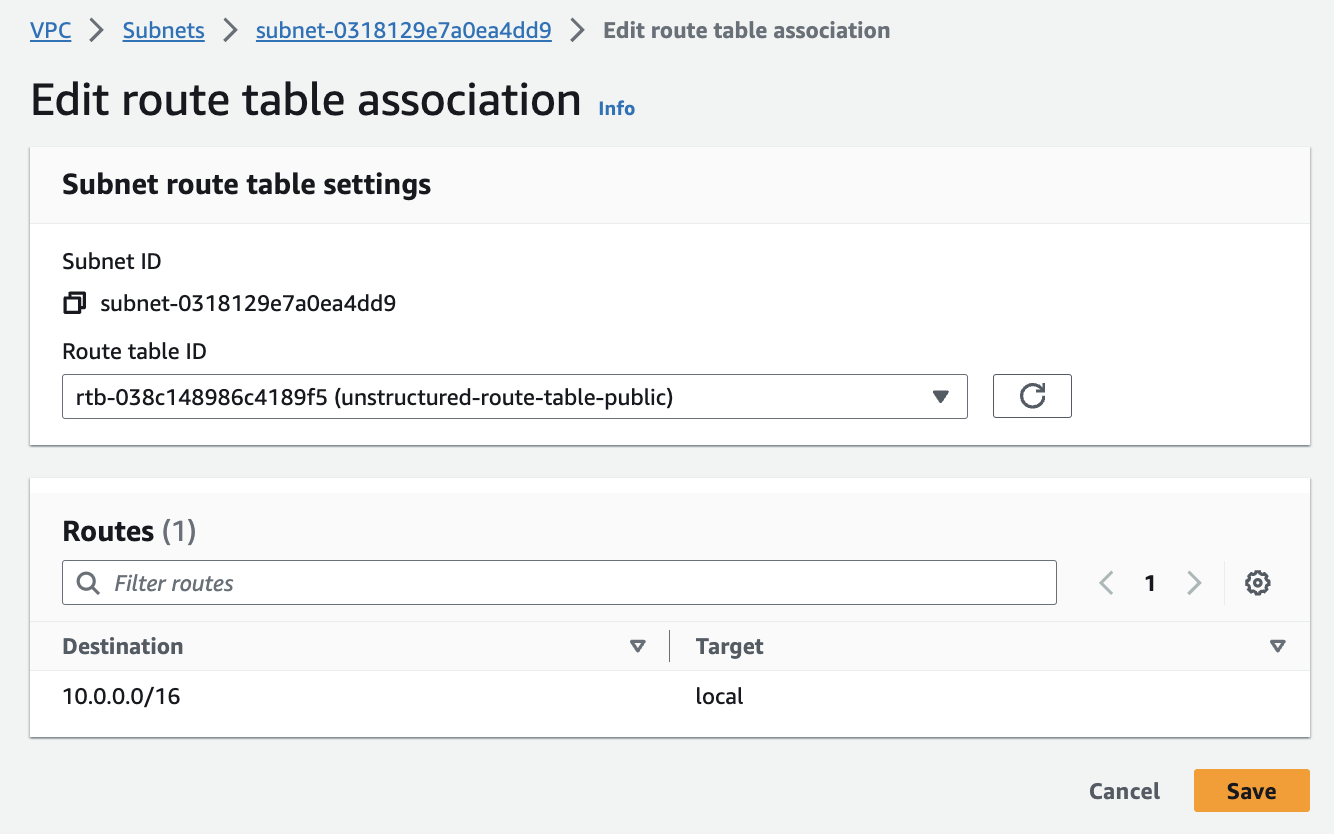
a. Connect the **public subnets** to the **route table** from *Step 5 - Set up route tables (for the public subnets)*:
6. **Associate public subnets to the route table and internet gateway**:
a. Connect the **public subnets** to the **route table** from *Step 5 - Set up route tables (for the public subnets)*:
* In the sidebar, click **Subnets**.
* Select the first public subnet from *Step 3 - Create the subnets*.
* Click **Actions > Edit route table association**.
* In the **Route table ID** dropdown list, select the route table from *Step 5 - Set up route tables (for the public subnets)*, and then click **Save**.
* Repeat the process for the second public subnet.
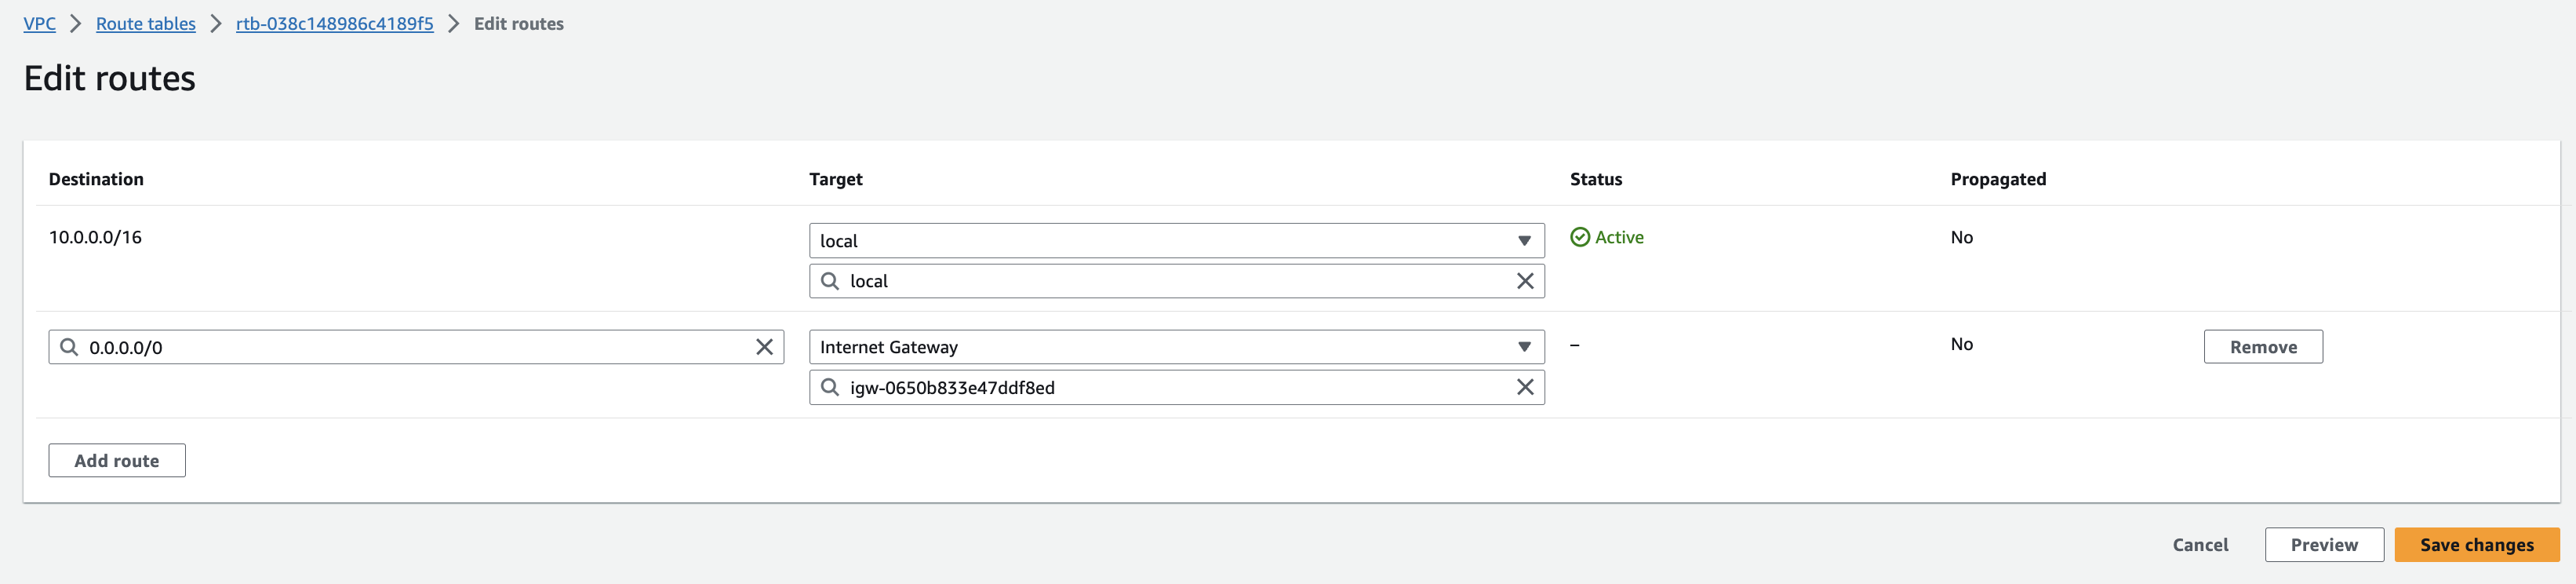
b. Now, you’ll ensure that the two public subnets can access the internet by connecting the route table to the internet gateway:
* In the sidebar, click **Route tables**.
* Select the route table from *Step 5 - Set up route tables (for the public subnets)*.
* Click **Actions > Edit routes**.
* Click **Add route**, in the destination box, enter `0.0.0.0/0`, which represents all IP addresses. In the **Target** dropdown list, select **Internet Gateway**, and select the internet gateway from *Step 4 - Create the internet gateway (for the public subnets)*.
* Click **Save changes** to establish the route, granting internet access to the first and second public subnets at the same time.
c. For the **private subnet**:
* In the sidebar, click **Subnets**.
* Select the private subnet from *Step 3 - Create the subnets*.
* Click **Actions > Edit route table association**.
* In the **Route table ID** dropdown list, select the main route table, or create and then select a new route table without a route to the internet gateway.
* Click **Save**.
 7. **Inspect the VPC resource map**:
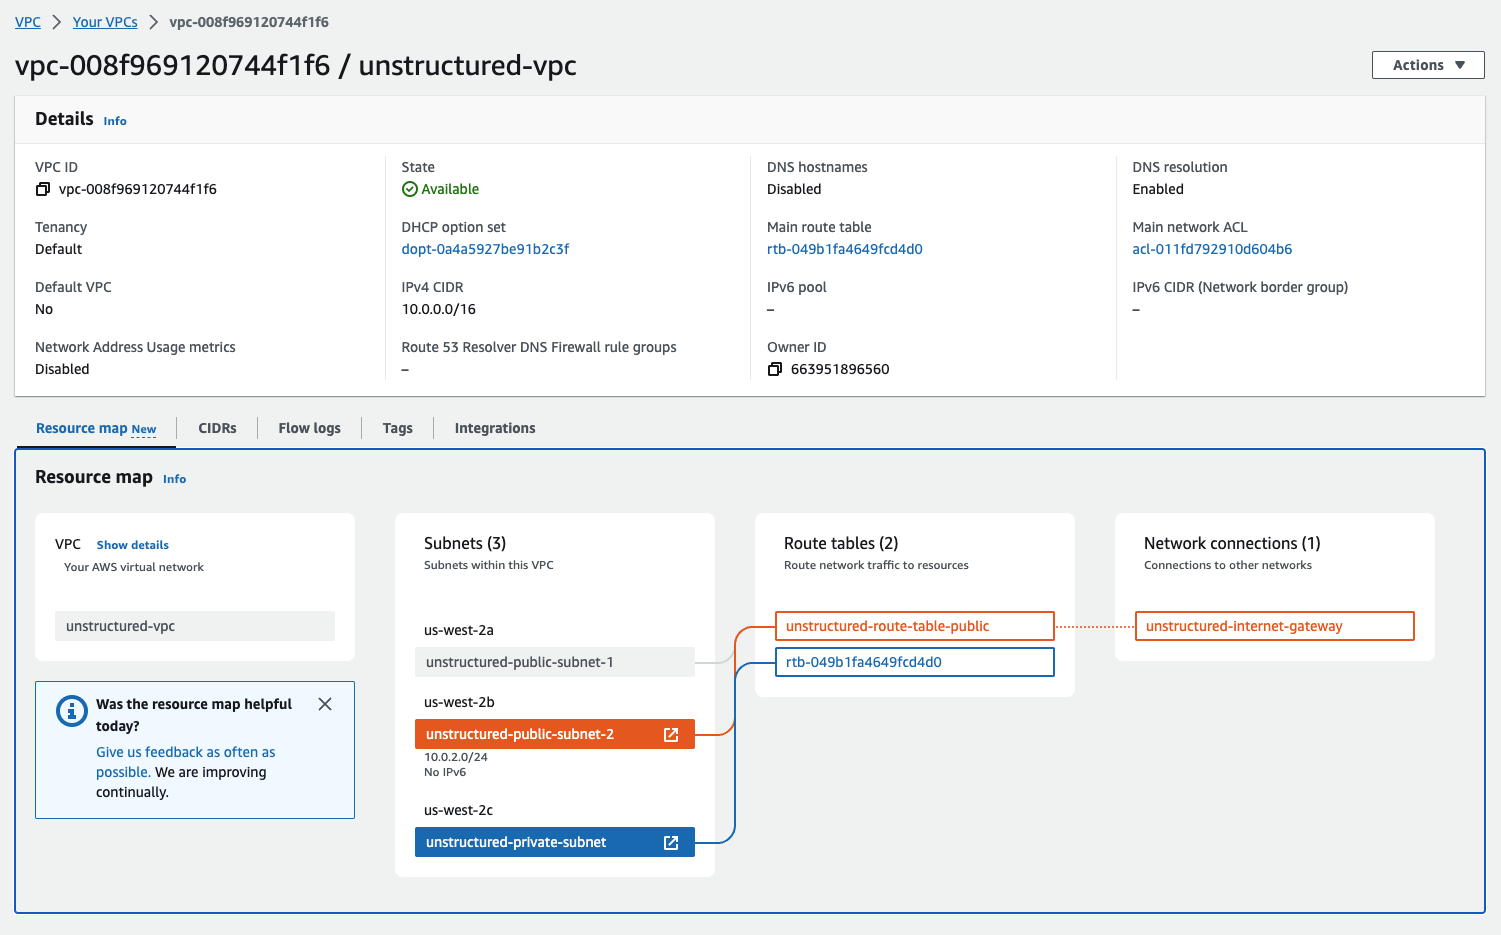
You can check the configurations from the resource maps on the VPC details dashboard by clicking **Your VPCs** in the sidebar, clicking the **VPC ID** for your VPC, and then clicking the **Resource map** tab.
7. **Inspect the VPC resource map**:
You can check the configurations from the resource maps on the VPC details dashboard by clicking **Your VPCs** in the sidebar, clicking the **VPC ID** for your VPC, and then clicking the **Resource map** tab.
 ## Part II: Deploying the Unstructured API from the AWS Marketplace
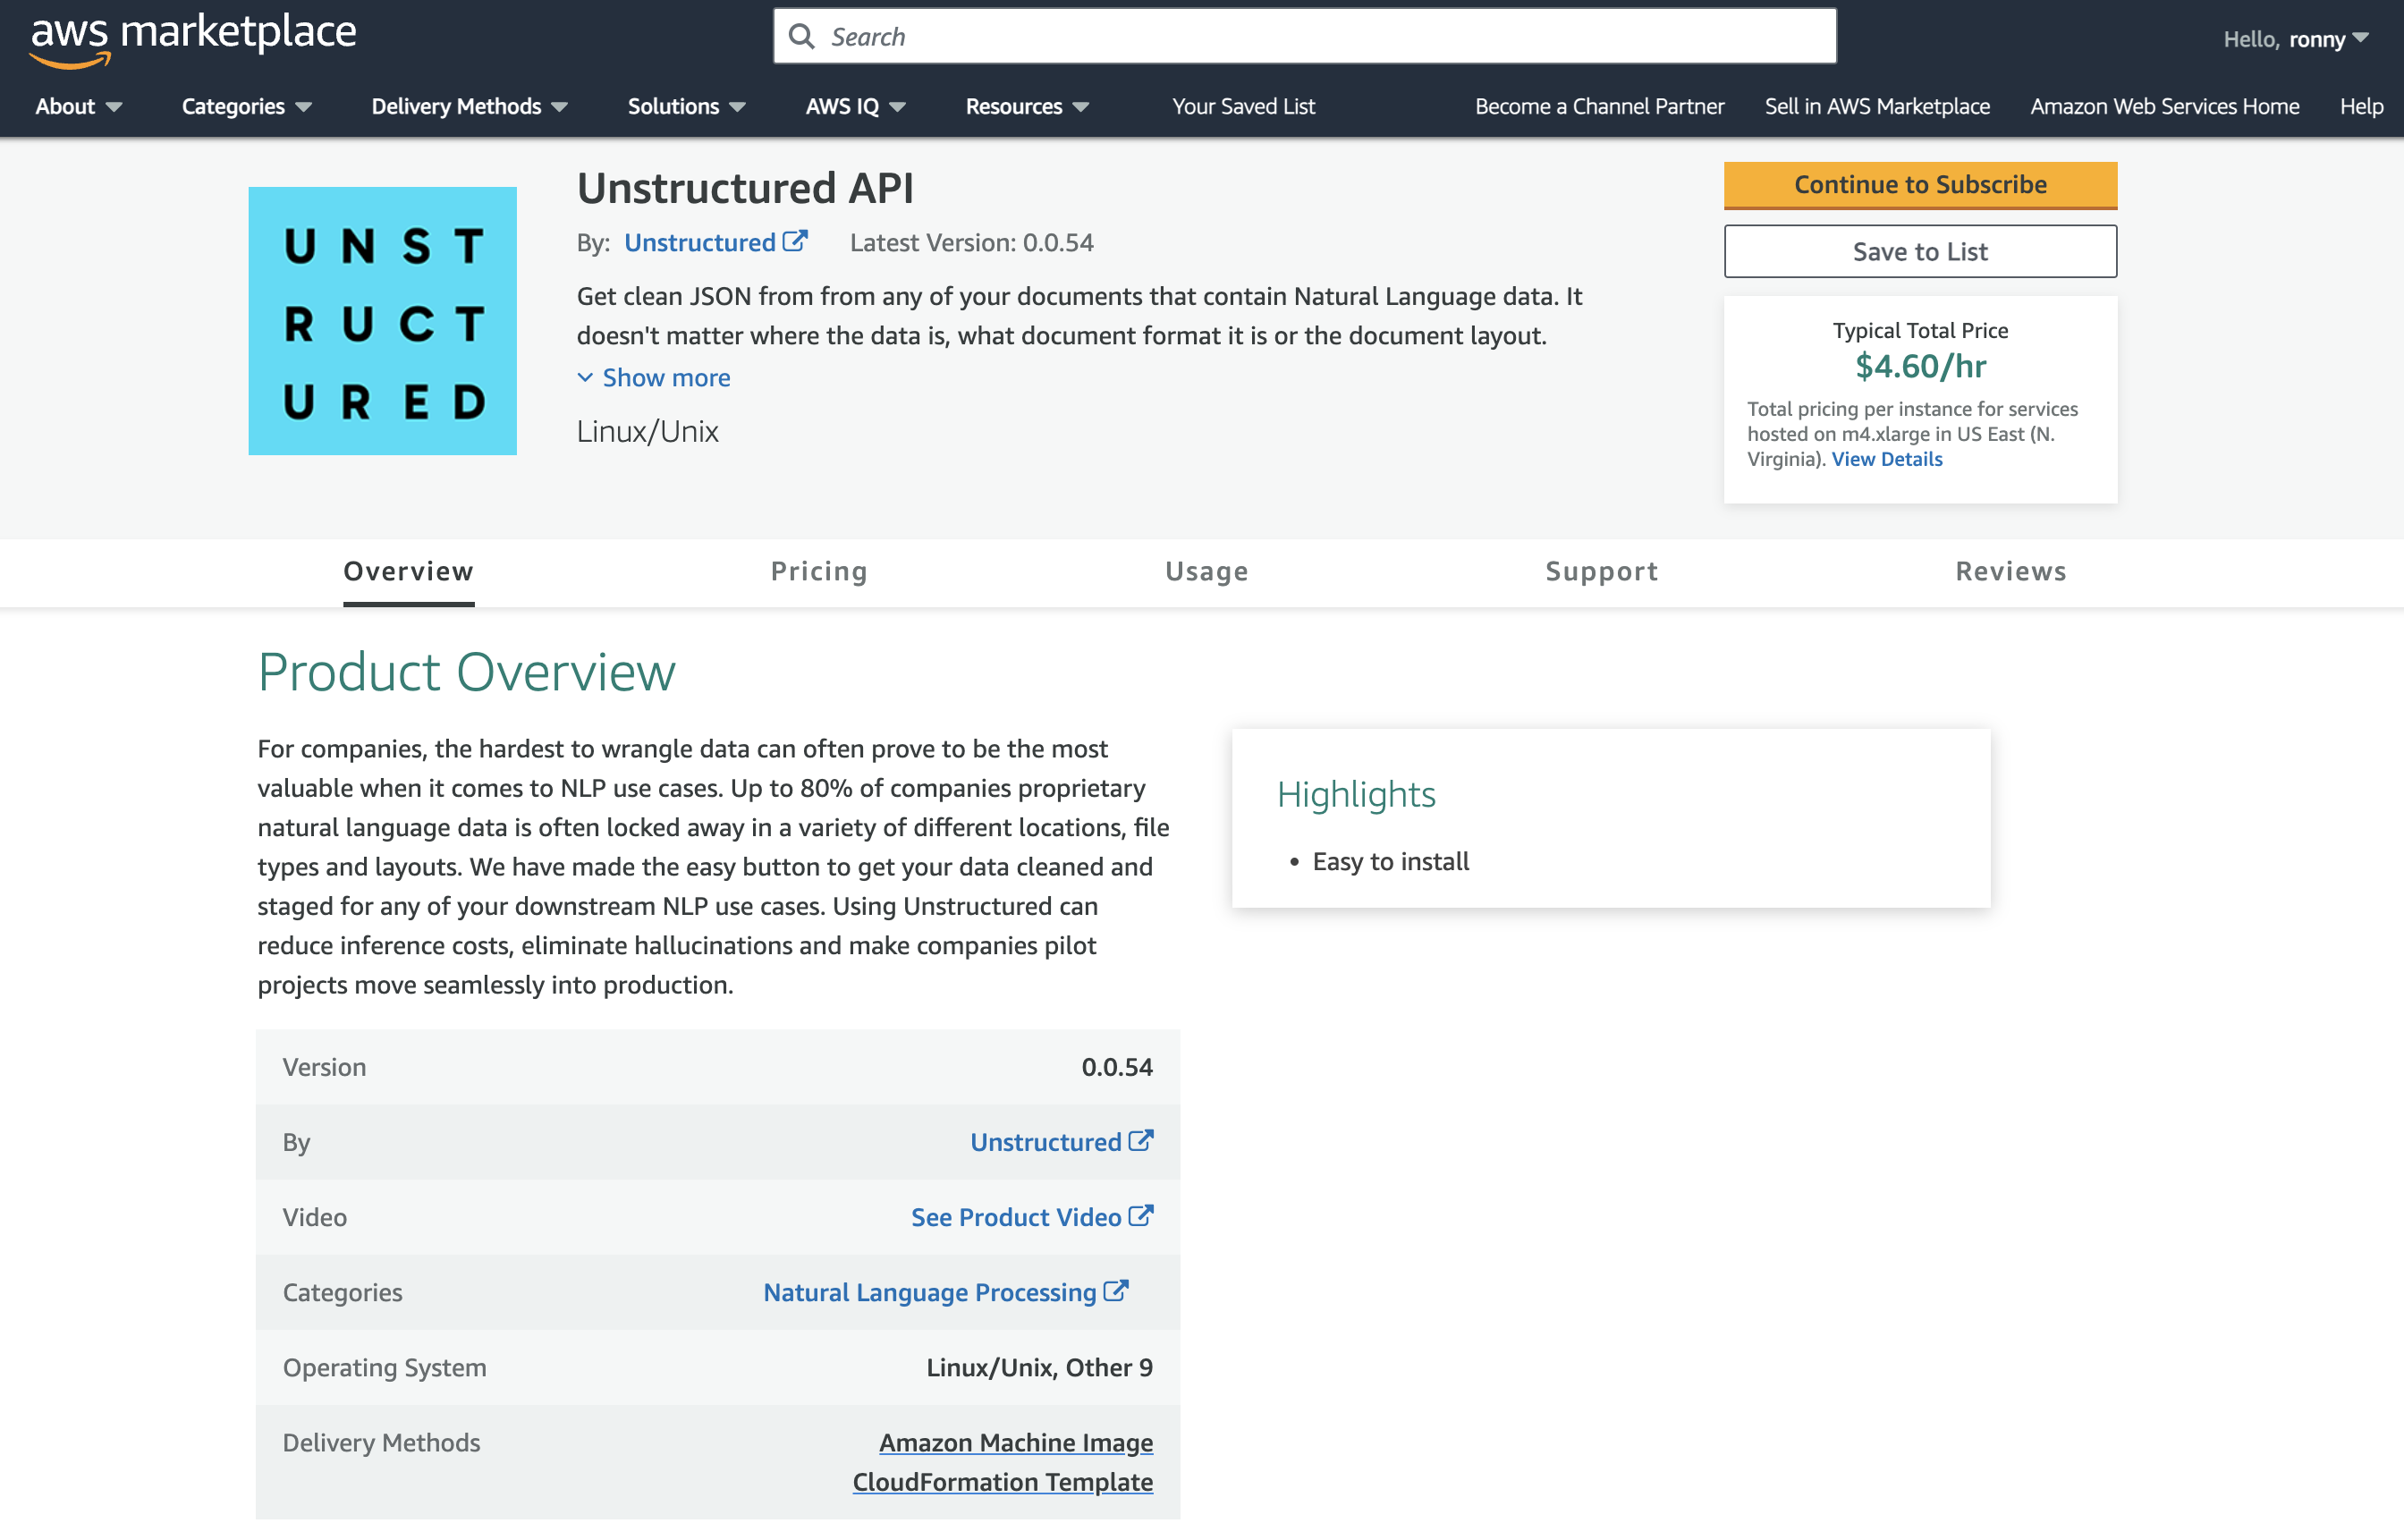
8. **Go to the Unstructured API page on AWS Marketplace**:
a. Leaving the VPC dashboard from Part I open, in a separate web browser tab, go to the [Unstructured API](http://aws.amazon.com/marketplace/pp/prodview-fuvslrofyuato) product page in the AWS Marketplace.
b. Click **Continue to Subscribe**.
c. Review the terms and conditions.
d. Click **Continue to Configuration**.
## Part II: Deploying the Unstructured API from the AWS Marketplace
8. **Go to the Unstructured API page on AWS Marketplace**:
a. Leaving the VPC dashboard from Part I open, in a separate web browser tab, go to the [Unstructured API](http://aws.amazon.com/marketplace/pp/prodview-fuvslrofyuato) product page in the AWS Marketplace.
b. Click **Continue to Subscribe**.
c. Review the terms and conditions.
d. Click **Continue to Configuration**.
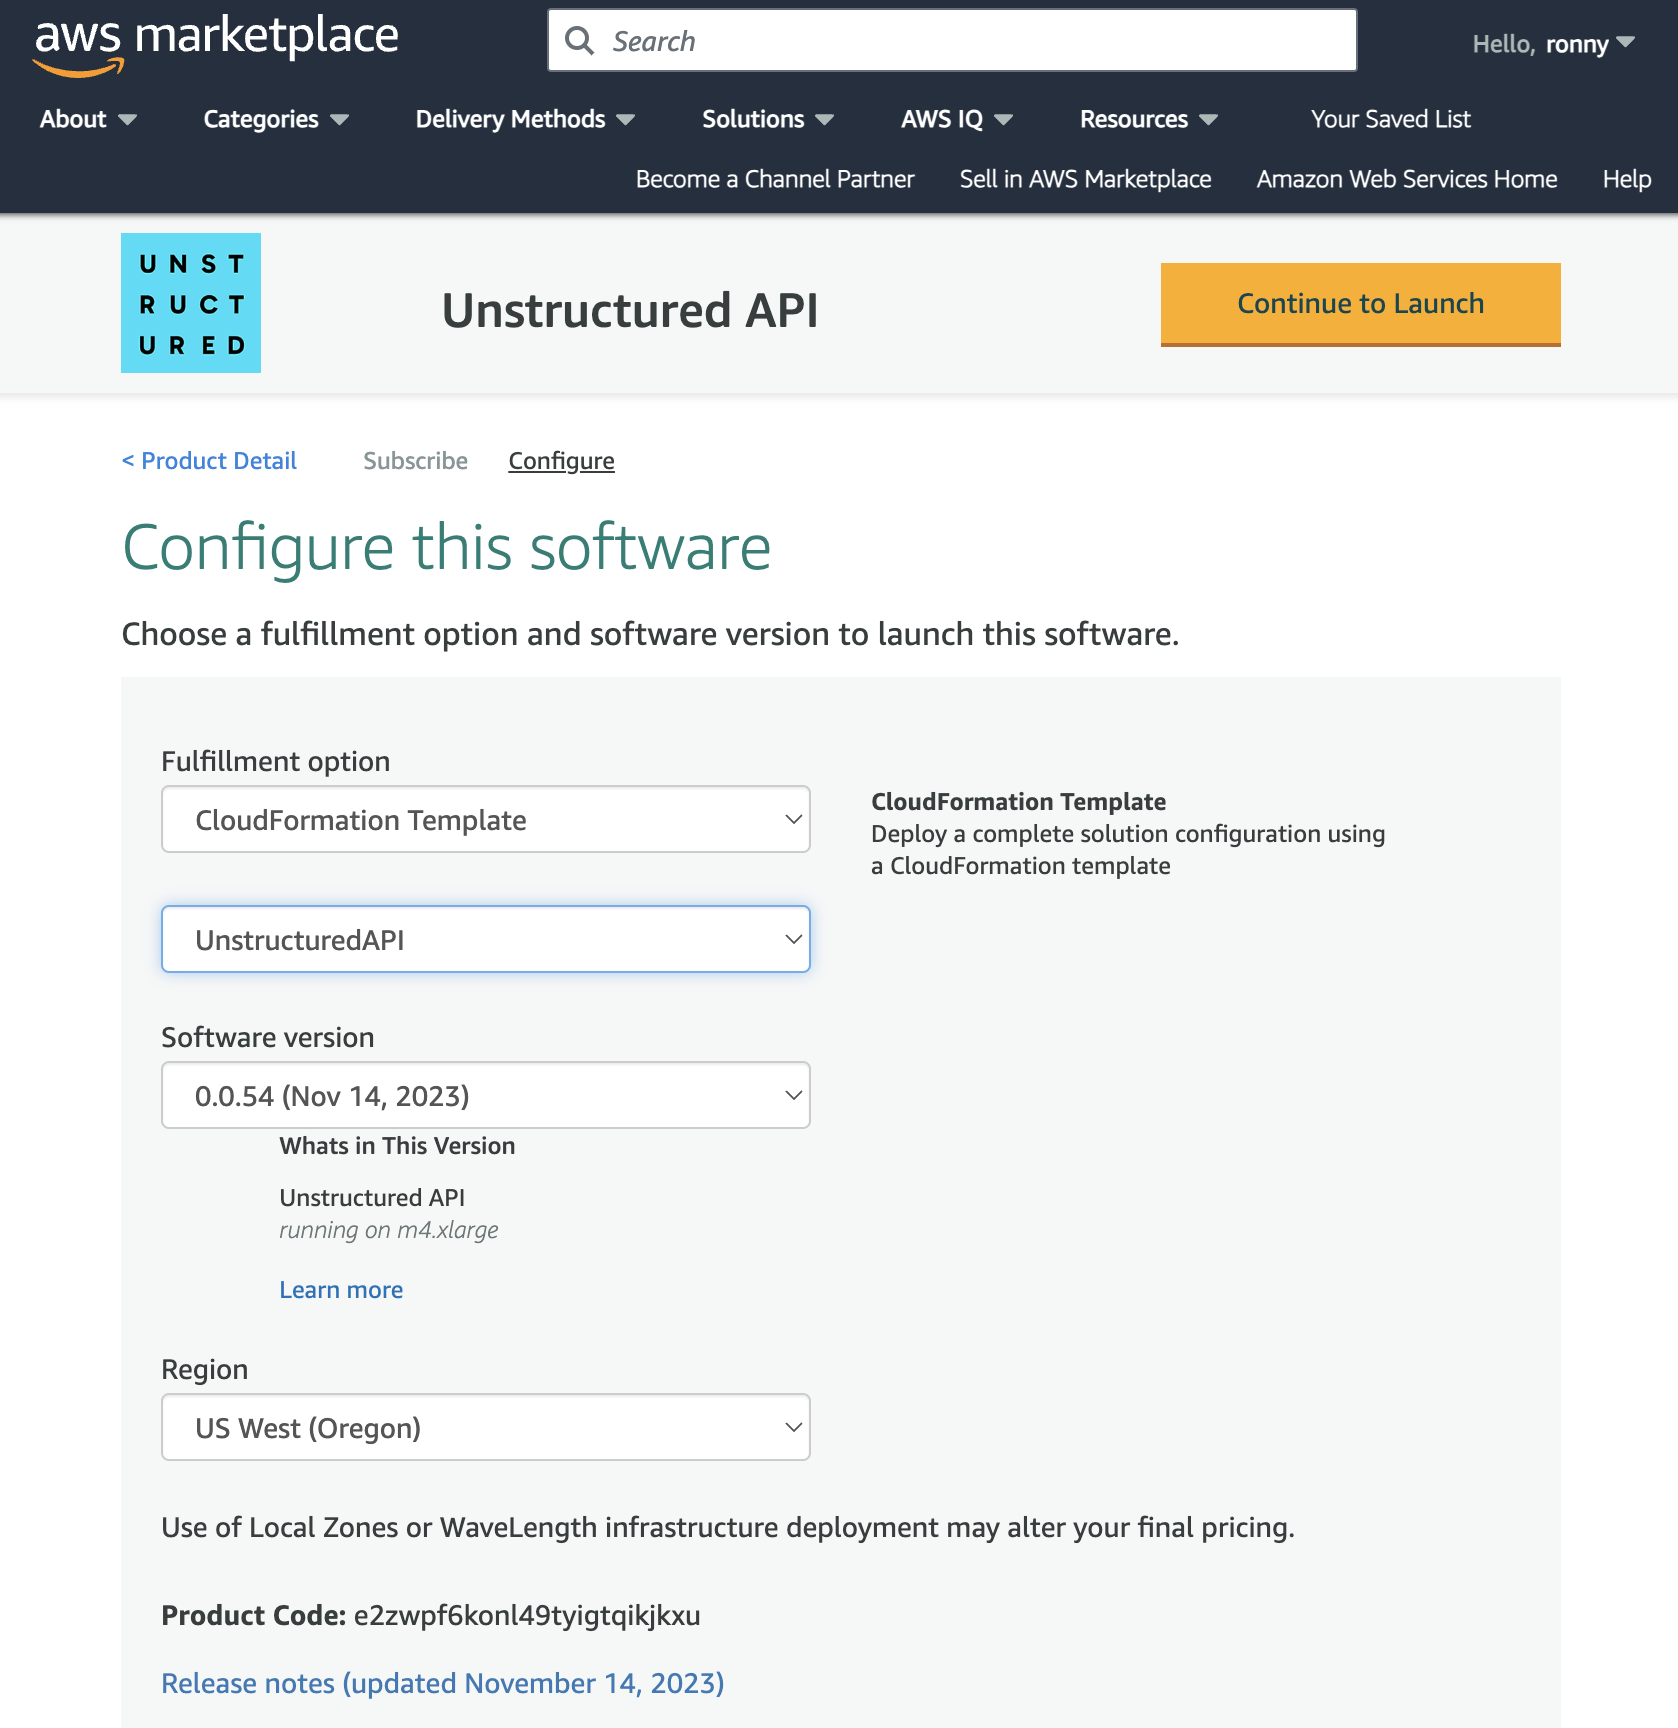
 9. **Configure the CloudFormation template**:
a. In the **Fulfillment option** dropdown list, select **CloudFormation Template**.
b. For **Fulfillment option** and **Software version**, leave the default `UnstructuredAPI` template and software version.
c. In the **Region** dropdown list, select the Region that corresponds to the VPC from Part I.
* *Note: You must select the same Region where you set up the VPC in Part I. To find the Region, on the VPC dashboard tab from Part I that you left open, with your VPC displayed, find the VPC's Region name next to your username in the top navigation bar.*
d. Click **Continue to Launch**.
e. In the **Choose Action** dropdown list, select **Launch CloudFormation**.
f. Click **Launch**.
9. **Configure the CloudFormation template**:
a. In the **Fulfillment option** dropdown list, select **CloudFormation Template**.
b. For **Fulfillment option** and **Software version**, leave the default `UnstructuredAPI` template and software version.
c. In the **Region** dropdown list, select the Region that corresponds to the VPC from Part I.
* *Note: You must select the same Region where you set up the VPC in Part I. To find the Region, on the VPC dashboard tab from Part I that you left open, with your VPC displayed, find the VPC's Region name next to your username in the top navigation bar.*
d. Click **Continue to Launch**.
e. In the **Choose Action** dropdown list, select **Launch CloudFormation**.
f. Click **Launch**.
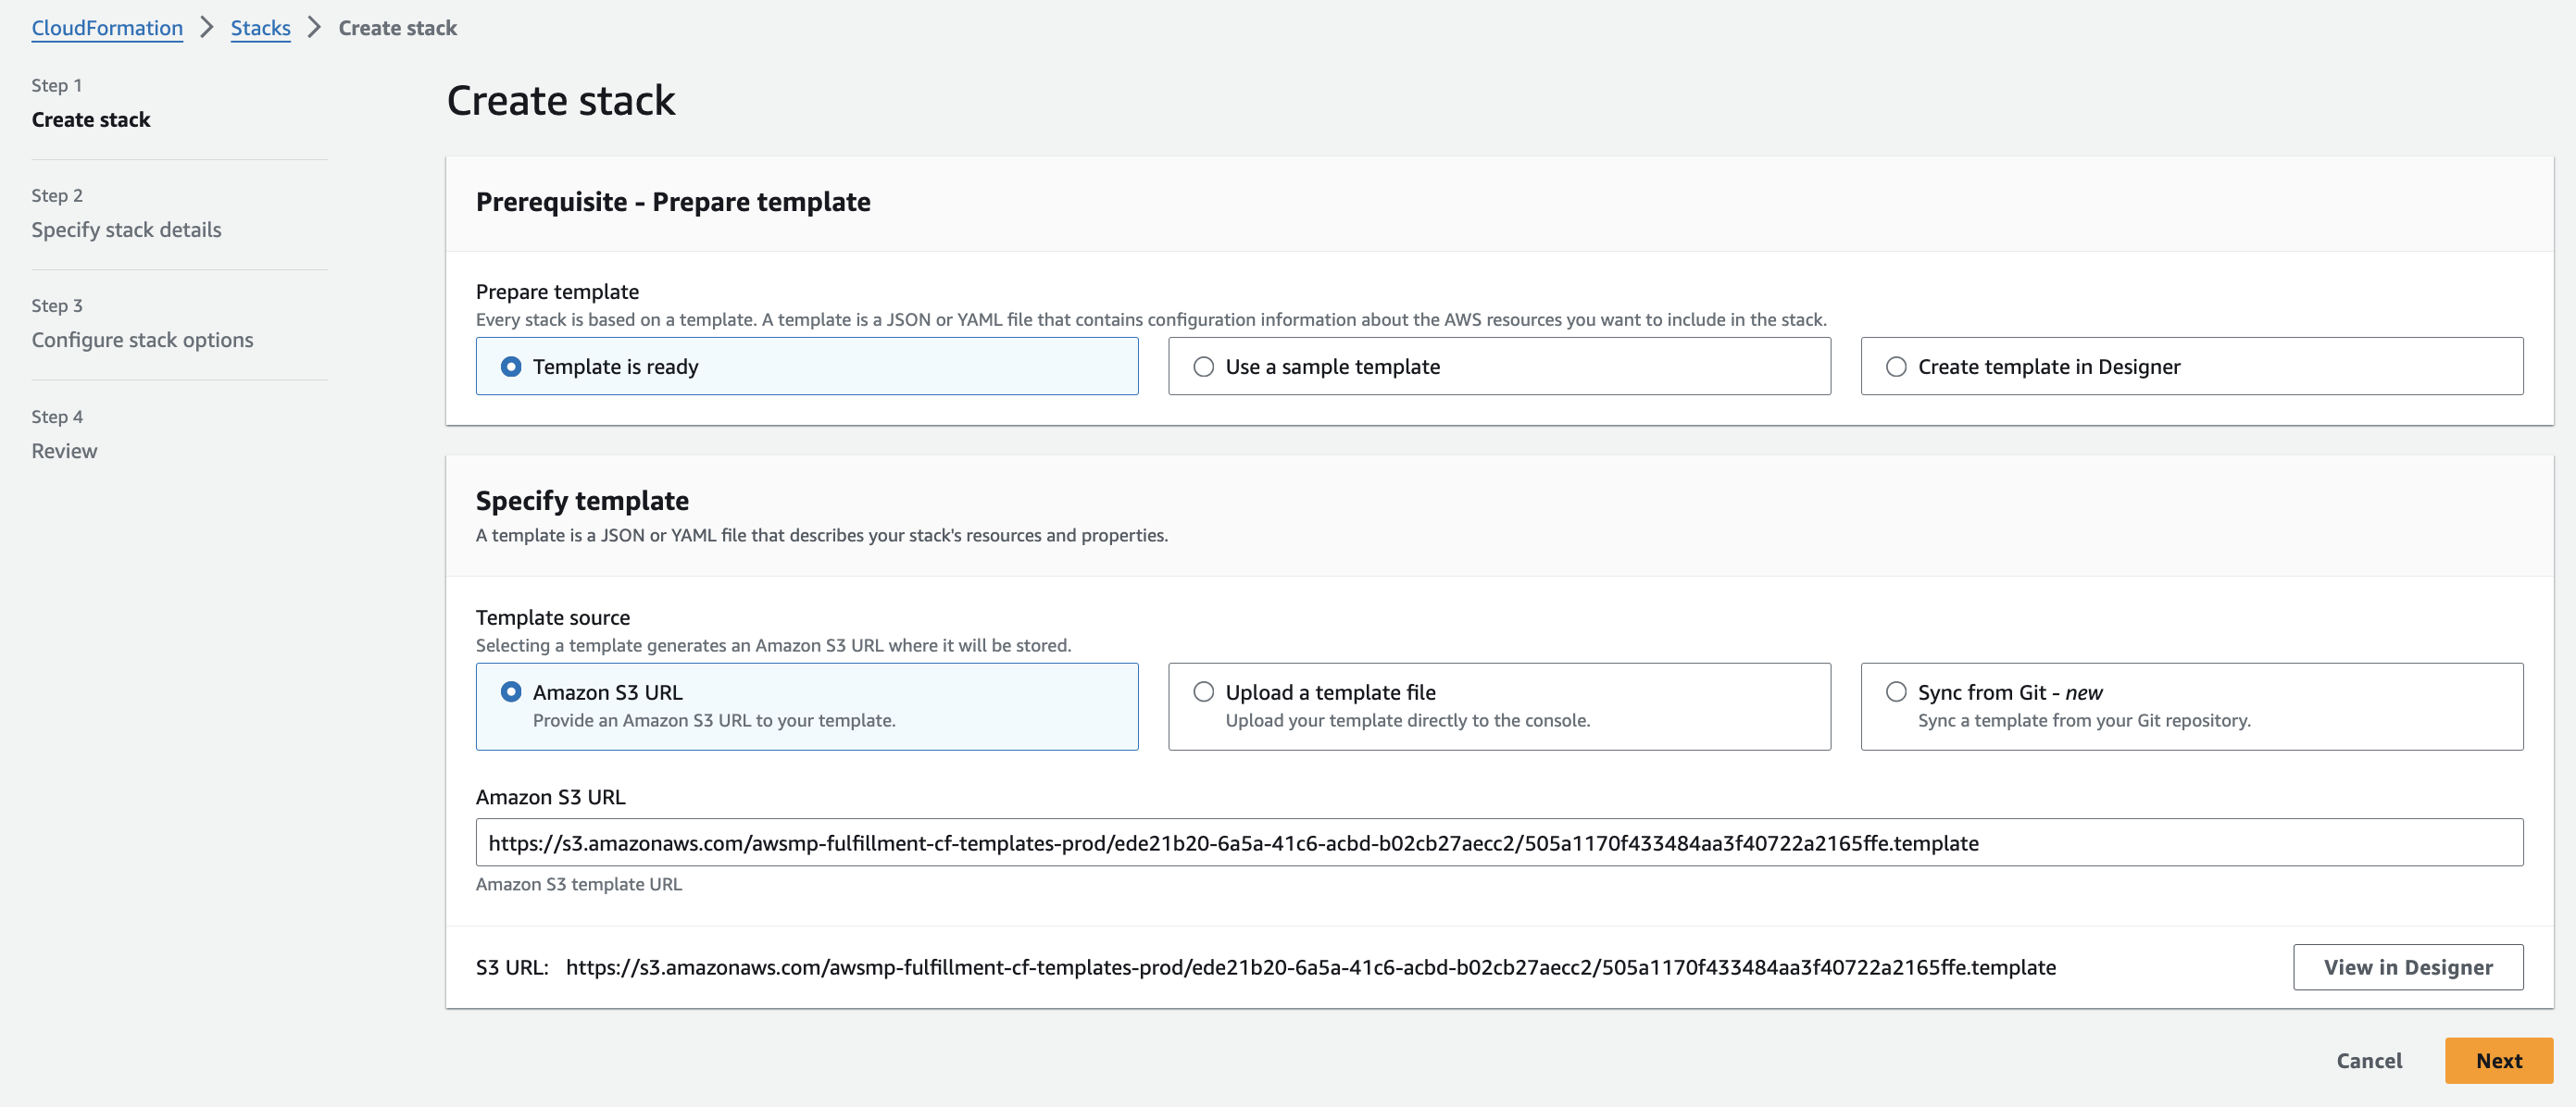
 10. **Create the CloudFormation stack**:
After you click **Launch**, the **Create stack** page appears in CloudFormation.
**Step 1: Create the stack**
a. Leave **Choose an existing template** selected.
b. Leave **Amazon S3 URL** selected and the default **Amazon S3 URL** value unchanged.
c. Click **Next**.
10. **Create the CloudFormation stack**:
After you click **Launch**, the **Create stack** page appears in CloudFormation.
**Step 1: Create the stack**
a. Leave **Choose an existing template** selected.
b. Leave **Amazon S3 URL** selected and the default **Amazon S3 URL** value unchanged.
c. Click **Next**.
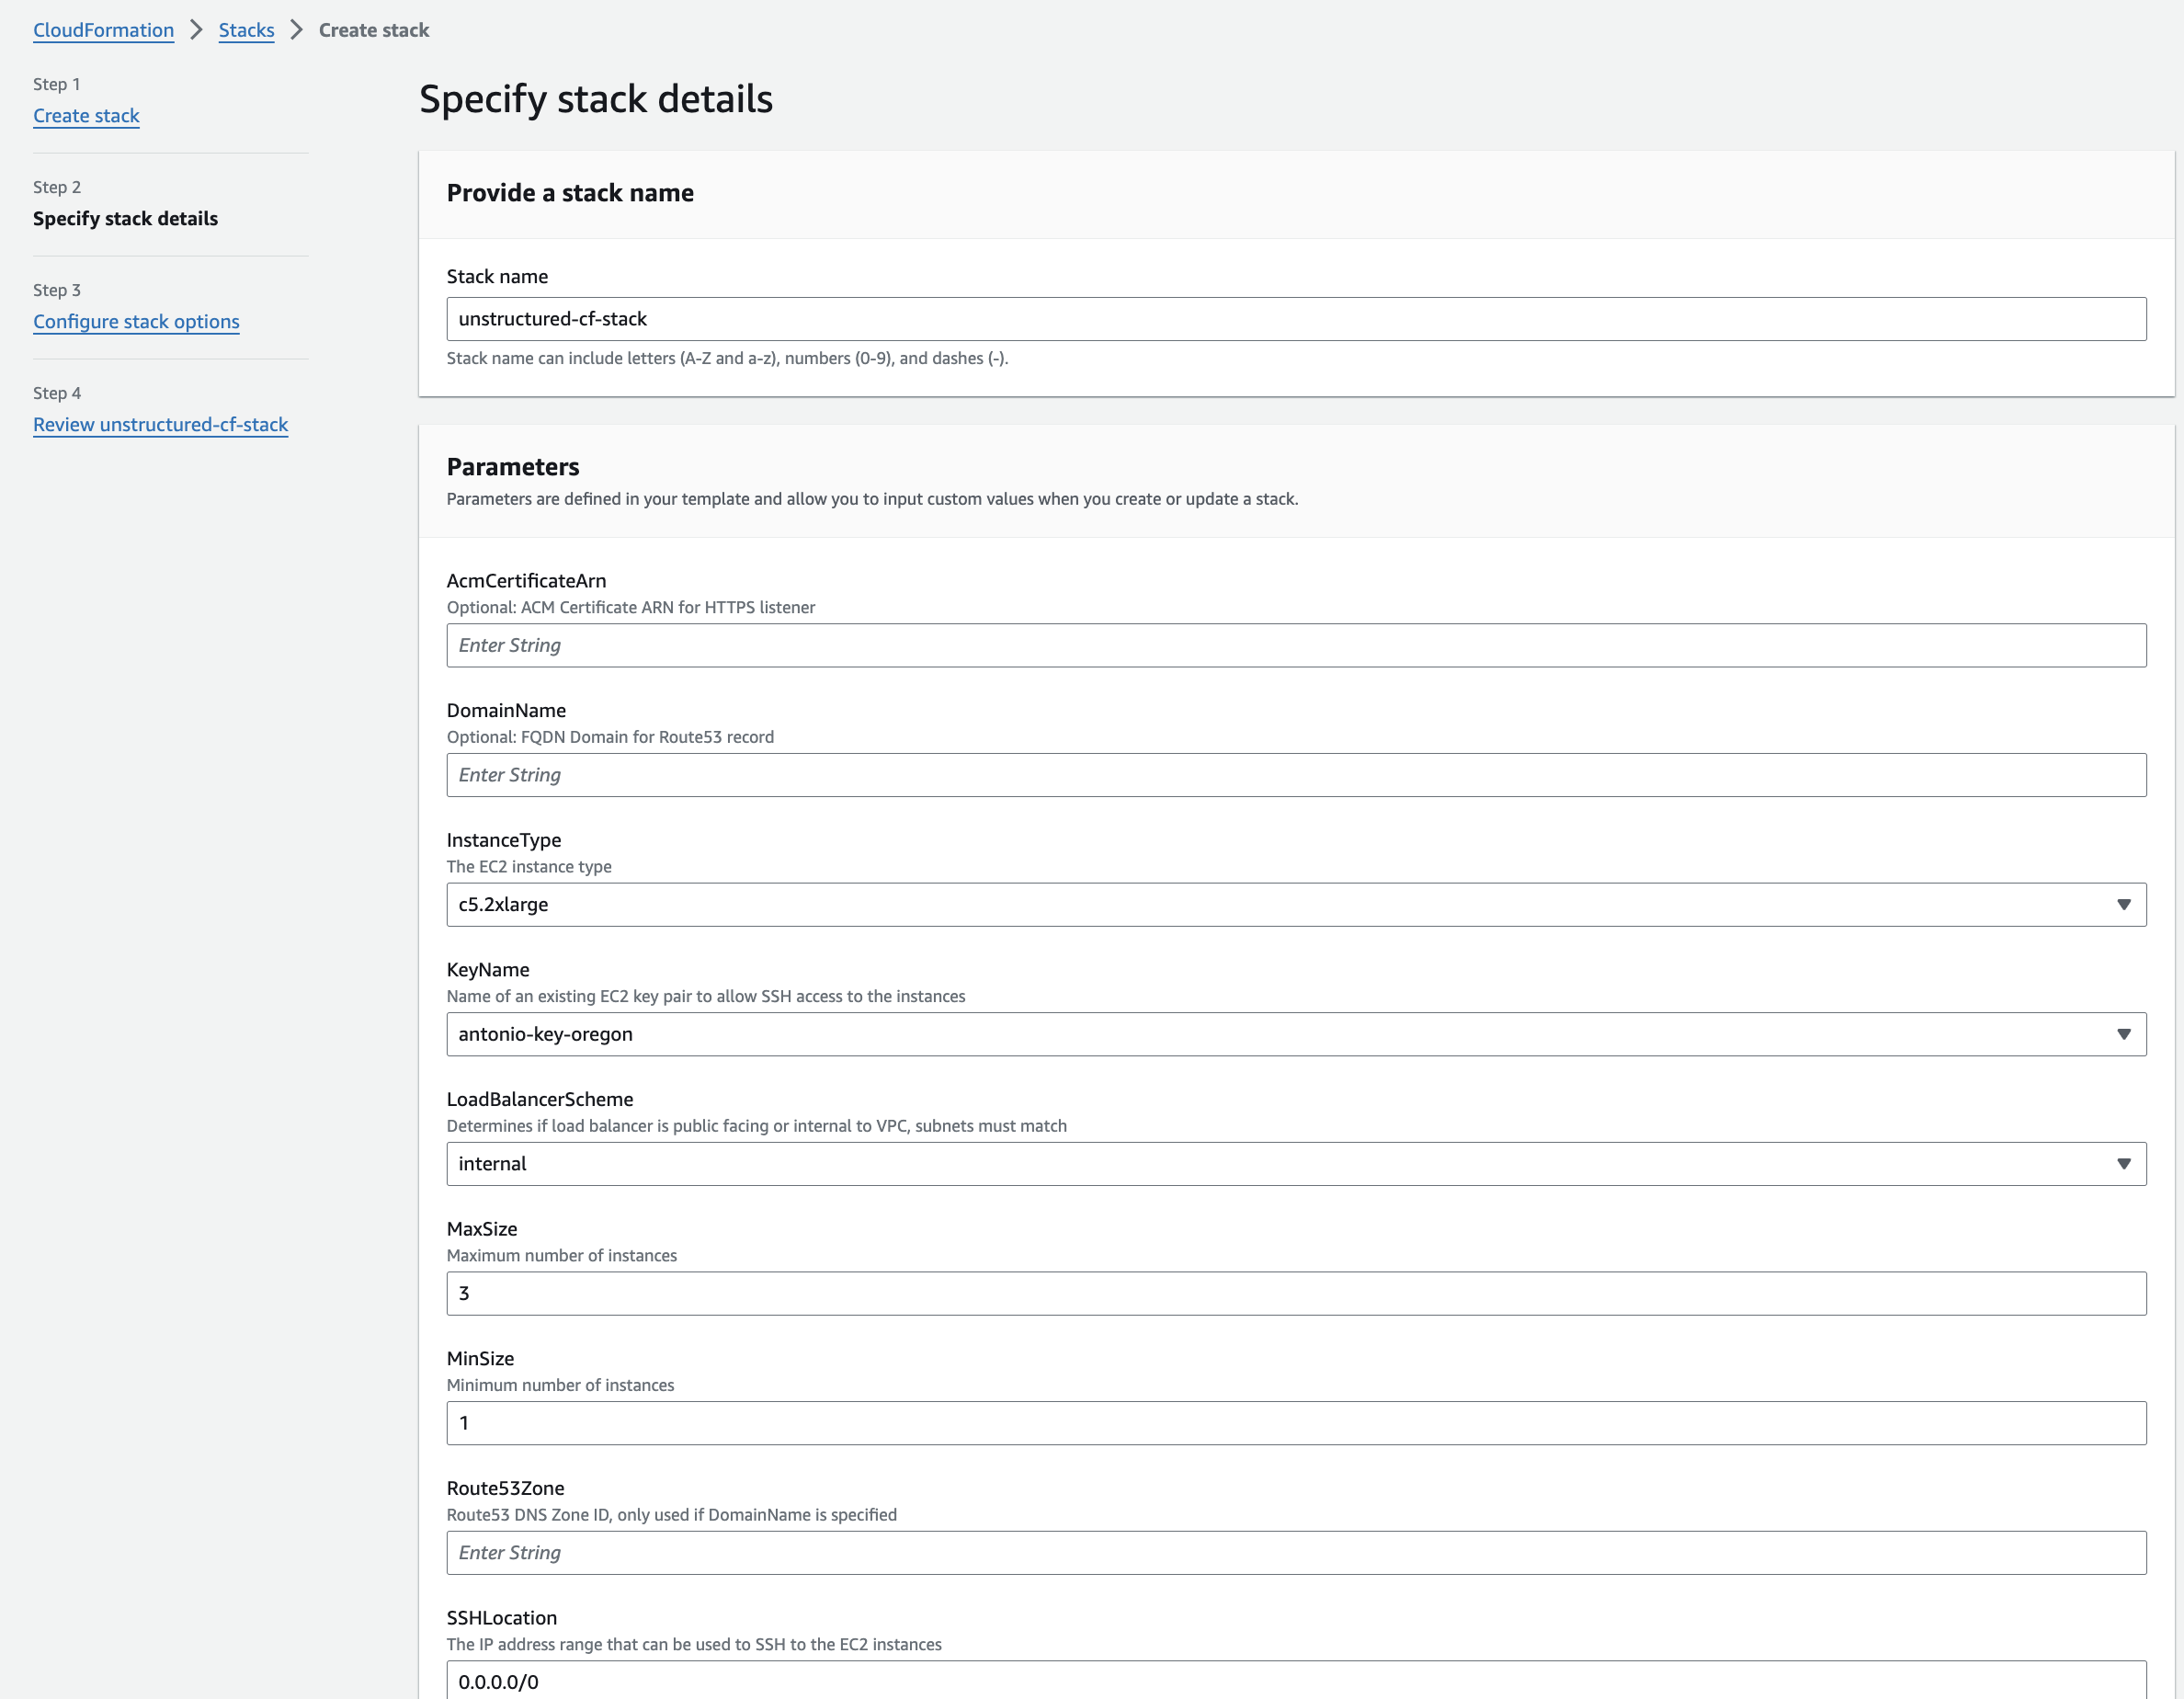
 **Step 2: Specify the stack's details**
a. Enter some unique **Stack name**.
b. In the **Parameters** section, in the **InstanceType** drop-down list, select **m5.xlarge**.
c. In the **KeyName** drop-down list, select the name of the SSH key pair from the beginning of this article.
d. In the **LoadBalancerScheme** dropdown list, select **internet-facing**.
e. For **SSHLocation**, enter `0.0.0.0/0`, but only if you allow public access on the internet.
* **Note**: It is generally recommended to limit SSH access to a specific IP range for enhanced security. This can be done by setting the `SSHLocation` to the IP address or range associated with your organization. Please consult your IT department or VPN vendor to obtain the correct IP information for these settings.
* AWS provides `AWS Client VPN`, which is a managed client-based VPN service that enables secure access AWS resources and resources in your on-premises network. To learn more, see [Getting started with AWS Client VPN](https://docs.aws.amazon.com/vpn/latest/clientvpn-admin/cvpn-getting-started.html).
f. In the **Subnets** dropdown multiselect list, select the two public subnets and the private subnet from Part I.
g. In the **VPC** dropdown list, select the VPC from Part I.
h. You can leave the default values for all of the other **Parameters** fields.
i. Click **Next**.
**Step 2: Specify the stack's details**
a. Enter some unique **Stack name**.
b. In the **Parameters** section, in the **InstanceType** drop-down list, select **m5.xlarge**.
c. In the **KeyName** drop-down list, select the name of the SSH key pair from the beginning of this article.
d. In the **LoadBalancerScheme** dropdown list, select **internet-facing**.
e. For **SSHLocation**, enter `0.0.0.0/0`, but only if you allow public access on the internet.
* **Note**: It is generally recommended to limit SSH access to a specific IP range for enhanced security. This can be done by setting the `SSHLocation` to the IP address or range associated with your organization. Please consult your IT department or VPN vendor to obtain the correct IP information for these settings.
* AWS provides `AWS Client VPN`, which is a managed client-based VPN service that enables secure access AWS resources and resources in your on-premises network. To learn more, see [Getting started with AWS Client VPN](https://docs.aws.amazon.com/vpn/latest/clientvpn-admin/cvpn-getting-started.html).
f. In the **Subnets** dropdown multiselect list, select the two public subnets and the private subnet from Part I.
g. In the **VPC** dropdown list, select the VPC from Part I.
h. You can leave the default values for all of the other **Parameters** fields.
i. Click **Next**.
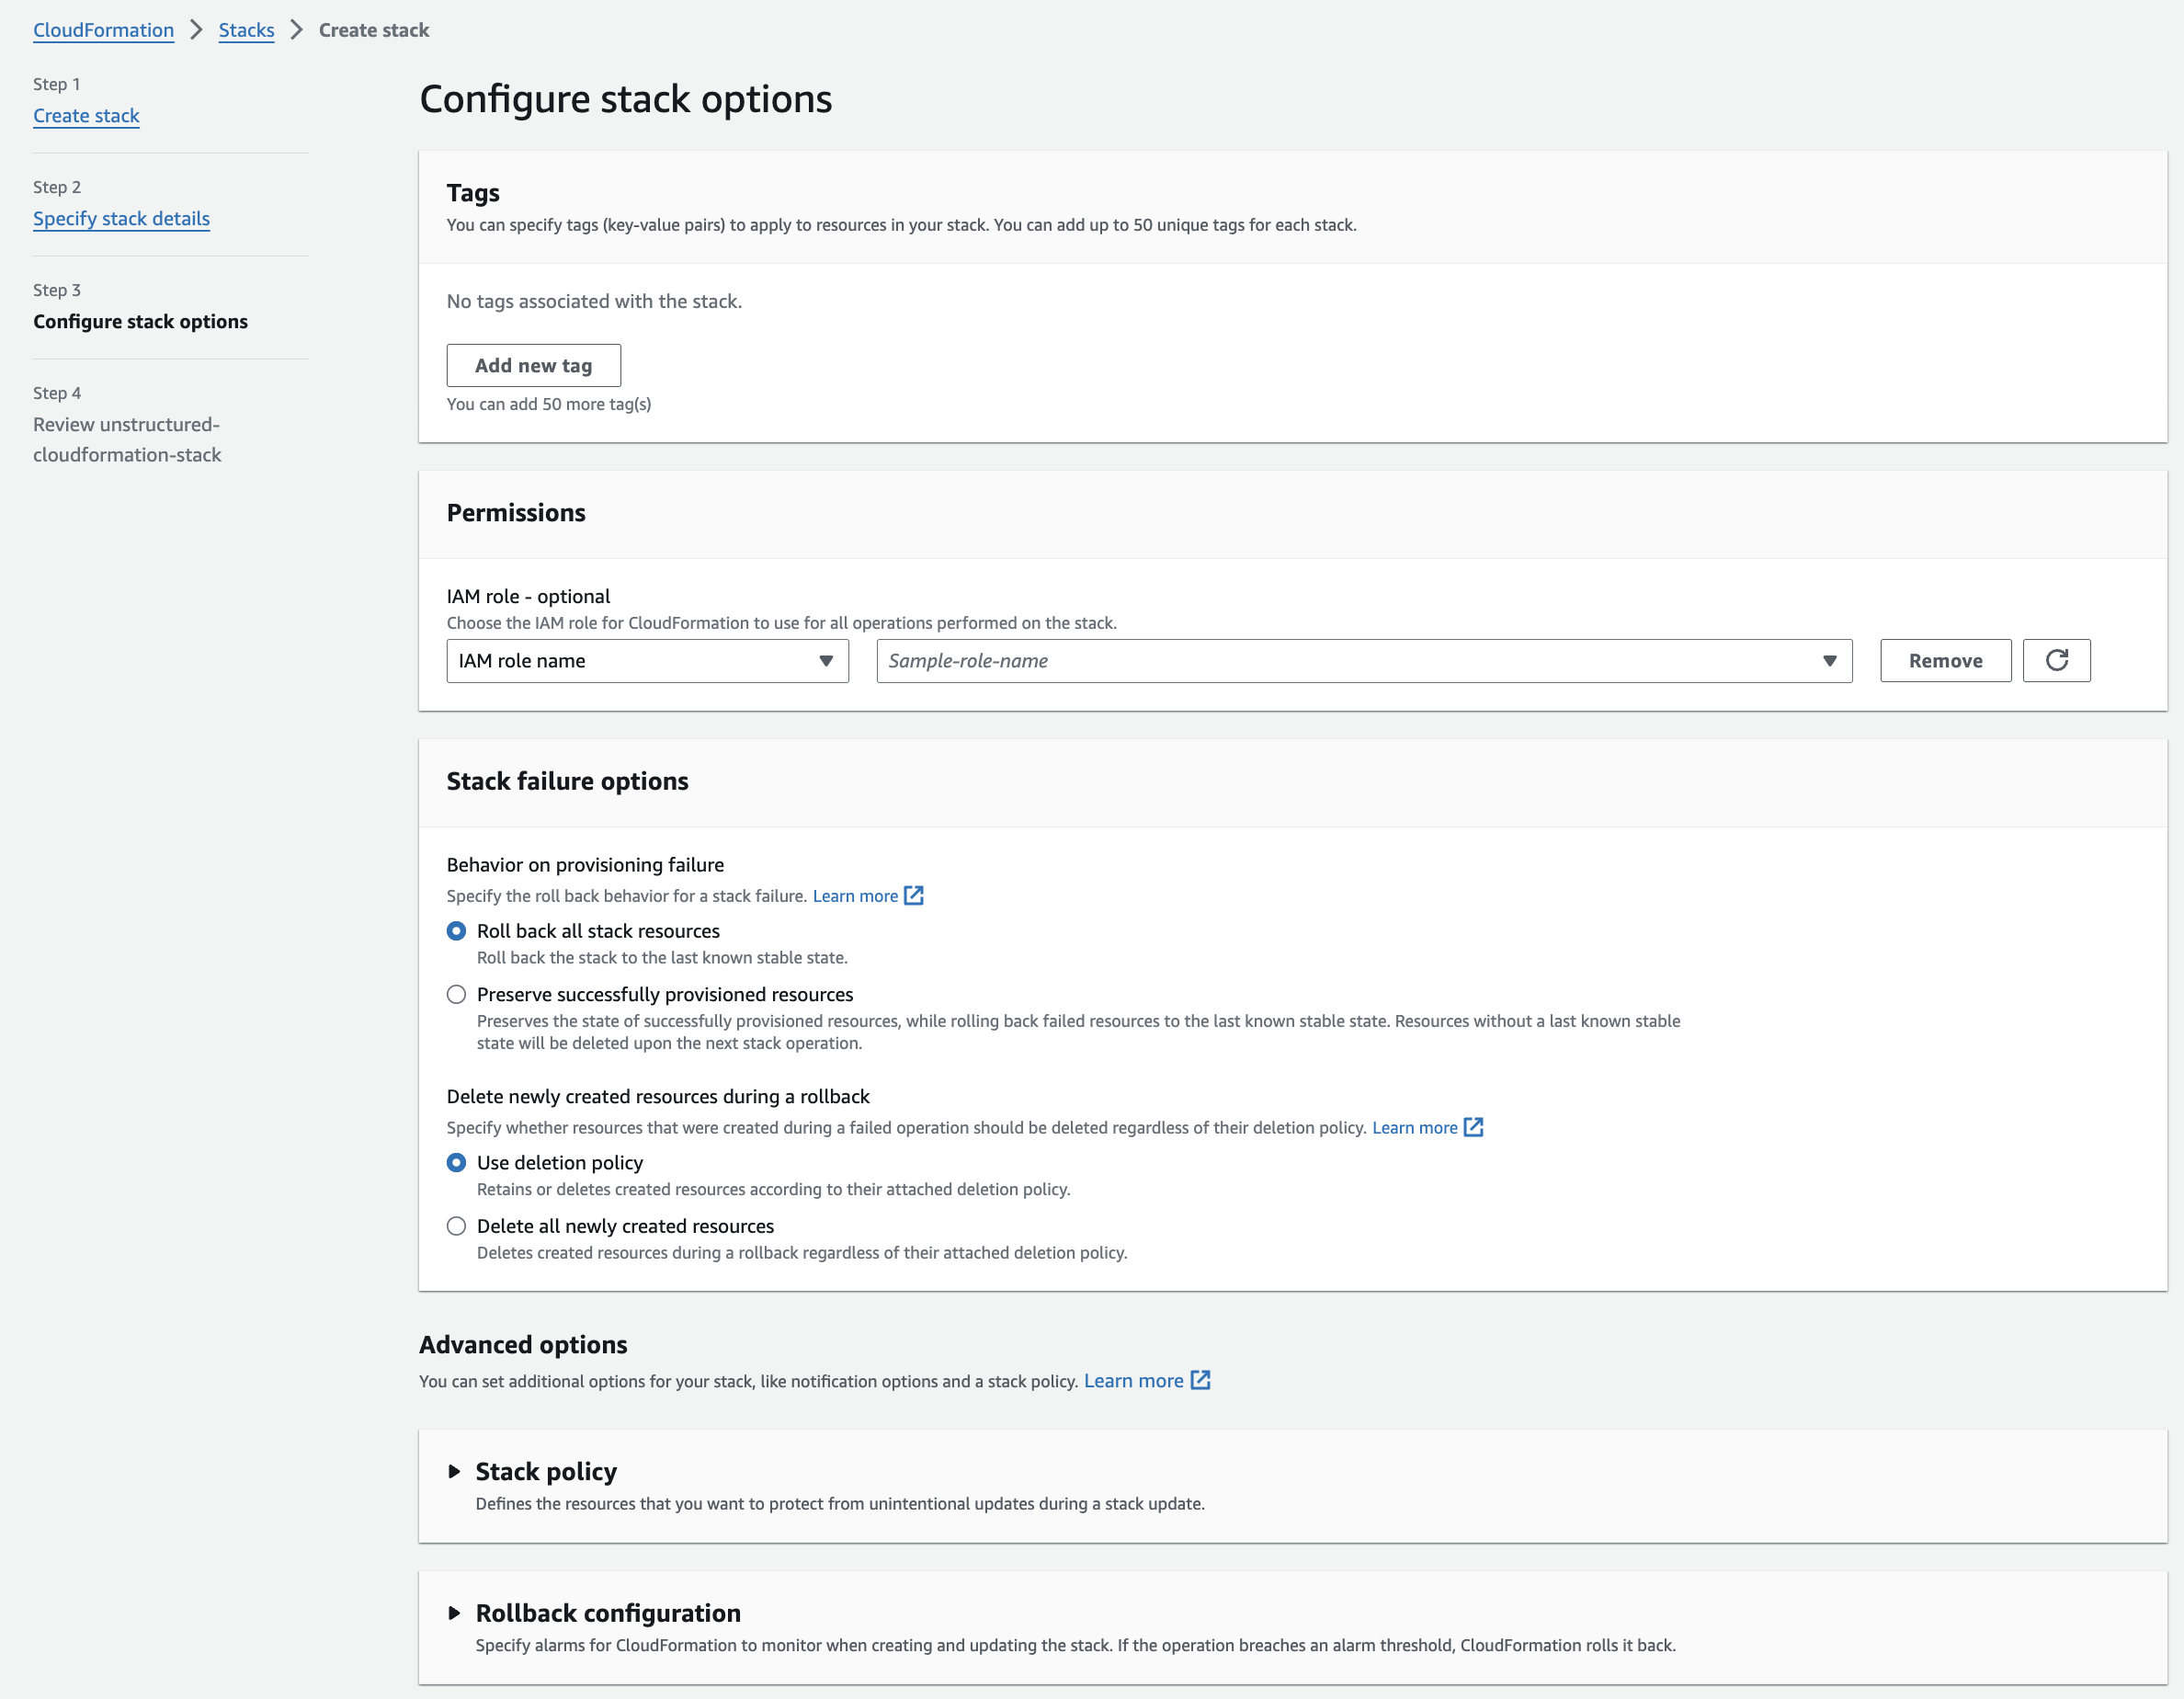
 **Step 3: Configure the stack's options**
a. You can leave the default values, or specify any non-default stack options.
b. Click **Next**.
**Step 3: Configure the stack's options**
a. You can leave the default values, or specify any non-default stack options.
b. Click **Next**.
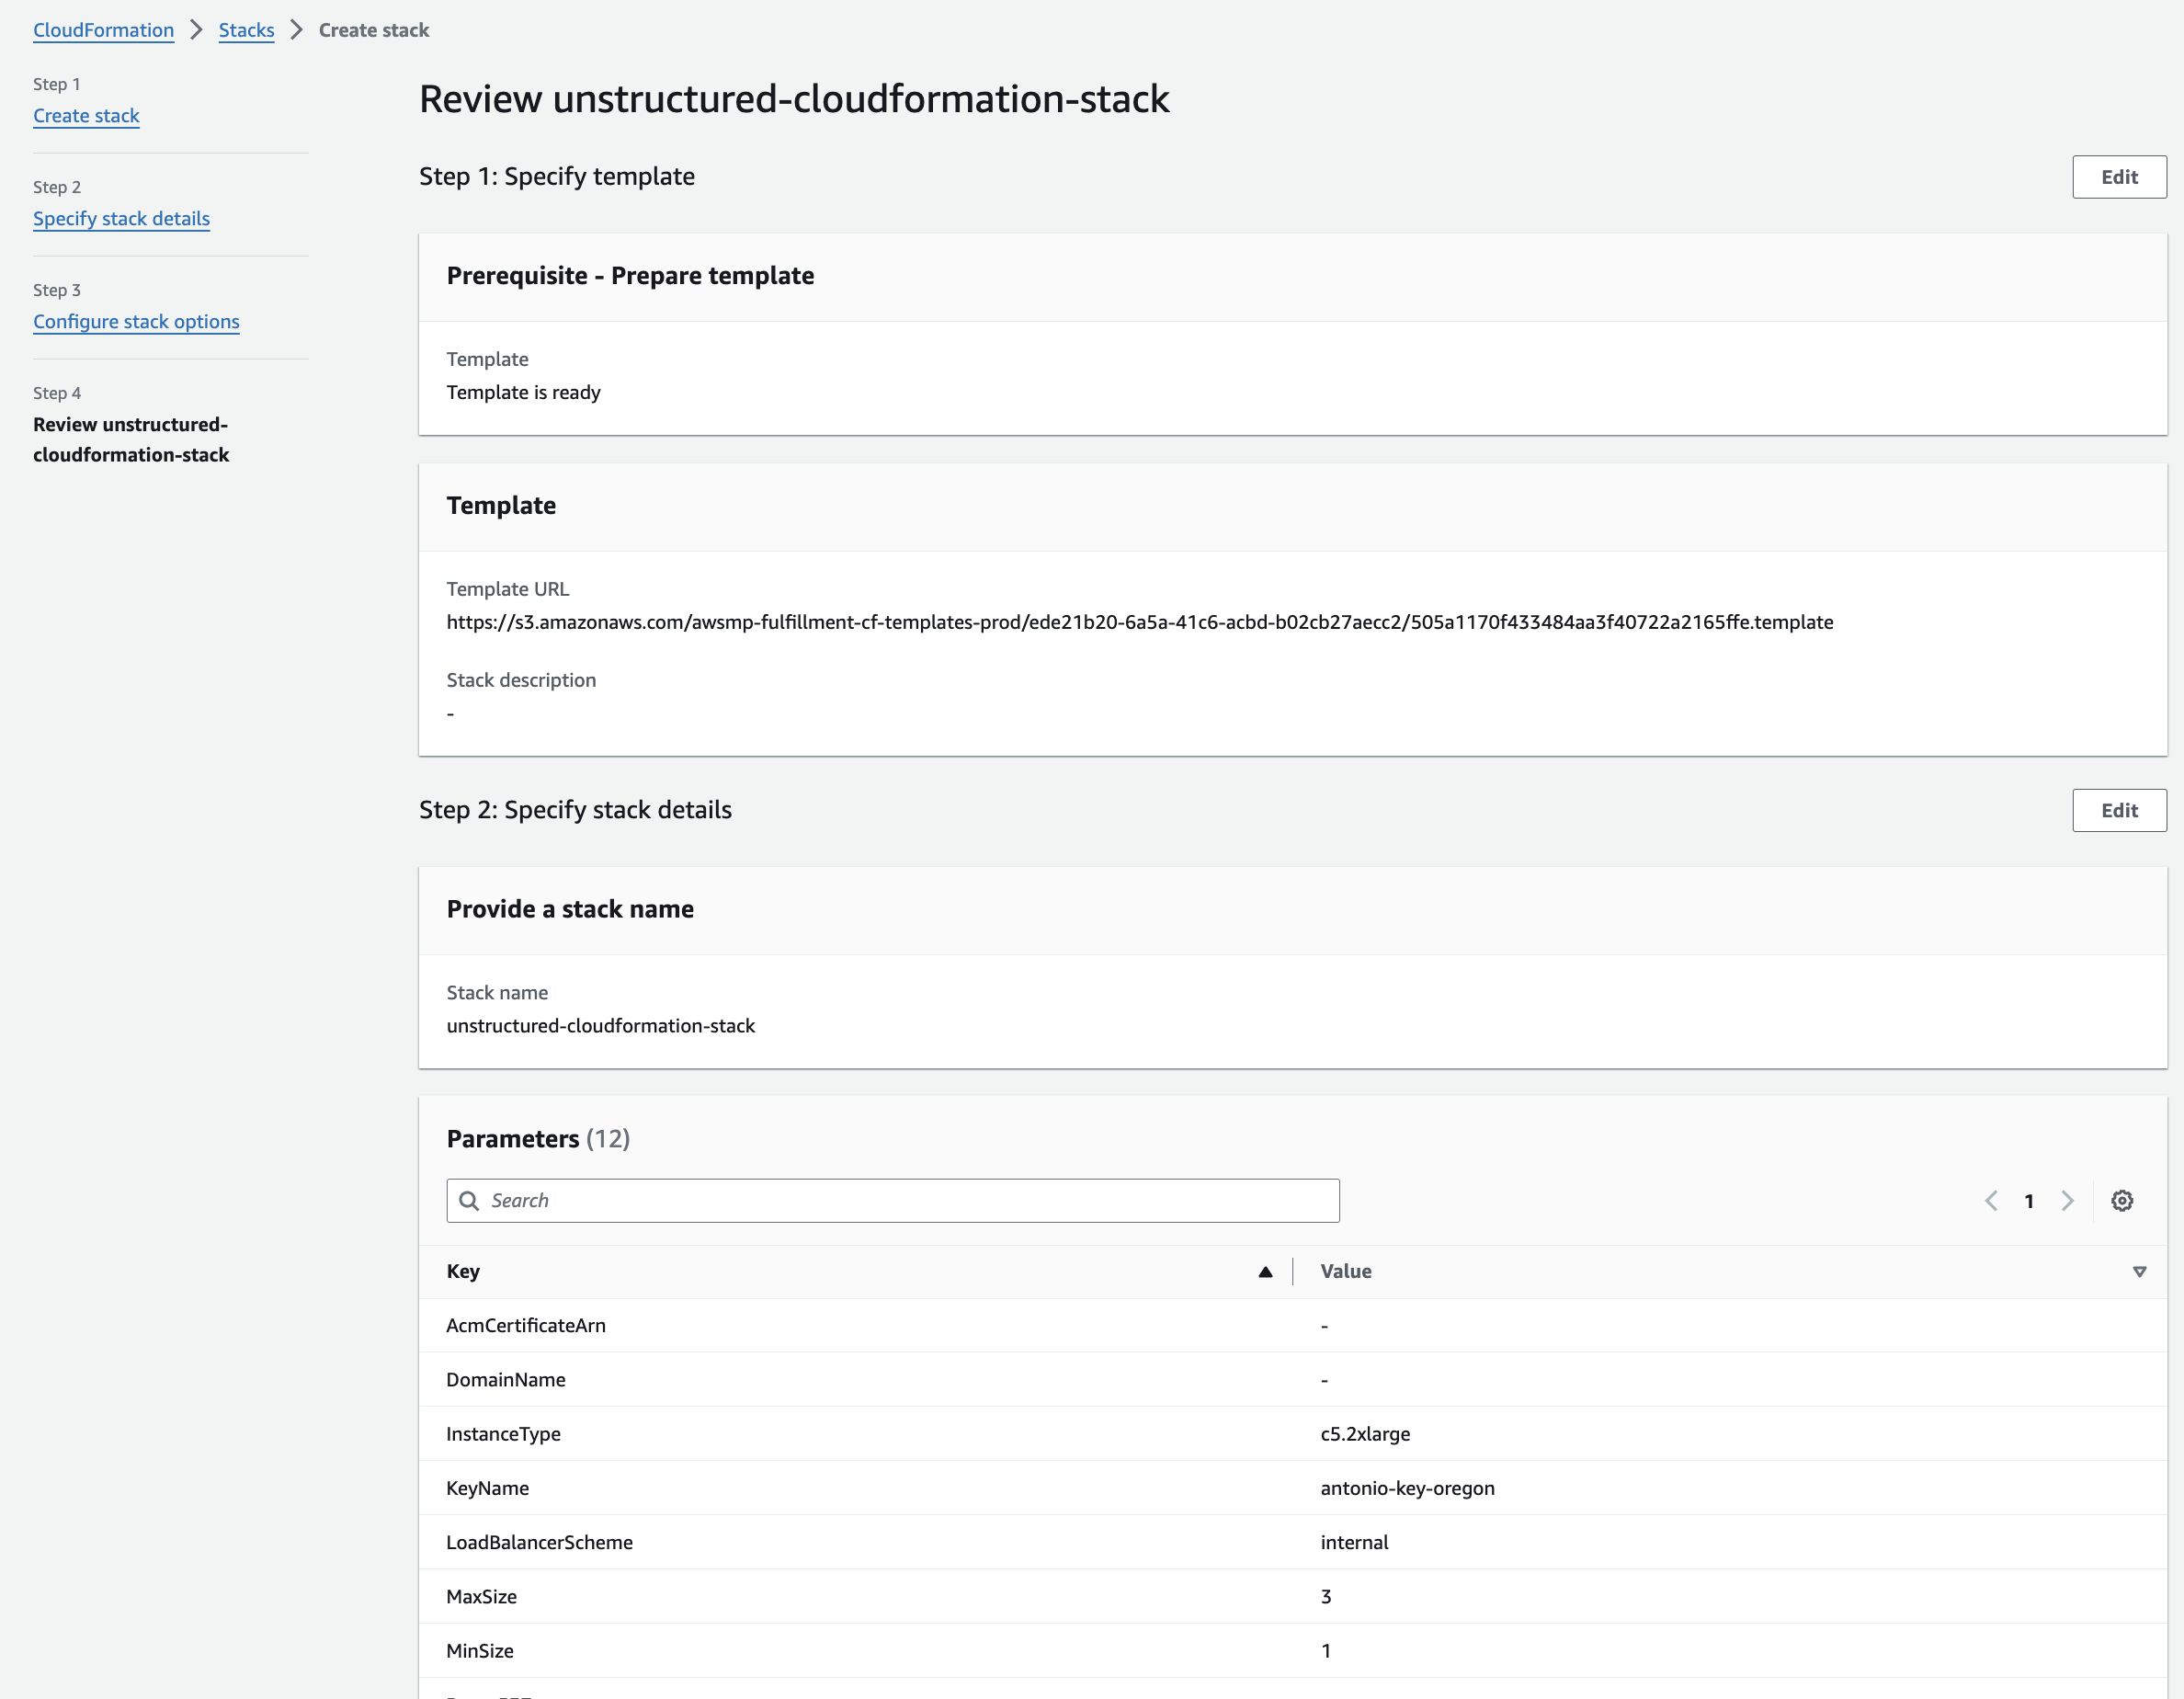
 **Step 4: Review**
a. Review the stack's settings.
b. Click **Submit**.
**Step 4: Review**
a. Review the stack's settings.
b. Click **Submit**.
 11. **Get the Unstructured API endpoint**:
a. The CloudFormation details page for the stack appears. If you do not see it, on the sidebar, click **Stacks**, and then click the name of your stack.
b. Check the status of the CloudFormation stack. A successful deployment will show a **CREATE\_COMPLETE** value for the **Status** field on the **Stack Info** tab on this stack's details page. The deployment can take several minutes.
c. After a successful deployment, click the **Resources** tab on this stack's details page. Then click the **Physical ID** link next to **ApplicationLoadBalancer** on this tab.
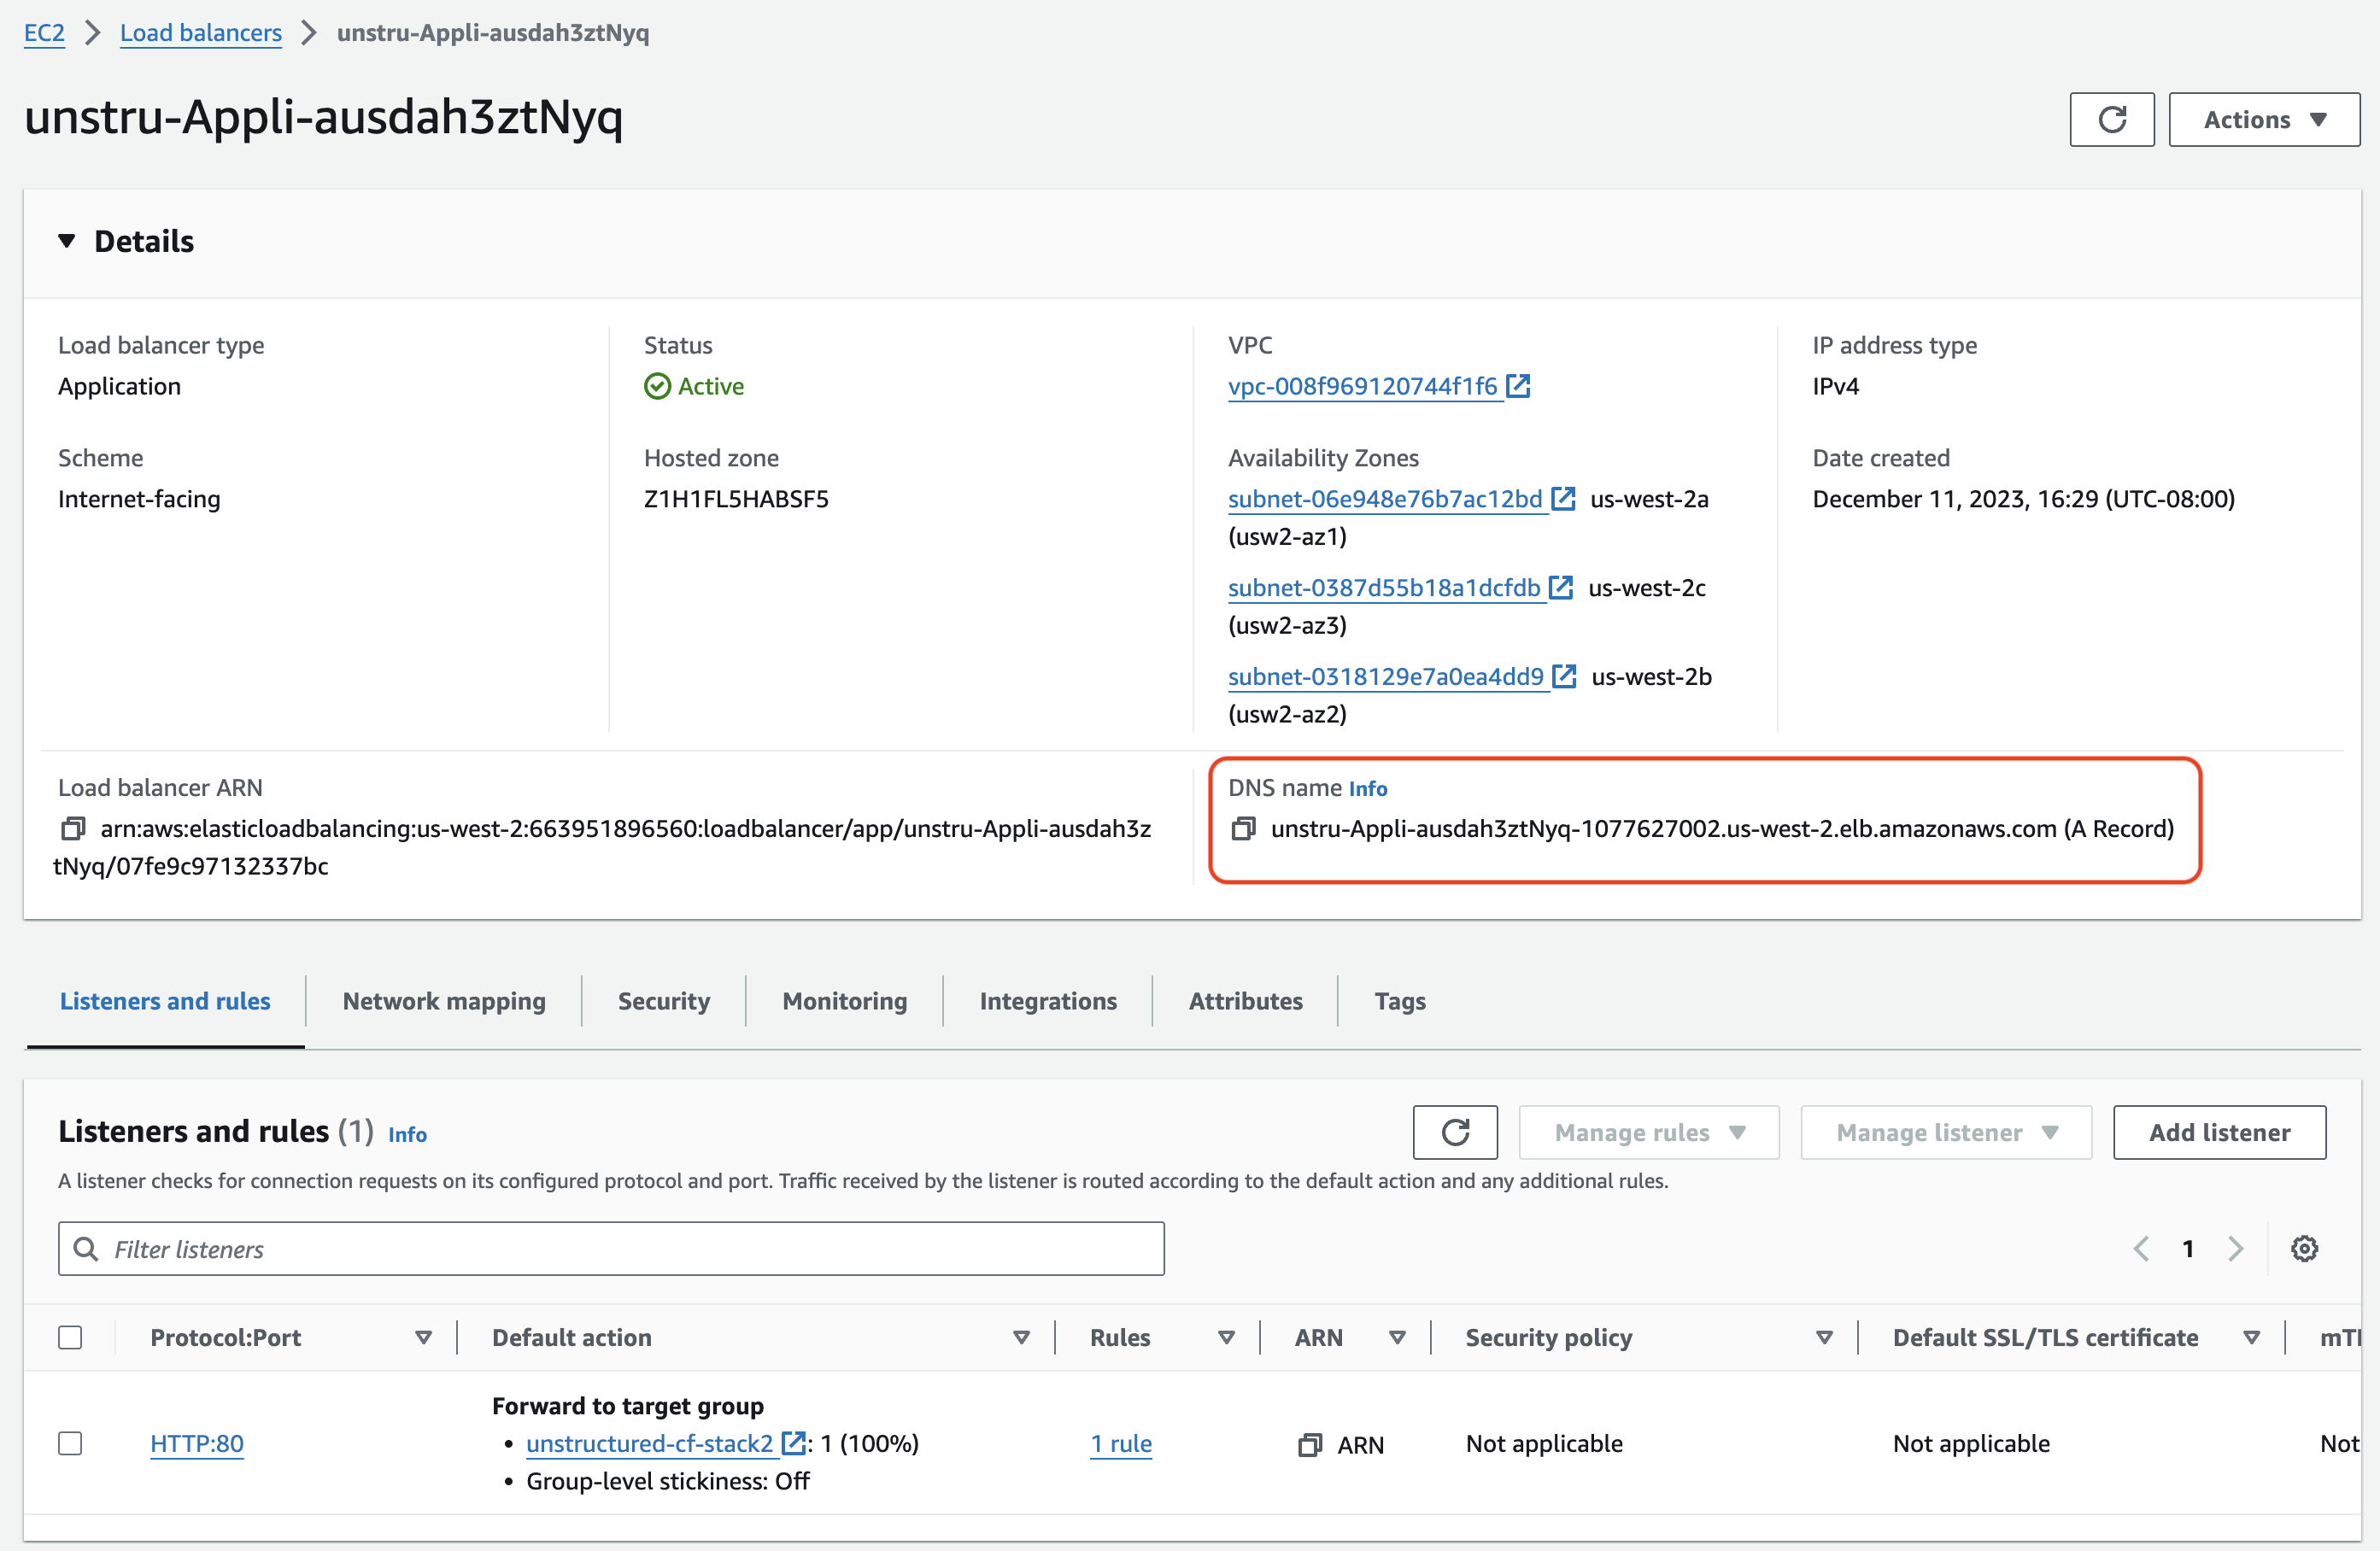
d. On the **EC2 > Load balancers > (Load balancer ID)** page that appears, copy the **DNS Name** value, which is shown as an **(A Record)** and ends with `.elb.amazonaws.com`.
* Note: You will use this **DNS Name** to replace the `` for the following healthcheck and data processing steps.
11. **Get the Unstructured API endpoint**:
a. The CloudFormation details page for the stack appears. If you do not see it, on the sidebar, click **Stacks**, and then click the name of your stack.
b. Check the status of the CloudFormation stack. A successful deployment will show a **CREATE\_COMPLETE** value for the **Status** field on the **Stack Info** tab on this stack's details page. The deployment can take several minutes.
c. After a successful deployment, click the **Resources** tab on this stack's details page. Then click the **Physical ID** link next to **ApplicationLoadBalancer** on this tab.
d. On the **EC2 > Load balancers > (Load balancer ID)** page that appears, copy the **DNS Name** value, which is shown as an **(A Record)** and ends with `.elb.amazonaws.com`.
* Note: You will use this **DNS Name** to replace the `` for the following healthcheck and data processing steps.
 ## Healthcheck
Perform a health check by running this [curl](https://curl.se/) command from a terminal on your local machine, replacing `` with your application load balancer's DNS name. This health check can take several minutes:
```bash theme={null}
curl http:///healthcheck
```
## Healthcheck
Perform a health check by running this [curl](https://curl.se/) command from a terminal on your local machine, replacing `` with your application load balancer's DNS name. This health check can take several minutes:
```bash theme={null}
curl http:///healthcheck
```
 ## Data processing
For example, run one of the following, setting the following environment variables to make your code more portable:
* Set `UNSTRUCTURED_API_URL` to `http://`, followed by your load balancer's DNS name, followed by `/general/v0/general`.
You can now use this value (`http://`, followed by your load balancer's DNS name, followed by `/general/v0/general`) in place of
calling the [Unstructured Partition Endpoint](/api-reference/legacy-api/partition/overview) URL as described elsewhere in the Unstructured API documentation.
* Set `LOCAL_FILE_INPUT_DIR` to the path on your local machine to the files for the Unstructured API to process. If you do not have any input files available, you can download any of the ones from the [example-docs](https://github.com/Unstructured-IO/unstructured-ingest/tree/main/example-docs) folder in GitHub.
* Set `LOCAL_FILE_OUTPUT_DIR` to the path on your local machine for Unstructured API to send the processed output in JSON format:
You must first [install the Unstructured Ingest CLI](/open-source/ingestion/overview#unstructured-ingest-cli).
Because you are calling a private API and therefore do not need an Unstructured API key, you can omit the command-line option `--api-key` Or, for better code portability, it is recommended that you first set the environment variable `UNSTRUCTURED_API_KEY` to an empty string and then include the command-line option `--api-key`.
```bash CLI theme={null}
unstructured-ingest \
local \
--input-path $LOCAL_FILE_INPUT_DIR \
--output-dir $LOCAL_FILE_OUTPUT_DIR \
--partition-by-api \
--api-key $UNSTRUCTURED_API_KEY \
--partition-endpoint $UNSTRUCTURED_API_URL \
--strategy hi_res \
--additional-partition-args="{\"split_pdf_page\":\"true\", \"split_pdf_allow_failed\":\"true\", \"split_pdf_concurrency_level\": 15}"
```
You must first [install the Unstructured Ingest Python library](/open-source/ingestion/python-ingest).
Because you are calling a private API and therefore do not need an Unstructured API key, you can omit the parameter `api_key`. Or, for better code portability, it is recommended that you first set the environment variable `UNSTRUCTURED_API_KEY` to an empty string and then include the parameter `api_key`.
```python Python Ingest theme={null}
import os
from unstructured_ingest.pipeline.pipeline import Pipeline
from unstructured_ingest.interfaces import ProcessorConfig
from unstructured_ingest.processes.connectors.local import (
LocalIndexerConfig,
LocalDownloaderConfig,
LocalConnectionConfig,
LocalUploaderConfig
)
from unstructured_ingest.processes.partitioner import PartitionerConfig
if __name__ == "__main__":
Pipeline.from_configs(
context=ProcessorConfig(),
indexer_config=LocalIndexerConfig(input_path=os.getenv("LOCAL_FILE_INPUT_DIR")),
downloader_config=LocalDownloaderConfig(),
source_connection_config=LocalConnectionConfig(),
partitioner_config=PartitionerConfig(
partition_by_api=True,
api_key=os.getenv("UNSTRUCTURED_API_KEY"),
partition_endpoint=os.getenv("UNSTRUCTURED_API_URL"),
strategy="hi_res",
additional_partition_args={
"split_pdf_page": True,
"split_pdf_allow_failed": True,
"split_pdf_concurrency_level": 15
}
),
uploader_config=LocalUploaderConfig(output_dir=os.getenv("LOCAL_FILE_OUTPUT_DIR"))
).run()
```
## Accessing the hosting EC2 instance
If you need to access the Amazon EC2 instance that hosts the Unstructured API, do the following:
1. In the CloudFormation console, open the details page for the stack from Part II. If you do not see it, on the CloudFormation console's sidebar, click **Stacks**, and then click the name of your stack.
2. Click the **Resources** tab on this stack's details page. Then click the **Physical ID** link next to **EC2TargetGroup** on this tab.
3. On the **EC2 > Target groups > (CloudFormation stack name)** page that appears, on the **Targets** tab, click the **Instance ID** link.
4. In the list of instances that appears, click the **Instance ID** link.
5. Click **Connect**, and then follow any of the on-screen options to access the EC2 instance.
## Manage related AWS account costs
After you run the CloudFormation stack that you created in Part II, charges will begin accruing to your AWS account on an ongoing basis for related AWS resources.
The amounts of these charges vary based on where these resource are located, which resources are covered by AWS Free Tier offerings, the extent to
which you customize these resources' settings, how much you use these resources, and other factors. Stopping or terminating
the related Amazon EC2 instances alone will not eliminate these ongoing charges.
To stop these charges from accruing,
[delete the CloudFormation stack](https://docs.aws.amazon.com/AWSCloudFormation/latest/UserGuide/cfn-console-delete-stack.html)
that you created and ran in Part II. This stops and deletes all of the related AWS resources.
Before you delete the stack, note the following:
* You should click the **Resources** tab on the stack's details page to be aware of the associated resources that will be deleted.
* You should note any resource dependencies, resources with deletion protection or termination protection enabled, or nested stacks
that might prevent stack deletion, and resolve these issues that could prevent stack deletion. To find these kinds of issues:
* On the **Template** tab on the stack's details page, look for occurences of the `DependsOn` attribute, which are set to the name
of the resource dependency.
* On the **Template** tab on the stack's details page, look for occurences of the `DeletionPolicy` attribute set to `Retain` or the
`UpdateReplacePolicy` attribute set to `Retain`. The associated resources have deletion protection enabled.
* On the **Stack info** tab on the stack's details page, look for the **Termination protection** field. If it is set to **Activated**,
termination protection is enabled.
* On the **Resources** tab on the stack's details page, look for resources with their **Type** set to `AWS::CloudFormation::Stack`. These indicate nested stacks.
After you delete the stack, you should check your [AWS Billing and Cost Management dashboard](https://docs.aws.amazon.com/awsconsolehelpdocs/latest/gsg/billinginfo.html) to confirm that associated charges are no longer accruing.
## Data processing
For example, run one of the following, setting the following environment variables to make your code more portable:
* Set `UNSTRUCTURED_API_URL` to `http://`, followed by your load balancer's DNS name, followed by `/general/v0/general`.
You can now use this value (`http://`, followed by your load balancer's DNS name, followed by `/general/v0/general`) in place of
calling the [Unstructured Partition Endpoint](/api-reference/legacy-api/partition/overview) URL as described elsewhere in the Unstructured API documentation.
* Set `LOCAL_FILE_INPUT_DIR` to the path on your local machine to the files for the Unstructured API to process. If you do not have any input files available, you can download any of the ones from the [example-docs](https://github.com/Unstructured-IO/unstructured-ingest/tree/main/example-docs) folder in GitHub.
* Set `LOCAL_FILE_OUTPUT_DIR` to the path on your local machine for Unstructured API to send the processed output in JSON format:
You must first [install the Unstructured Ingest CLI](/open-source/ingestion/overview#unstructured-ingest-cli).
Because you are calling a private API and therefore do not need an Unstructured API key, you can omit the command-line option `--api-key` Or, for better code portability, it is recommended that you first set the environment variable `UNSTRUCTURED_API_KEY` to an empty string and then include the command-line option `--api-key`.
```bash CLI theme={null}
unstructured-ingest \
local \
--input-path $LOCAL_FILE_INPUT_DIR \
--output-dir $LOCAL_FILE_OUTPUT_DIR \
--partition-by-api \
--api-key $UNSTRUCTURED_API_KEY \
--partition-endpoint $UNSTRUCTURED_API_URL \
--strategy hi_res \
--additional-partition-args="{\"split_pdf_page\":\"true\", \"split_pdf_allow_failed\":\"true\", \"split_pdf_concurrency_level\": 15}"
```
You must first [install the Unstructured Ingest Python library](/open-source/ingestion/python-ingest).
Because you are calling a private API and therefore do not need an Unstructured API key, you can omit the parameter `api_key`. Or, for better code portability, it is recommended that you first set the environment variable `UNSTRUCTURED_API_KEY` to an empty string and then include the parameter `api_key`.
```python Python Ingest theme={null}
import os
from unstructured_ingest.pipeline.pipeline import Pipeline
from unstructured_ingest.interfaces import ProcessorConfig
from unstructured_ingest.processes.connectors.local import (
LocalIndexerConfig,
LocalDownloaderConfig,
LocalConnectionConfig,
LocalUploaderConfig
)
from unstructured_ingest.processes.partitioner import PartitionerConfig
if __name__ == "__main__":
Pipeline.from_configs(
context=ProcessorConfig(),
indexer_config=LocalIndexerConfig(input_path=os.getenv("LOCAL_FILE_INPUT_DIR")),
downloader_config=LocalDownloaderConfig(),
source_connection_config=LocalConnectionConfig(),
partitioner_config=PartitionerConfig(
partition_by_api=True,
api_key=os.getenv("UNSTRUCTURED_API_KEY"),
partition_endpoint=os.getenv("UNSTRUCTURED_API_URL"),
strategy="hi_res",
additional_partition_args={
"split_pdf_page": True,
"split_pdf_allow_failed": True,
"split_pdf_concurrency_level": 15
}
),
uploader_config=LocalUploaderConfig(output_dir=os.getenv("LOCAL_FILE_OUTPUT_DIR"))
).run()
```
## Accessing the hosting EC2 instance
If you need to access the Amazon EC2 instance that hosts the Unstructured API, do the following:
1. In the CloudFormation console, open the details page for the stack from Part II. If you do not see it, on the CloudFormation console's sidebar, click **Stacks**, and then click the name of your stack.
2. Click the **Resources** tab on this stack's details page. Then click the **Physical ID** link next to **EC2TargetGroup** on this tab.
3. On the **EC2 > Target groups > (CloudFormation stack name)** page that appears, on the **Targets** tab, click the **Instance ID** link.
4. In the list of instances that appears, click the **Instance ID** link.
5. Click **Connect**, and then follow any of the on-screen options to access the EC2 instance.
## Manage related AWS account costs
After you run the CloudFormation stack that you created in Part II, charges will begin accruing to your AWS account on an ongoing basis for related AWS resources.
The amounts of these charges vary based on where these resource are located, which resources are covered by AWS Free Tier offerings, the extent to
which you customize these resources' settings, how much you use these resources, and other factors. Stopping or terminating
the related Amazon EC2 instances alone will not eliminate these ongoing charges.
To stop these charges from accruing,
[delete the CloudFormation stack](https://docs.aws.amazon.com/AWSCloudFormation/latest/UserGuide/cfn-console-delete-stack.html)
that you created and ran in Part II. This stops and deletes all of the related AWS resources.
Before you delete the stack, note the following:
* You should click the **Resources** tab on the stack's details page to be aware of the associated resources that will be deleted.
* You should note any resource dependencies, resources with deletion protection or termination protection enabled, or nested stacks
that might prevent stack deletion, and resolve these issues that could prevent stack deletion. To find these kinds of issues:
* On the **Template** tab on the stack's details page, look for occurences of the `DependsOn` attribute, which are set to the name
of the resource dependency.
* On the **Template** tab on the stack's details page, look for occurences of the `DeletionPolicy` attribute set to `Retain` or the
`UpdateReplacePolicy` attribute set to `Retain`. The associated resources have deletion protection enabled.
* On the **Stack info** tab on the stack's details page, look for the **Termination protection** field. If it is set to **Activated**,
termination protection is enabled.
* On the **Resources** tab on the stack's details page, look for resources with their **Type** set to `AWS::CloudFormation::Stack`. These indicate nested stacks.
After you delete the stack, you should check your [AWS Billing and Cost Management dashboard](https://docs.aws.amazon.com/awsconsolehelpdocs/latest/gsg/billinginfo.html) to confirm that associated charges are no longer accruing.