> ## Documentation Index
> Fetch the complete documentation index at: https://docs.unstructured.io/llms.txt
> Use this file to discover all available pages before exploring further.
# Langflow
[Langflow](https://www.langflow.org/) is a visual framework for building multi-agent and RAG applications.
It is open-source, fully customizable, and works with most LLMs and many vector stores out of the box.
This no-code, hands-on demonstration walks you through creating a Langflow project that enables you to use GPT-4o-mini to chat
in real time with a PDF document that is processed by Unstructured and has its processed data stored in an
[Astra DB](https://www.datastax.com/products/datastax-astra) vector database.
## Prerequisites
* An IBM Cloud account or DataStax account.
* For an IBM Cloud account, [sign up](https://cloud.ibm.com/registration) for an IBMid, and then [sign in](https://accounts.datastax.com/session-service/v1/login) to DataStax with your IBMid.
* For a DataStax account, [sign up](https://astra.datastax.com/signup) for a DataStax account, and then [sign in](https://accounts.datastax.com/session-service/v1/login) to DataStax with your DataStax account.
* An Astra DB database in the DataStax account. To create a database:
a. After you sign in to DataStax, click **Create database**.
b. Click the **Serverless (vector)** tile, if it is not already selected.
c. For **Database name**, enter some unique name for the database.
d. Select a **Provider** and a **Region**, and then click **Create database**.
[Learn more](https://docs.datastax.com/en/astra-db-classic/databases/manage-create.html).
* An application token for the database. To create an application token:
a. After you sign in to DataStax, in the list of databases, click the name of the target database.
b. On the **Overview** tab, under **Database Details**, in the **Application Tokens** tile, click **Generate Token**.
c. Enter some **Token description** and select and **Expiration** time period, and then click **Generate token**.
d. Save the application token that is displayed to a secure location, and then click **Close**.
[Learn more](https://docs.datastax.com/en/astra-db-serverless/administration/manage-application-tokens.html).
* A keyspace in the database. To create a keyspace:
a. After you sign in to DataStax, in the list of databases, click the name of the target database.
b. On the **Data Explorer** tab, in the **Keyspace** list, select **Create keyspace**.
c. Enter some **Keyspace name**, and then click **Add keyspace**.
[Learn more](https://docs.datastax.com/en/astra-db-serverless/databases/manage-keyspaces.html#keyspaces).
* A collection in the keyspace.
For the [Unstructured Pipelines](/pipelines/overview) and [Unstructured API](/api-reference/overview):
* An existing collection is not required. At runtime, the collection behavior is as follows:
* If an existing collection name is specified, and Unstructured generates embeddings,
but the number of dimensions that are generated does not match the existing collection's embedding settings, the run will fail.
You must change your Unstructured embedding settings or your existing collection's embedding settings to match, and try the run again.
* If a collection name is not specified, Unstructured creates a new collection in your keyspace. If Unstructured generates embeddings,
the new collection's name will be `u__`.
If Unstructured does not generate embeddings, the new collection's name will be `u
b. On the **Data Explorer** tab, in the **Keyspace** list, select the name of the target keyspace.
c. In the **Collections** list, select **Create collection**.
d. Enter some **Collection name**.
e. Turn on **Vector-enabled collection**, if it is not already turned on.
f. Choose a mode for **Embedding generation method**. See [Astra DB generated embeddings](#astra-db-generated-embeddings).
g. If you chose **Bring my own**, enter the number of dimensions for the embedding model that you plan to use.
h. For **Similarity metric**, select **Cosine**.
i. Click **Create collection**.
[Learn more](https://docs.datastax.com/en/astra-db-serverless/databases/manage-collections.html#create-collection).
Also:
* [Sign up for an OpenAI account](https://platform.openai.com/signup), and [get your OpenAI API key](https://help.openai.com/en/articles/4936850-where-do-i-find-my-openai-api-key).
* [Sign up for a free Langflow account](https://astra.datastax.com/signup?type=langflow).
* Get your Unstructured account and Unstructured API key:
1. If you do not already have an Unstructured account, [sign up for free](https://unstructured.io/?modal=try-for-free).
After you sign up, you are automatically signed in to your new Unstructured **Let's Go** account, at [https://platform.unstructured.io](https://platform.unstructured.io).
To sign up for a **Business** account instead, [contact Unstructured Sales](https://unstructured.io/?modal=contact-sales), or [learn more](/api-reference/overview#pricing).
2. If you have an Unstructured **Let's Go**, **Pay-As-You-Go**, or **Business SaaS** account and are not already signed in, sign in to your account at [https://platform.unstructured.io](https://platform.unstructured.io).
For other types of **Business** accounts, see your Unstructured account administrator for sign-in instructions,
or email Unstructured Support at [support@unstructured.io](mailto:support@unstructured.io).
3. Get your Unstructured API key:
a. After you sign in to your Unstructured **Let's Go**, **Pay-As-You-Go**, or **Business** account, click **API Keys** on the sidebar.
For a **Business** account, before you click **API Keys**, make sure you have selected the organizational workspace you want to create an API key
for. Each API key works with one and only one organizational workspace. [Learn more](/pipelines/account/workspaces#create-an-api-key-for-a-workspace).
b. Click **Generate API Key**.
c. Follow the on-screen instructions to finish generating the key.
d. Click the **Copy** icon next to your new key to add the key to your system's clipboard. If you lose this key, simply return and click the **Copy** icon again.
## Create and run the demonstration project
1. Sign in to your Langflow dashboard.
2. From your dashboard, click **New Project**.
3. Click **Blank Flow**.
In this step, you add a component that instructs the legacy Unstructured Partition Endpoint to process a local file that you specify.
1. On the sidebar, expand **Experimental (Beta)**, and then expand **Loaders**.
2. Drag the **Unstructured** component onto the designer area.
3. In the **Unstructured** component, click the box or icon next to **File**, and then select a local file for Unstructured to process.
This component works only with the file extensions `.pdf`, `.docx`, and `.txt`. Although you can use any local file with one of these extensions,
this demonstration uses [the text of the United States Constitution in PDF format](https://constitutioncenter.org/media/files/constitution.pdf),
saved to your local development machine.
To work with multiple local files, or to work with remote files, see the suggested options in [Next steps](#next-steps).
4. For **Unstructured.io Serverless API Key**, enter your Unstructured API key value.
5. Wait until **Saved** appears in the top navigation bar.
In this step, you add a component that generates vector embeddings for the processed data that Unstructured outputs.
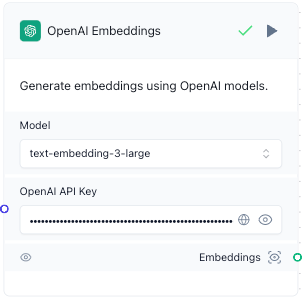
1. On the sidebar, expand **Embeddings**, and then drag the **OpenAI Embeddings** component onto the designer area.
2. In the **OpenAI Embeddings** component, for **Model**, select `text-embedding-3-large`.
3. For **OpenAI API Key**, enter your OpenAI API key's value.
4. Wait until **Saved** appears in the top navigation bar.
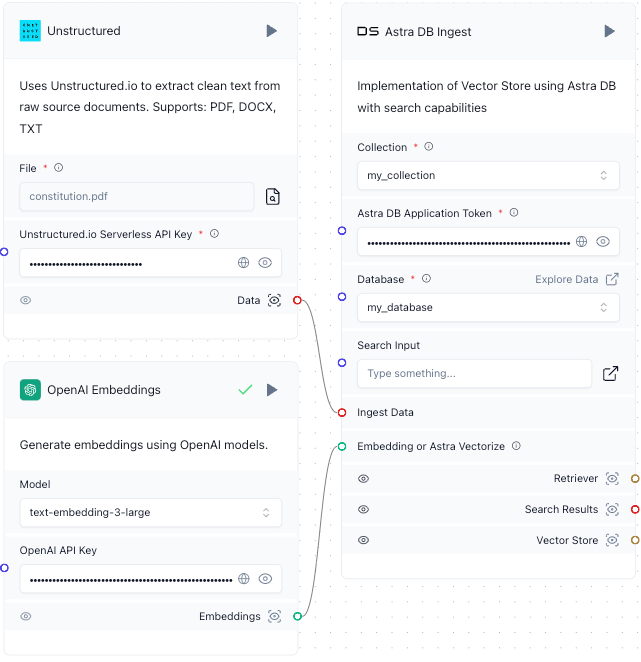
In this step, you add two components. The first component instructs Astra DB to ingest into the specified Astra DB collection the processed data that Unstructured outputs along
with the associated generated vector embeddings. The second component instructs Astra DB to take user-supplied chat messages and perform contextual
searches over the ingested data in the specified Astra DB collection, outputting its search results.
1. On the sidebar, expand **Vector Stores**, and then drag the **Astra DB** component onto the designer area.
2. Double-click the **Astra DB** component's title bar, and rename the component to `Astra DB Ingest`.
3. Repeat these previous two actions to add a second **Astra DB** component, renaming it to `Astra DB RAG`.
4. In both of these **Astra DB** components, in the **Database** list, select the name of your Astra DB database. Make sure this is the same database name in both components.
5. In the **Collection** list in both components, select the name of the collection in the database. Make sure this is the same collection name in both components.
6. In the **Astra DB Application Token** box in both components, enter your Astra DB application token's value. Make sure this is the same application token value in both components.
7. Connect the **Data** output from the **Unstructured** component to the **Ingest Data** input in the **Astra DB Ingest** component.
To make the connection, click and hold your mouse pointer inside of the circle next to **Data** in the **Unstructured** component.
While holding your mouse pointer, drag it over into the circle next to **Ingest Data** in the **Astra DB Ingest** component. Then
release your mouse pointer. A line appears between these two circles.
8. Connect the **Embeddings** output from the **OpenAI Embeddings** component to the **Embedding or Astra Vectorize** input in the **Astra DB Ingest** component.
9. Wait until **Saved** appears in the top navigation bar.
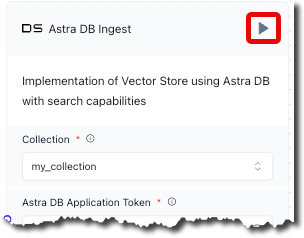
10. In the title bar of the **Astra DB Ingest** component, click the play icon. This ingests the processed data
from Unstructured and the associated generated vector embeddings into the specified Astra DB collection.
11. Wait until **Building** disppears from the top navigation bar, and a green check mark appears next to this play icon. This could take several minutes.
Each time you click the play icon in the **Astra DB Ingest** component, Unstructured reprocesses the specified local
file. If this file does not change, this could result in multiple duplicate records
being inserted into the specified Astra DB collection. You should only click the play icon in the **Astra DB Ingest** component when you want to insert new processed data into
the specified Astra DB collection.
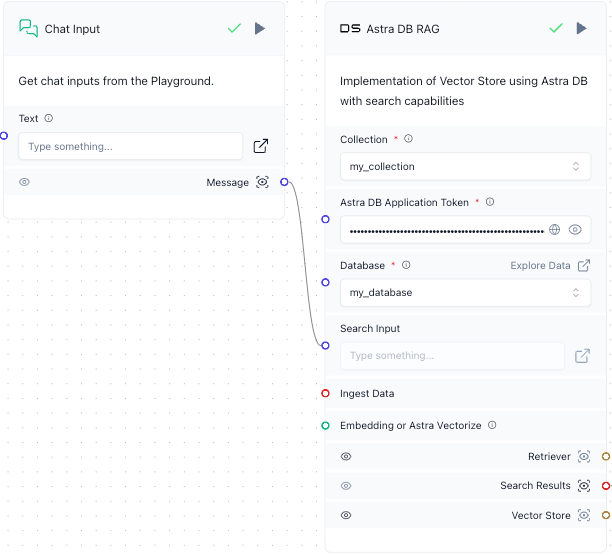
In this step, you add a component that takes user-supplied chat messages and sends them as input to Astra DB for contextual searching.
1. On the sidebar, expand **Inputs**, and then drag the **Chat Input** component onto the designer area.
2. Connect the **Message** output from the **Chat Input** component to the **Search Input** input in the **Astra DB RAG** component.
3. Wait until **Saved** appears in the top navigation bar.
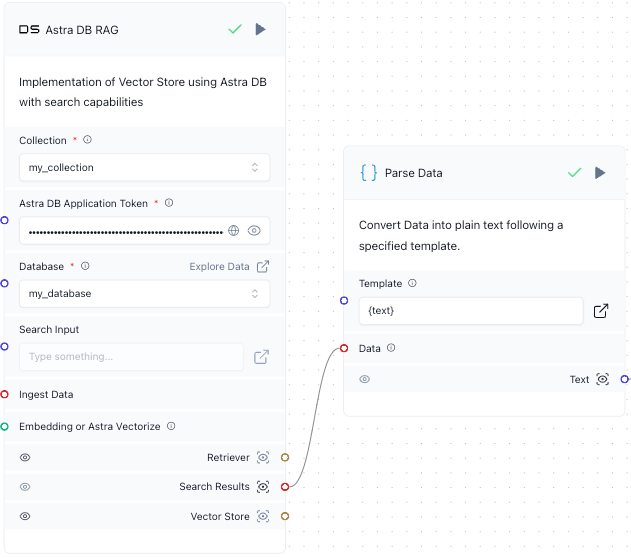
In this step, you add a component that takes the Astra DB search results and converts them into plain text, suitable for inclusion in
a prompt to a text-based LLM.
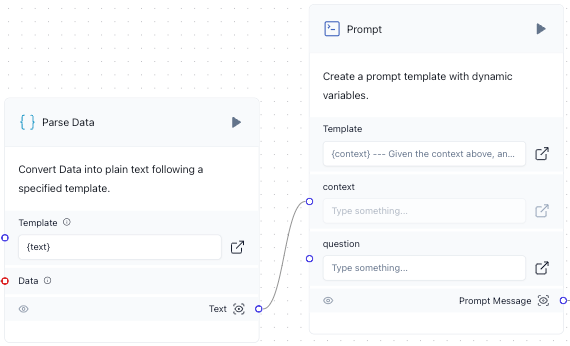
1. On the sidebar, expand **Helpers**, and then drag the **Parse Data** component onto the designer area.
2. Connect the **Search Results** output from the **Astra DB RAG** component to the **Data** input in the **Parse Data** component.
3. Wait until **Saved** appears in the top navigation bar.
In this step, you add a component that builds a prompt and then sends it to a text-based LLM.
1. On the sidebar, expand **Prompts**, and then drag the **Prompt** component onto the designer area.
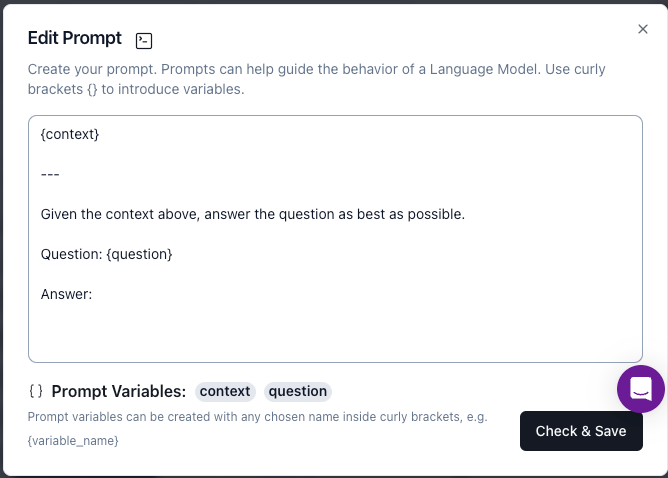
2. In the **Prompt** component, next to **Template**, click the box or arrow icon.
3. In the **Edit Prompt** window, enter the following prompt:
```text theme={null}
{context}
---
Given the context above, answer the question as best as possible.
Question: {question}
Answer:
```
To answer the question, the preceding prompt uses the context along with general information that the text-based LLM is
trained on. To use only the context to answer the question, you can change the prompt, for example to something like this:
```text theme={null}
{context}
---
Given the context above, answer the question as best as possible. Use only the context to answer the question. Do not use
any other sources of information. If the context does not provide enough information to answer the question, reply with
'I do not have enough context to answer the question.'
Question: {question}
Answer:
```
4. Click **Check & Save**.
5. Connect the **Text** output from the **Parse Data** component to the **context** input in the **Prompt** component.
6. Connect the **Message** output from the **Chat Input** component to the **question** input in the **Prompt** component.
You will now have two connections from the **Message** output in the **Chat Input** component:
* One connection was already made to the **Search Input** input in the **Astra DB RAG** component.
* Another connection has just now been made to the **question** input in the **Prompt** component.
7. Wait until **Saved** appears in the top navigation bar.
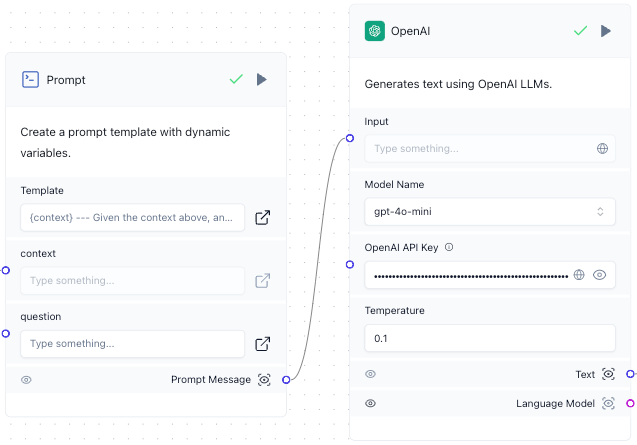
In this step, you create a component that sends a prompt to a text-based LLM and outputs the LLM's response.
1. On the sidebar, expand **Models**, and then drag the **OpenAI** component onto the designer area.
2. In the **Model Name** list, select **gpt-4o-mini**.
3. For **OpenAI API Key**, enter your OpenAI API key's value.
4. For **Temperature**, enter `0.1`.
5. Connect the **Prompt Message** output from the **Prompt** component to the **Input** input in the **OpenAI** component.
6. Wait until **Saved** appears in the top navigation bar.
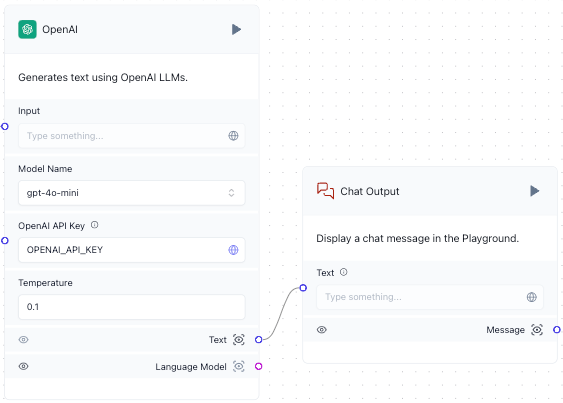
In this step, you create a component that returns the answer to the user's original chat message.
1. On the sidebar, expand **Outputs**, and then drag the **Chat Output** component onto the designer area.
2. Connect the **Text** output from the **OpenAI** component to the **Text** input in the **Chat Output** component.
3. Wait until **Saved** appears in the top navigation bar.
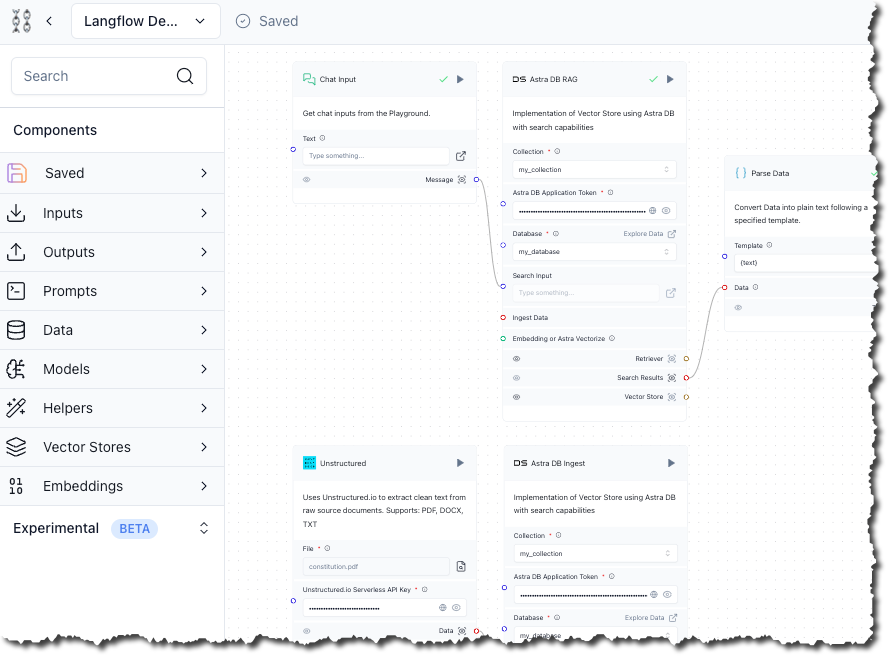
The final project should look like this:
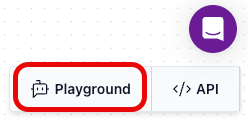
1. In the designer area, click **Playground**.
2. Enter a question into the chat box, for example, `What rights does the fifth amendment guarantee?` Then press the send button.
3. Wait until the answer appears.
4. Ask as many additional questions as you want to.
## Next steps
Now that you have your pipeline set up, here are just a few ways that you could modify it to support different requirements,
such as processing multiple files or using a different vector store.
### Process multiple files
In this demonstration, you pass to Unstructured a single local file. To pass multiple local or
non-local files to Unstructured instead, you can use the
[Unstructured Pipelines](/pipelines/overview) or the [Unstructured API](/api-reference/overview) or
[Unstructured Ingest](/open-source/ingestion/overview) outside of Langflow.
To do this, you can:
* [Use Unstructured Pipelines to create a workflow](/pipelines/quickstart) that relies on any available
[source connector](/pipelines/sources/overview) to connect to
[Astra DB](/pipelines/destinations/astradb). Run this workflow outside of Langflow anytime you have new documents in that source location that
you want Unstructured to process and then insert the new processed data into Astra DB. Then, back in the Langflow project,
use the **Playground** to ask additional questions, which will now include the new data when generating answers.
* [Use Unstructured Ingest to create a pipeline](/open-source/ingestion/overview) that relies on any available
[source connector](/open-source/ingestion/source-connectors/overview) to connect to
[Astra DB](/open-source/ingestion/destination-connectors/astradb). Run this pipeline outside of Langflow anytime you have new documents in that non-local source location that
you want Unstructured to process and then insert the new processed data into Astra DB. Then, back in the Langflow project,
use the **Playground** to ask additonal questions, which will now include the new data when generating answers.
### Use a different vector store
In this demonstration, you use Astra DB as the vector store. Langflow and Unstructured support several vector stores in addition to Astra DB.
To do this, you can:
[Use Unstructured Pipelines to create a workflow](/pipelines/quickstart) that relies on any available
[source connector](/pipelines/sources/overview) to connect to
one of the following available vector stores that Langflow also supports:
* [Milvus](/pipelines/destinations/milvus)
* [MongoDB](/pipelines/destinations/mongodb)
* [Pinecone](/pipelines/destinations/pinecone)
Run this workflow outside of Langflow anytime you have new documents in the source location that
you want Unstructured to process and then insert the new processed data into the vector store. Then, back in the Langflow project,
swap out the **Astra DB RAG** component for the corresponding **Vector Stores** component that matches the new vector
store's name. Configure the new component, and then
use the **Playground** to ask additional questions, which will now use the new vector store when generating answers.
Or, [use Unstructured Ingest to create a pipeline](/open-source/ingestion/overview) that relies on any available
[source connector](/open-source/ingestion/source-connectors/overview) to connect to
one of the following available vector stores that Langflow also supports:
* [Chroma DB](/open-source/ingestion/destination-connectors/chroma)
* [Couchbase](/open-source/ingestion/destination-connectors/couchbase)
* [Elasticsearch](/open-source/ingestion/destination-connectors/elasticsearch)
* [Milvus](/open-source/ingestion/destination-connectors/milvus)
* [MongoDB](/open-source/ingestion/destination-connectors/mongodb)
* [OpenSearch](/open-source/ingestion/destination-connectors/opensearch)
* [Pinecone](/open-source/ingestion/destination-connectors/pinecone)
* [Qdrant](/open-source/ingestion/destination-connectors/qdrant)
* [Vectara](/open-source/ingestion/destination-connectors/vectara)
* [Weaviate](/open-source/ingestion/destination-connectors/weaviate)
Run this pipeline outside of Langflow anytime you have new documents in the source location that
you want Unstructured to process and then insert the new processed data into the vector store. Then, back in the Langflow project,
swap out the **Astra DB RAG** component for the corresponding **Vector Stores** component that matches the new vector
store's name. Configure the new component, and then
use the **Playground** to ask additional questions, which will now use the new vector store when generating answers.
## Learn more
* See the [Langflow documentation](https://docs.langflow.org/).
* [No-Code AI Assistant in No Time with Unstructured Platform, AstraDB, and Langflow](https://unstructured.io/blog/no-code-ai-assistant-in-no-time-with-unstructured-platform-astradb-and-langflow)
 This no-code, hands-on demonstration walks you through creating a Langflow project that enables you to use GPT-4o-mini to chat
in real time with a PDF document that is processed by Unstructured and has its processed data stored in an
[Astra DB](https://www.datastax.com/products/datastax-astra) vector database.
## Prerequisites
* An IBM Cloud account or DataStax account.
* For an IBM Cloud account, [sign up](https://cloud.ibm.com/registration) for an IBMid, and then [sign in](https://accounts.datastax.com/session-service/v1/login) to DataStax with your IBMid.
* For a DataStax account, [sign up](https://astra.datastax.com/signup) for a DataStax account, and then [sign in](https://accounts.datastax.com/session-service/v1/login) to DataStax with your DataStax account.
* An Astra DB database in the DataStax account. To create a database:
a. After you sign in to DataStax, click **Create database**.
This no-code, hands-on demonstration walks you through creating a Langflow project that enables you to use GPT-4o-mini to chat
in real time with a PDF document that is processed by Unstructured and has its processed data stored in an
[Astra DB](https://www.datastax.com/products/datastax-astra) vector database.
## Prerequisites
* An IBM Cloud account or DataStax account.
* For an IBM Cloud account, [sign up](https://cloud.ibm.com/registration) for an IBMid, and then [sign in](https://accounts.datastax.com/session-service/v1/login) to DataStax with your IBMid.
* For a DataStax account, [sign up](https://astra.datastax.com/signup) for a DataStax account, and then [sign in](https://accounts.datastax.com/session-service/v1/login) to DataStax with your DataStax account.
* An Astra DB database in the DataStax account. To create a database:
a. After you sign in to DataStax, click **Create database**.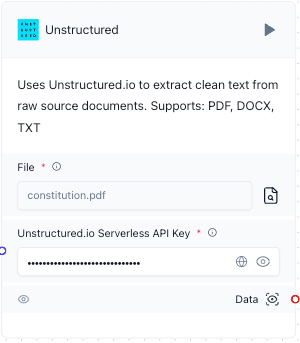 5. Wait until **Saved** appears in the top navigation bar.
 4. Wait until **Saved** appears in the top navigation bar.
 9. Wait until **Saved** appears in the top navigation bar.
10. In the title bar of the **Astra DB Ingest** component, click the play icon. This ingests the processed data
from Unstructured and the associated generated vector embeddings into the specified Astra DB collection.
9. Wait until **Saved** appears in the top navigation bar.
10. In the title bar of the **Astra DB Ingest** component, click the play icon. This ingests the processed data
from Unstructured and the associated generated vector embeddings into the specified Astra DB collection.
 11. Wait until **Building** disppears from the top navigation bar, and a green check mark appears next to this play icon. This could take several minutes.
 3. Wait until **Saved** appears in the top navigation bar.
 3. Wait until **Saved** appears in the top navigation bar.
 5. Connect the **Text** output from the **Parse Data** component to the **context** input in the **Prompt** component.
 6. Connect the **Message** output from the **Chat Input** component to the **question** input in the **Prompt** component.
 6. Wait until **Saved** appears in the top navigation bar.
 3. Wait until **Saved** appears in the top navigation bar.
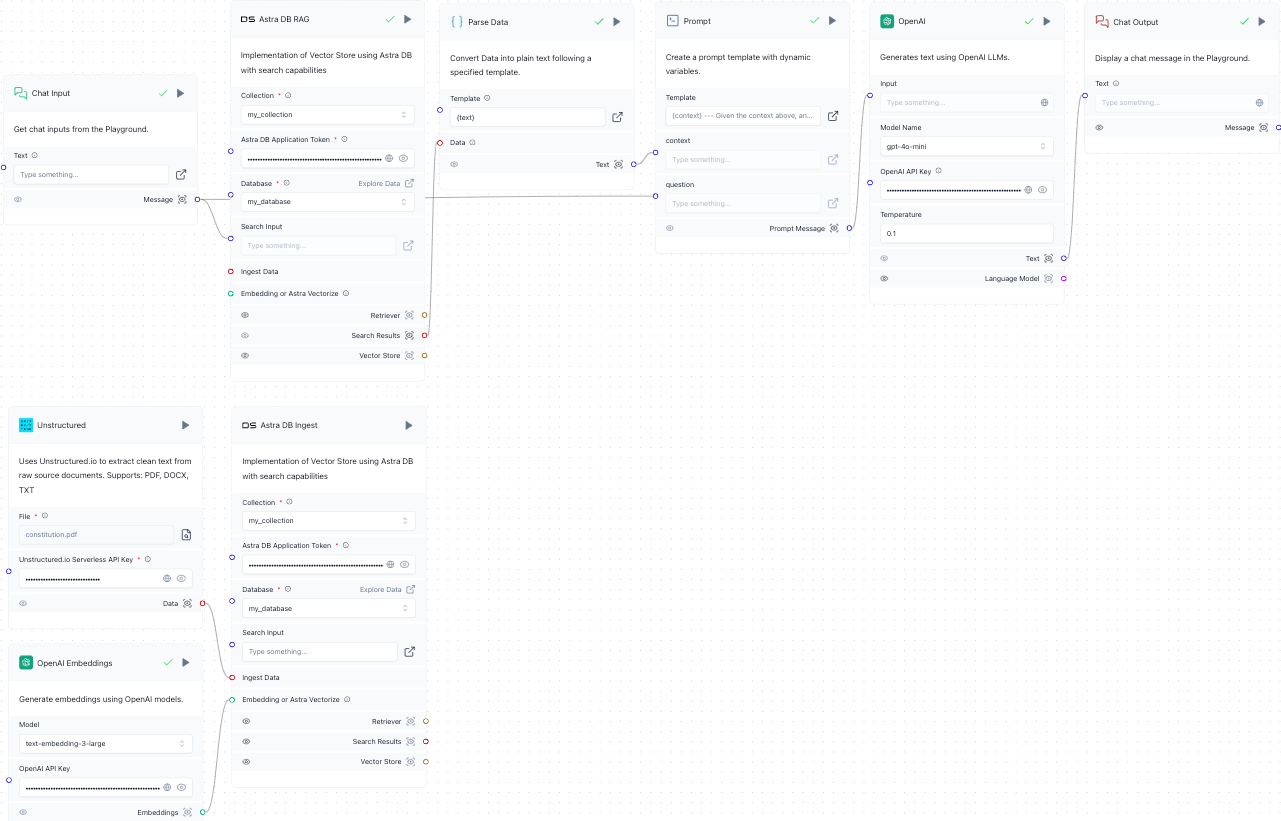
The final project should look like this:
3. Wait until **Saved** appears in the top navigation bar.
The final project should look like this:
 2. Enter a question into the chat box, for example, `What rights does the fifth amendment guarantee?` Then press the send button.
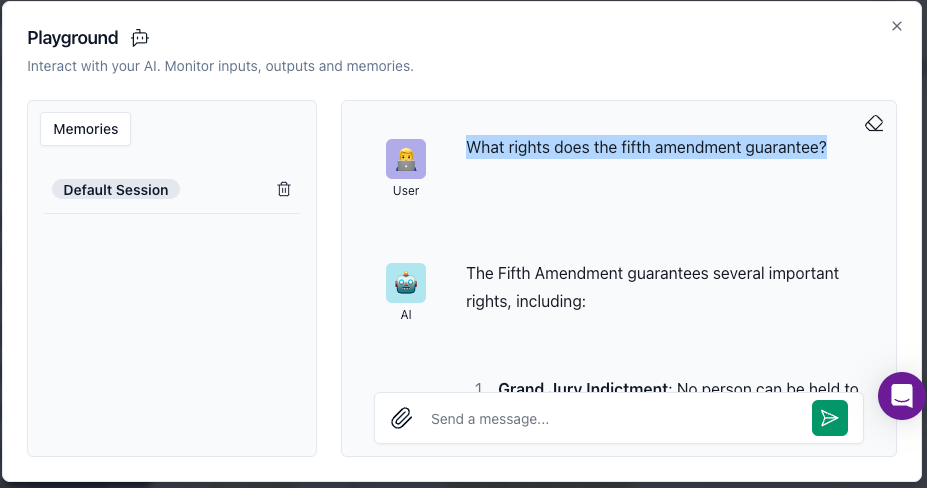 3. Wait until the answer appears.
4. Ask as many additional questions as you want to.
3. Wait until the answer appears.
4. Ask as many additional questions as you want to.