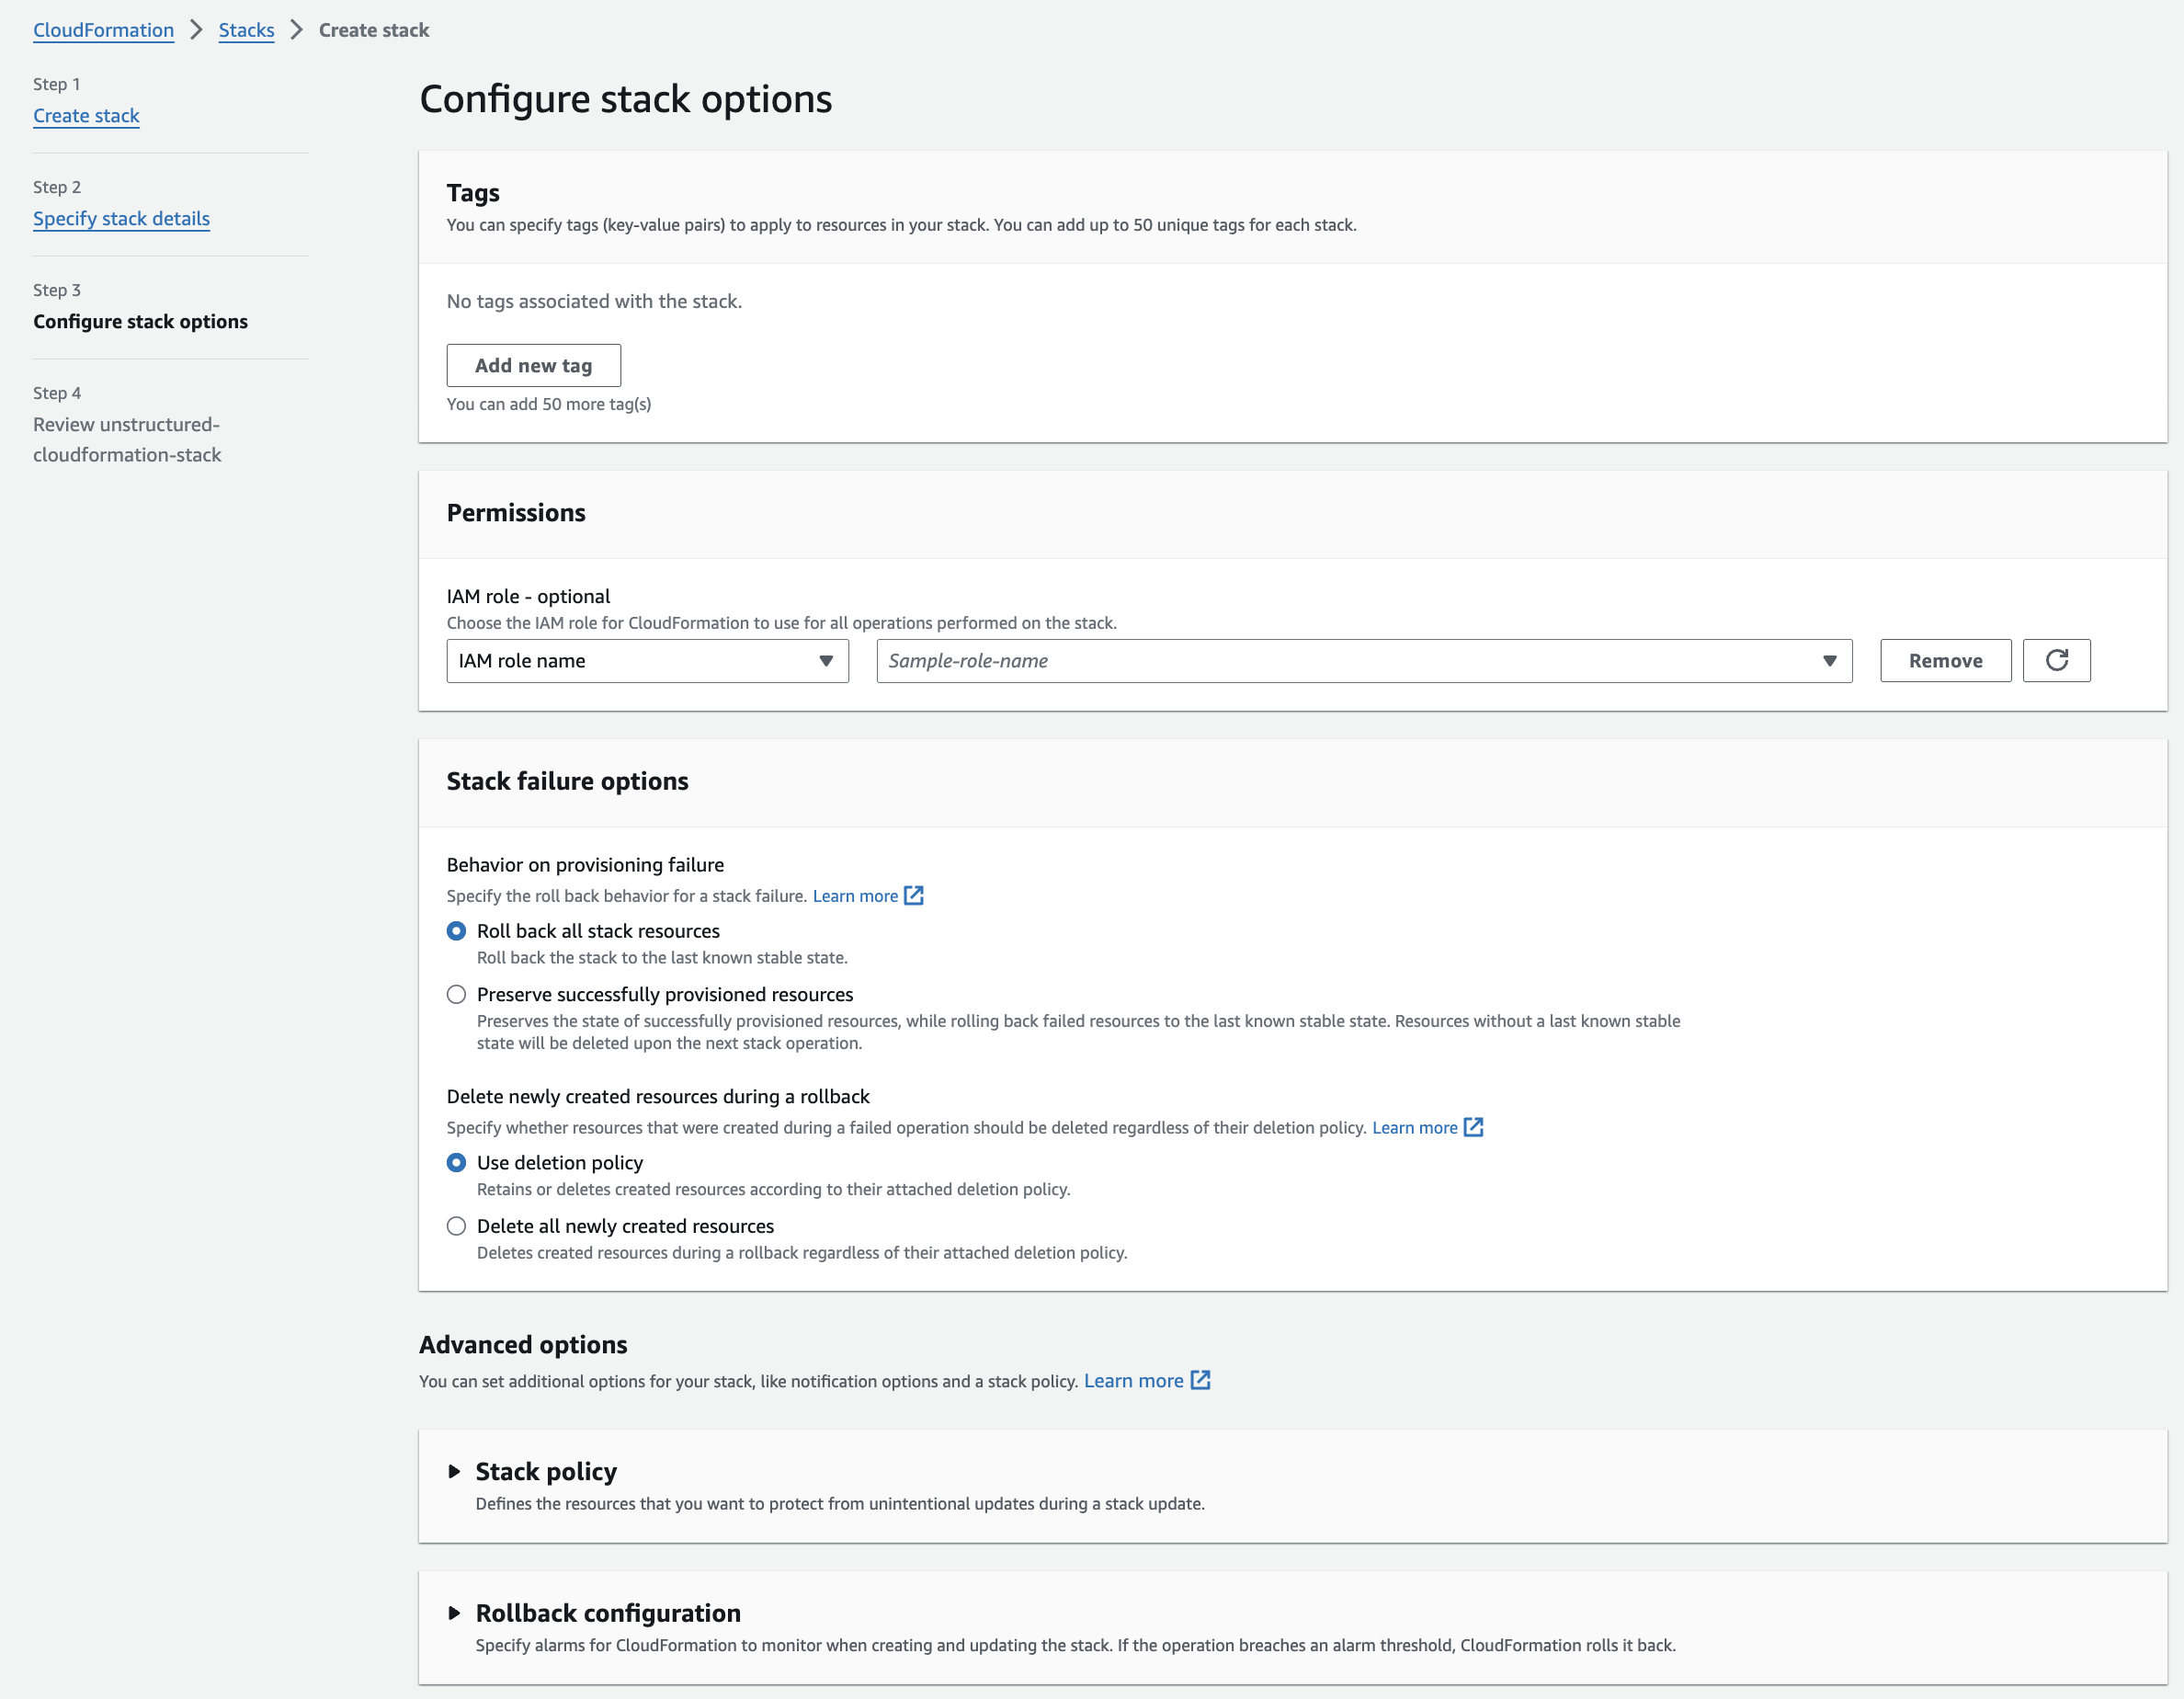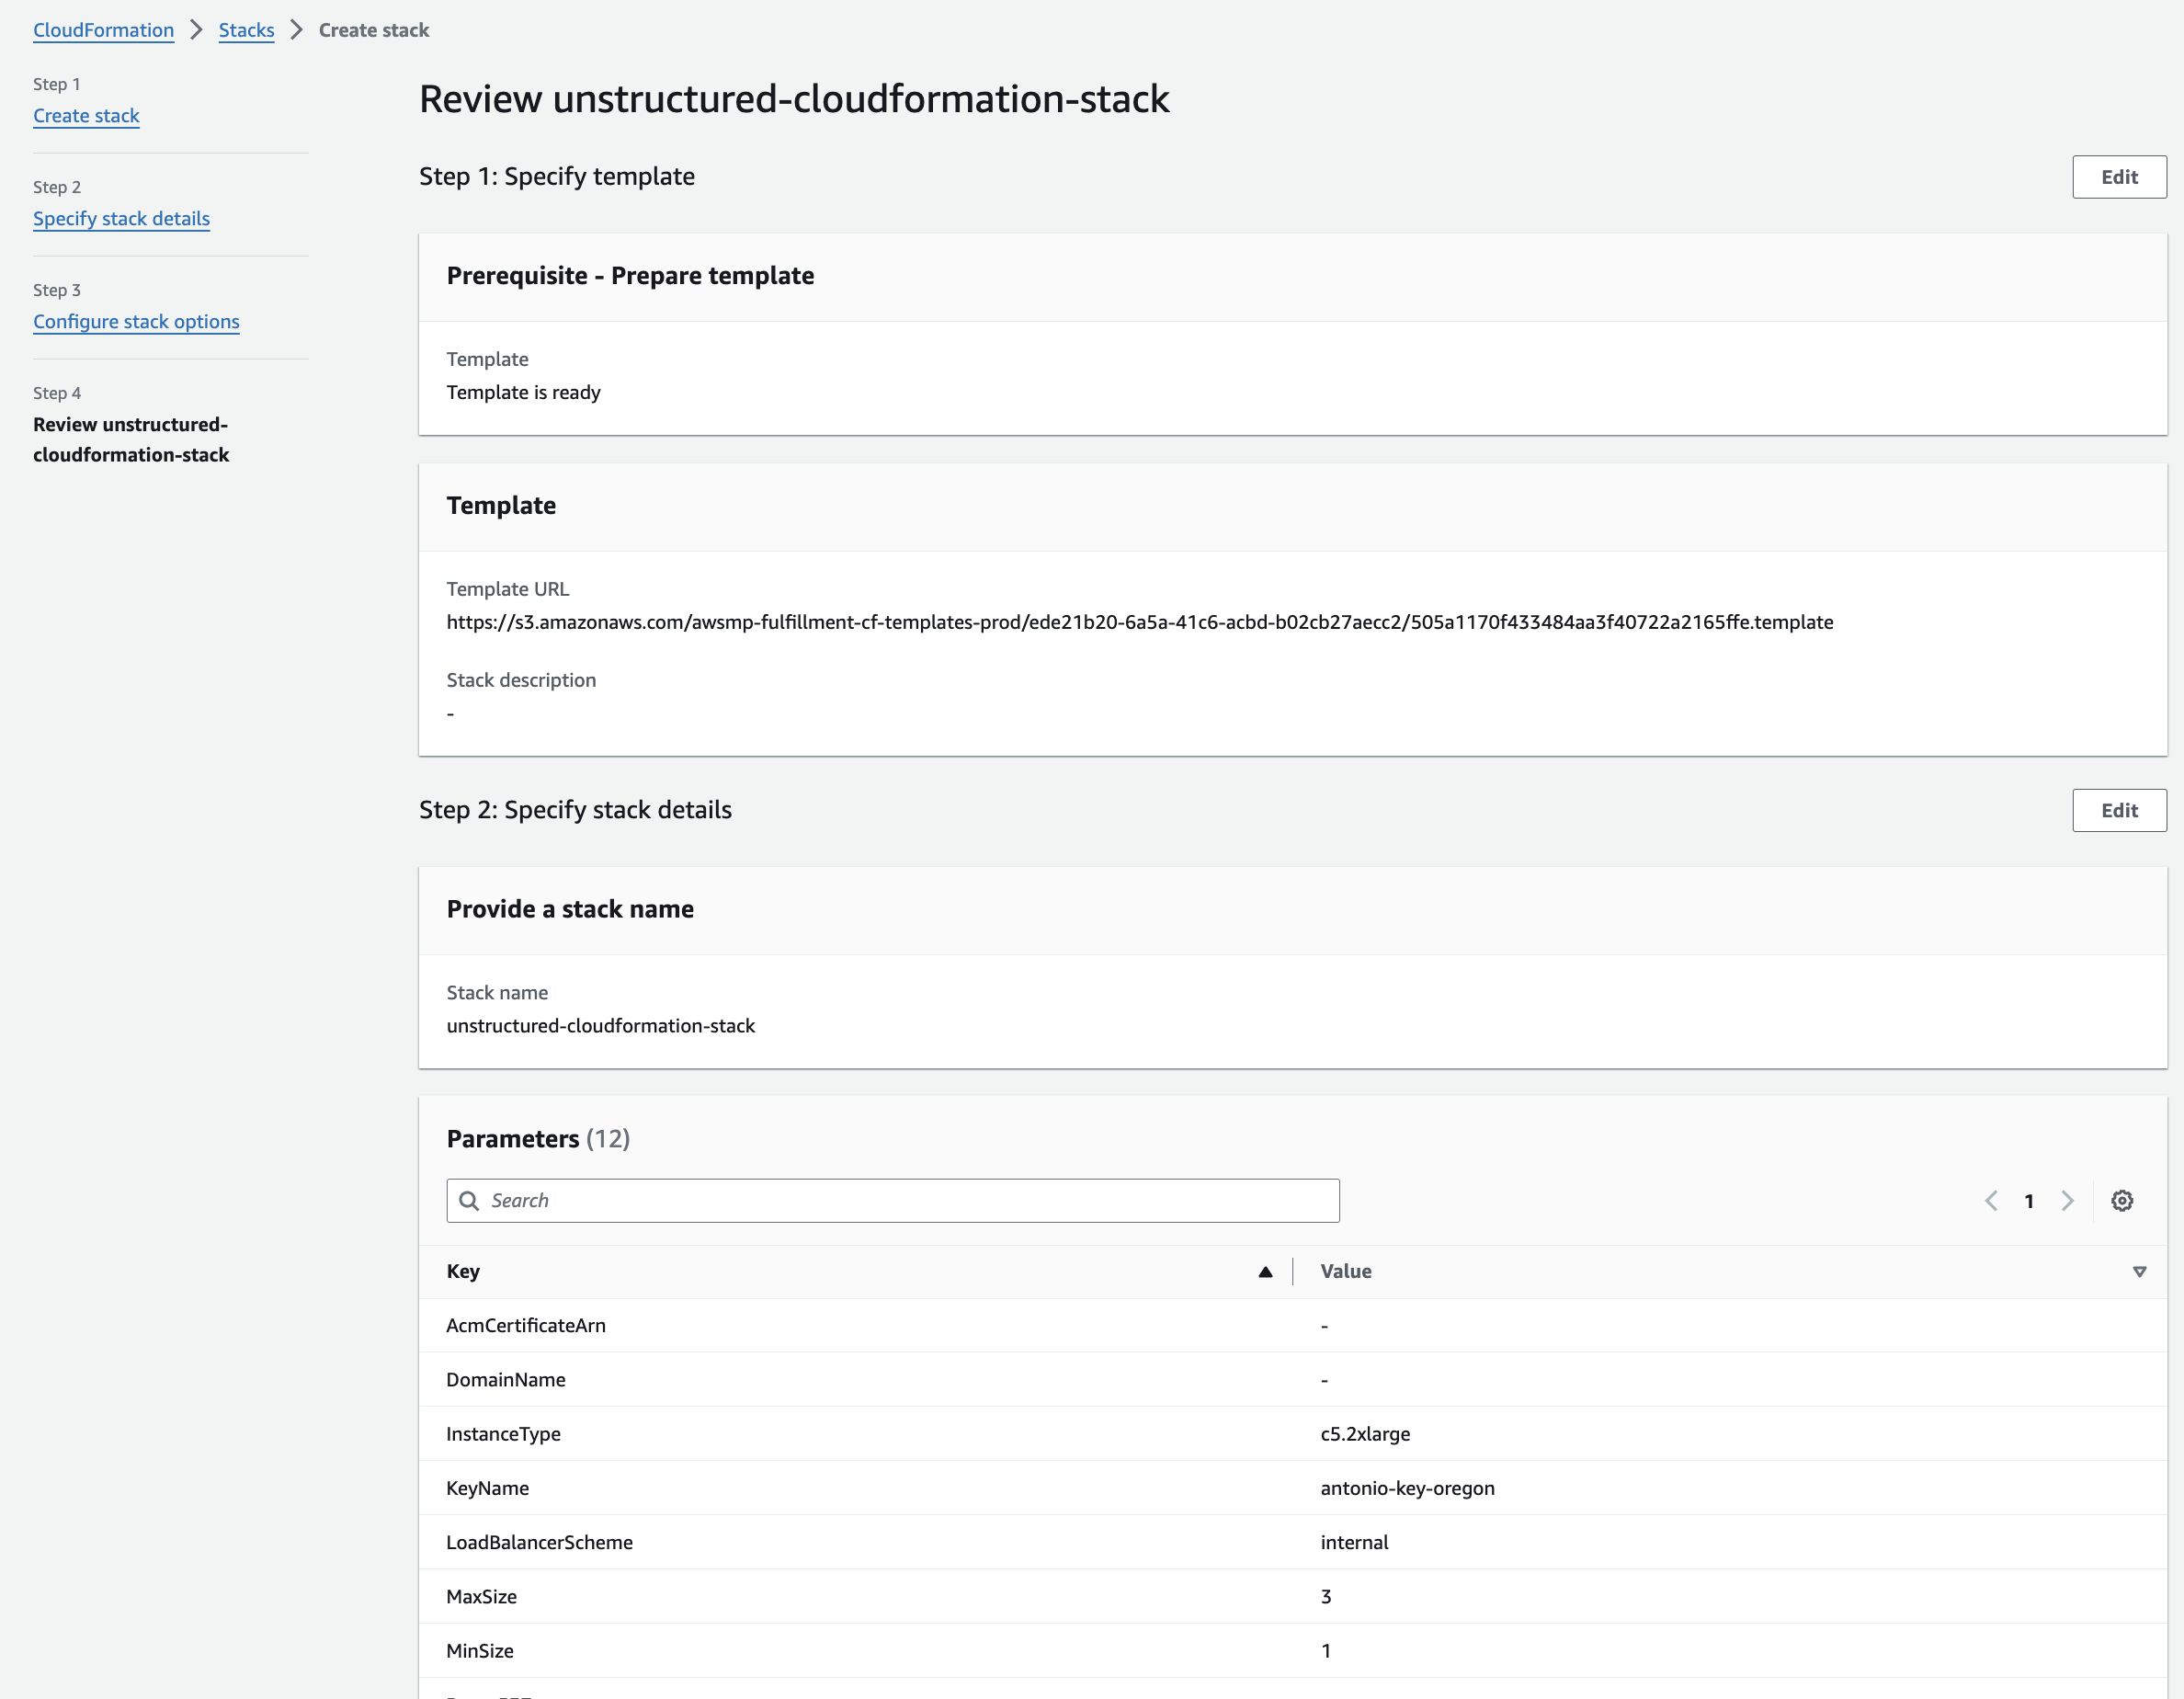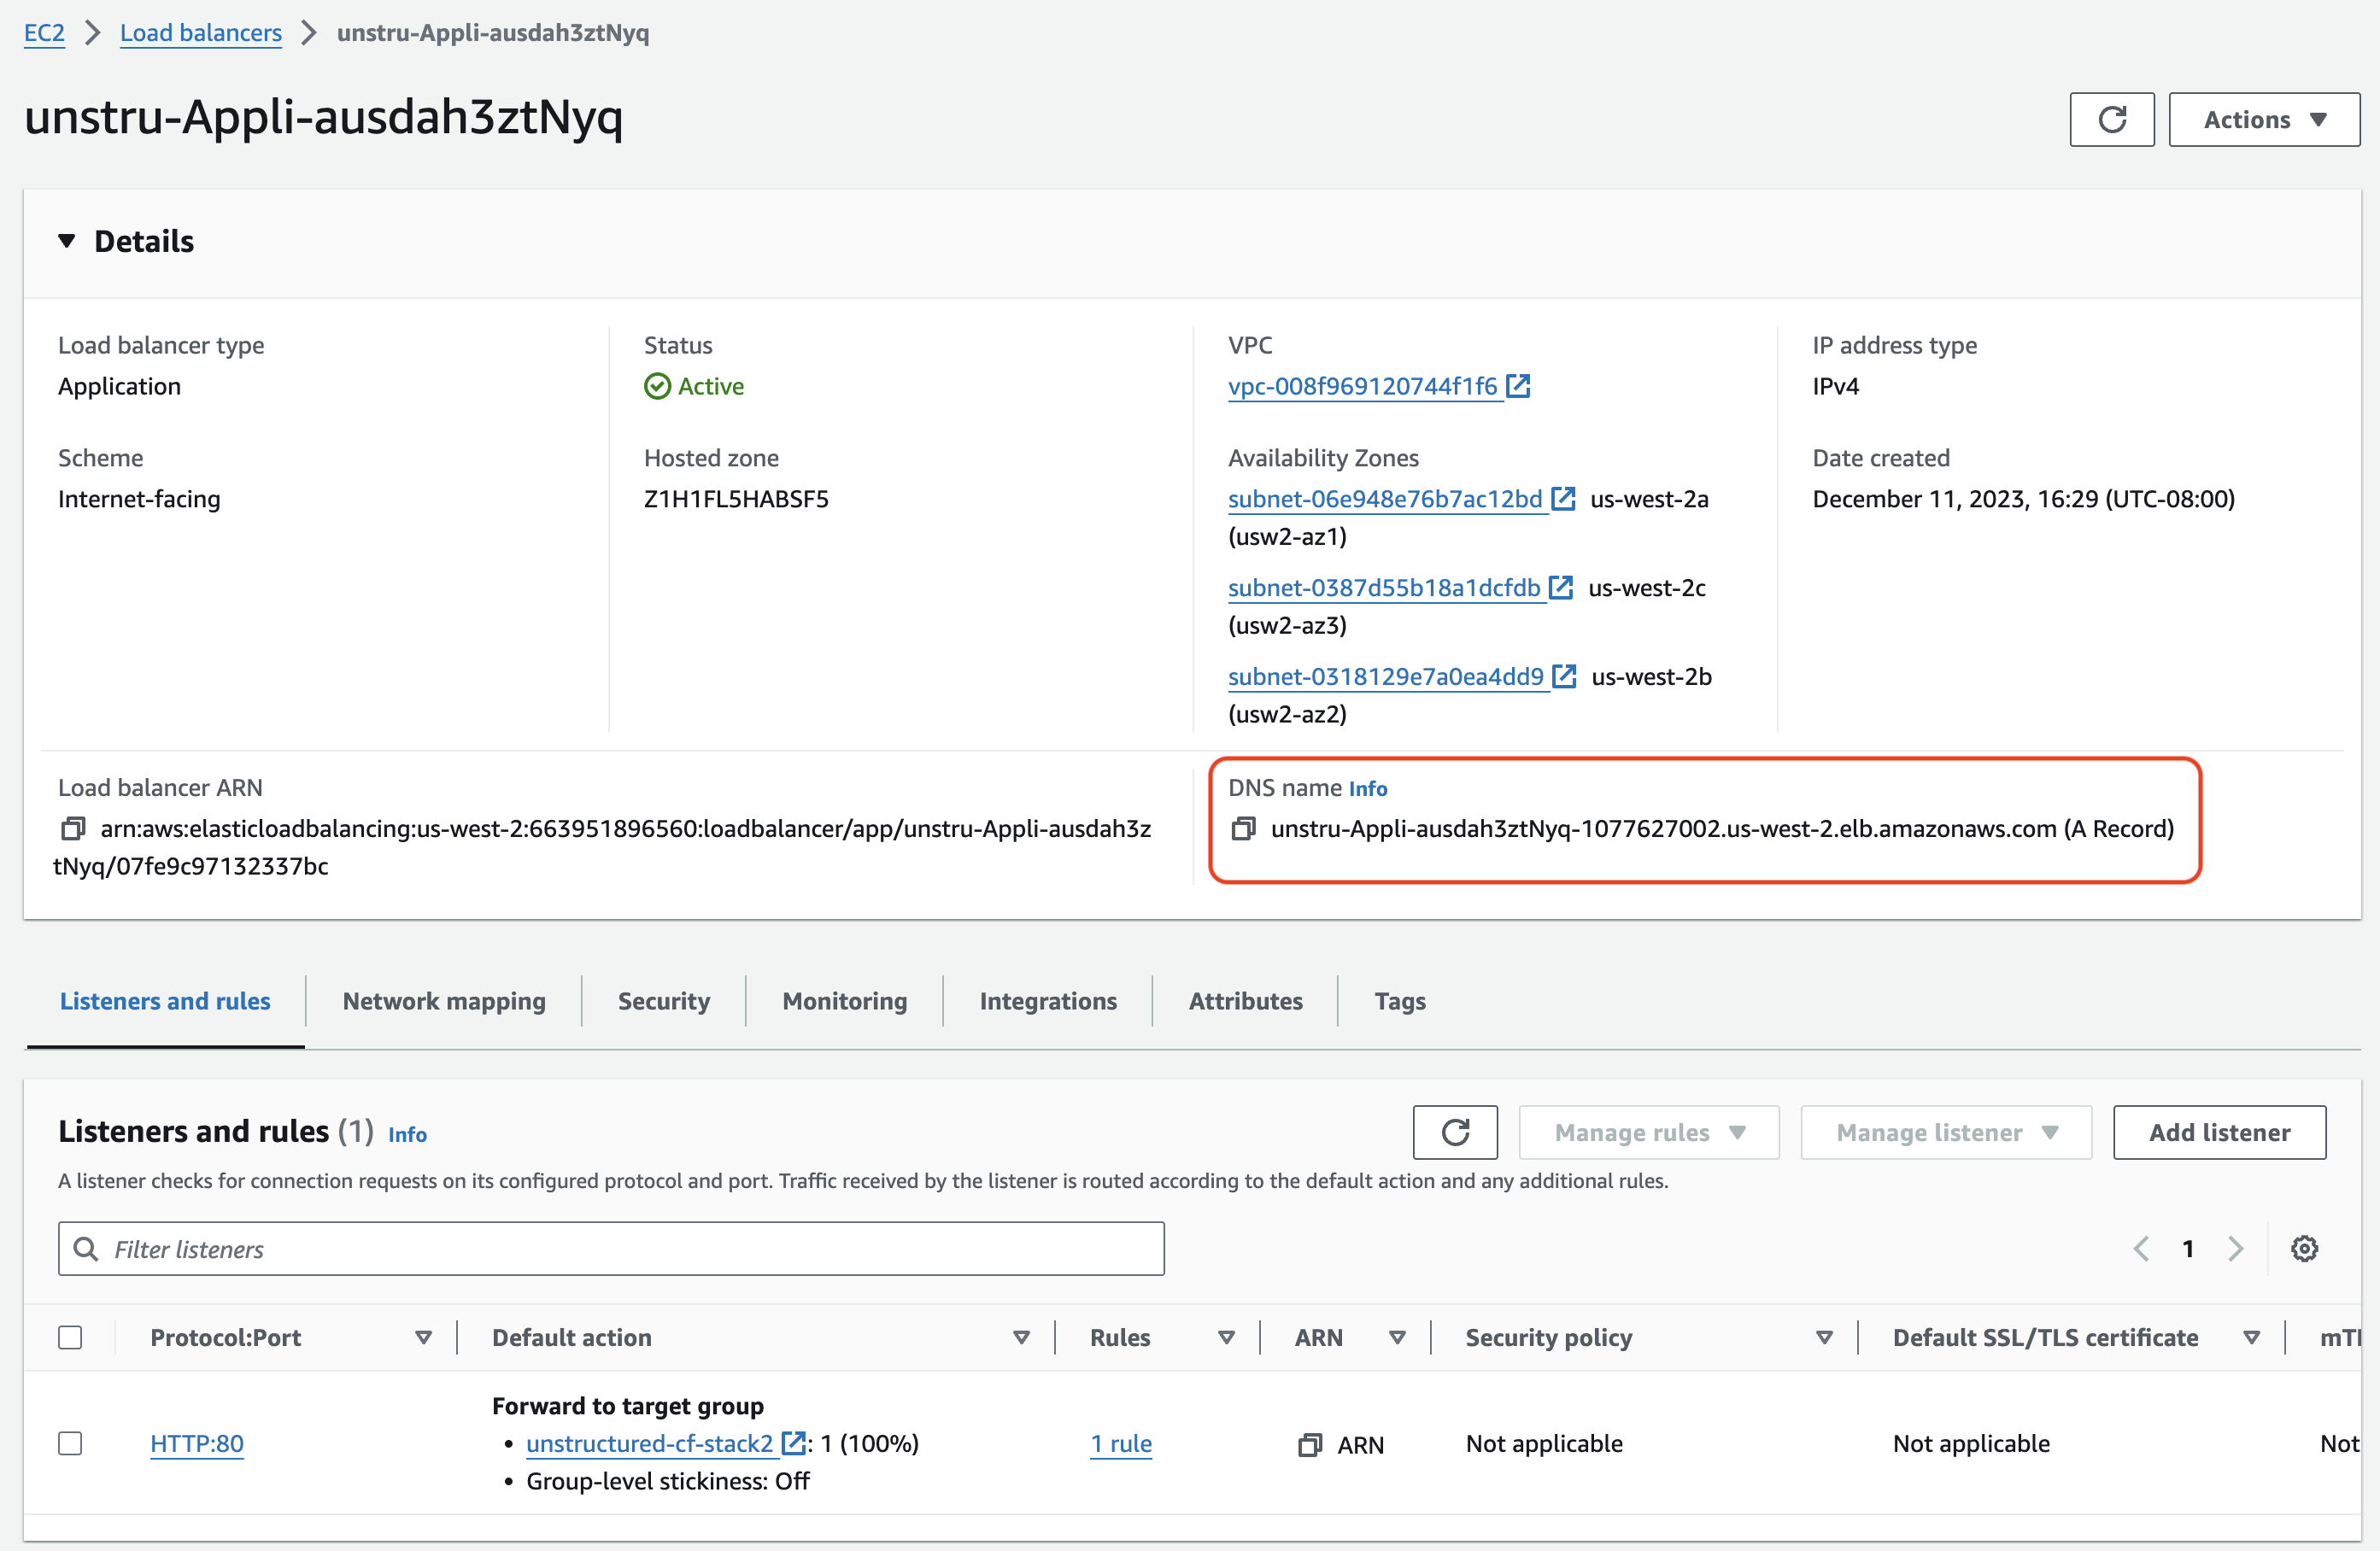
# Unstructured API on AWS Source: https://docs.unstructured.io/api-reference/legacy-api/aws Follow these steps to deploy the Unstructured API service into your AWS account. The Unstructured API on AWS is deprecated. It is no longer supported and is not being actively updated. Unstructured is now available on the AWS Marketplace as a private offering. To explore supported options for running Unstructured within your virtual private cloud (VPC), email Unstructured Sales at [sales@unstructured.io](mailto:sales@unstructured.io). This page is not being actively updated. It might contain out-of-date information. This page is provided for legacy reference purposes only. This article describes how to create several interrelated resources in your AWS account. Your AWS account will be charged on an ongoing basis for these resources, even if you are not actively using them.

Manually stopping or terminating the associated Amazon EC2 instances alone will not reduce these ongoing charges.

To stop accruing all related ongoing charges, you must delete all of the associated AWS resources. To do this, see [Manage related AWS account costs](#manage-related-aws-account-costs).
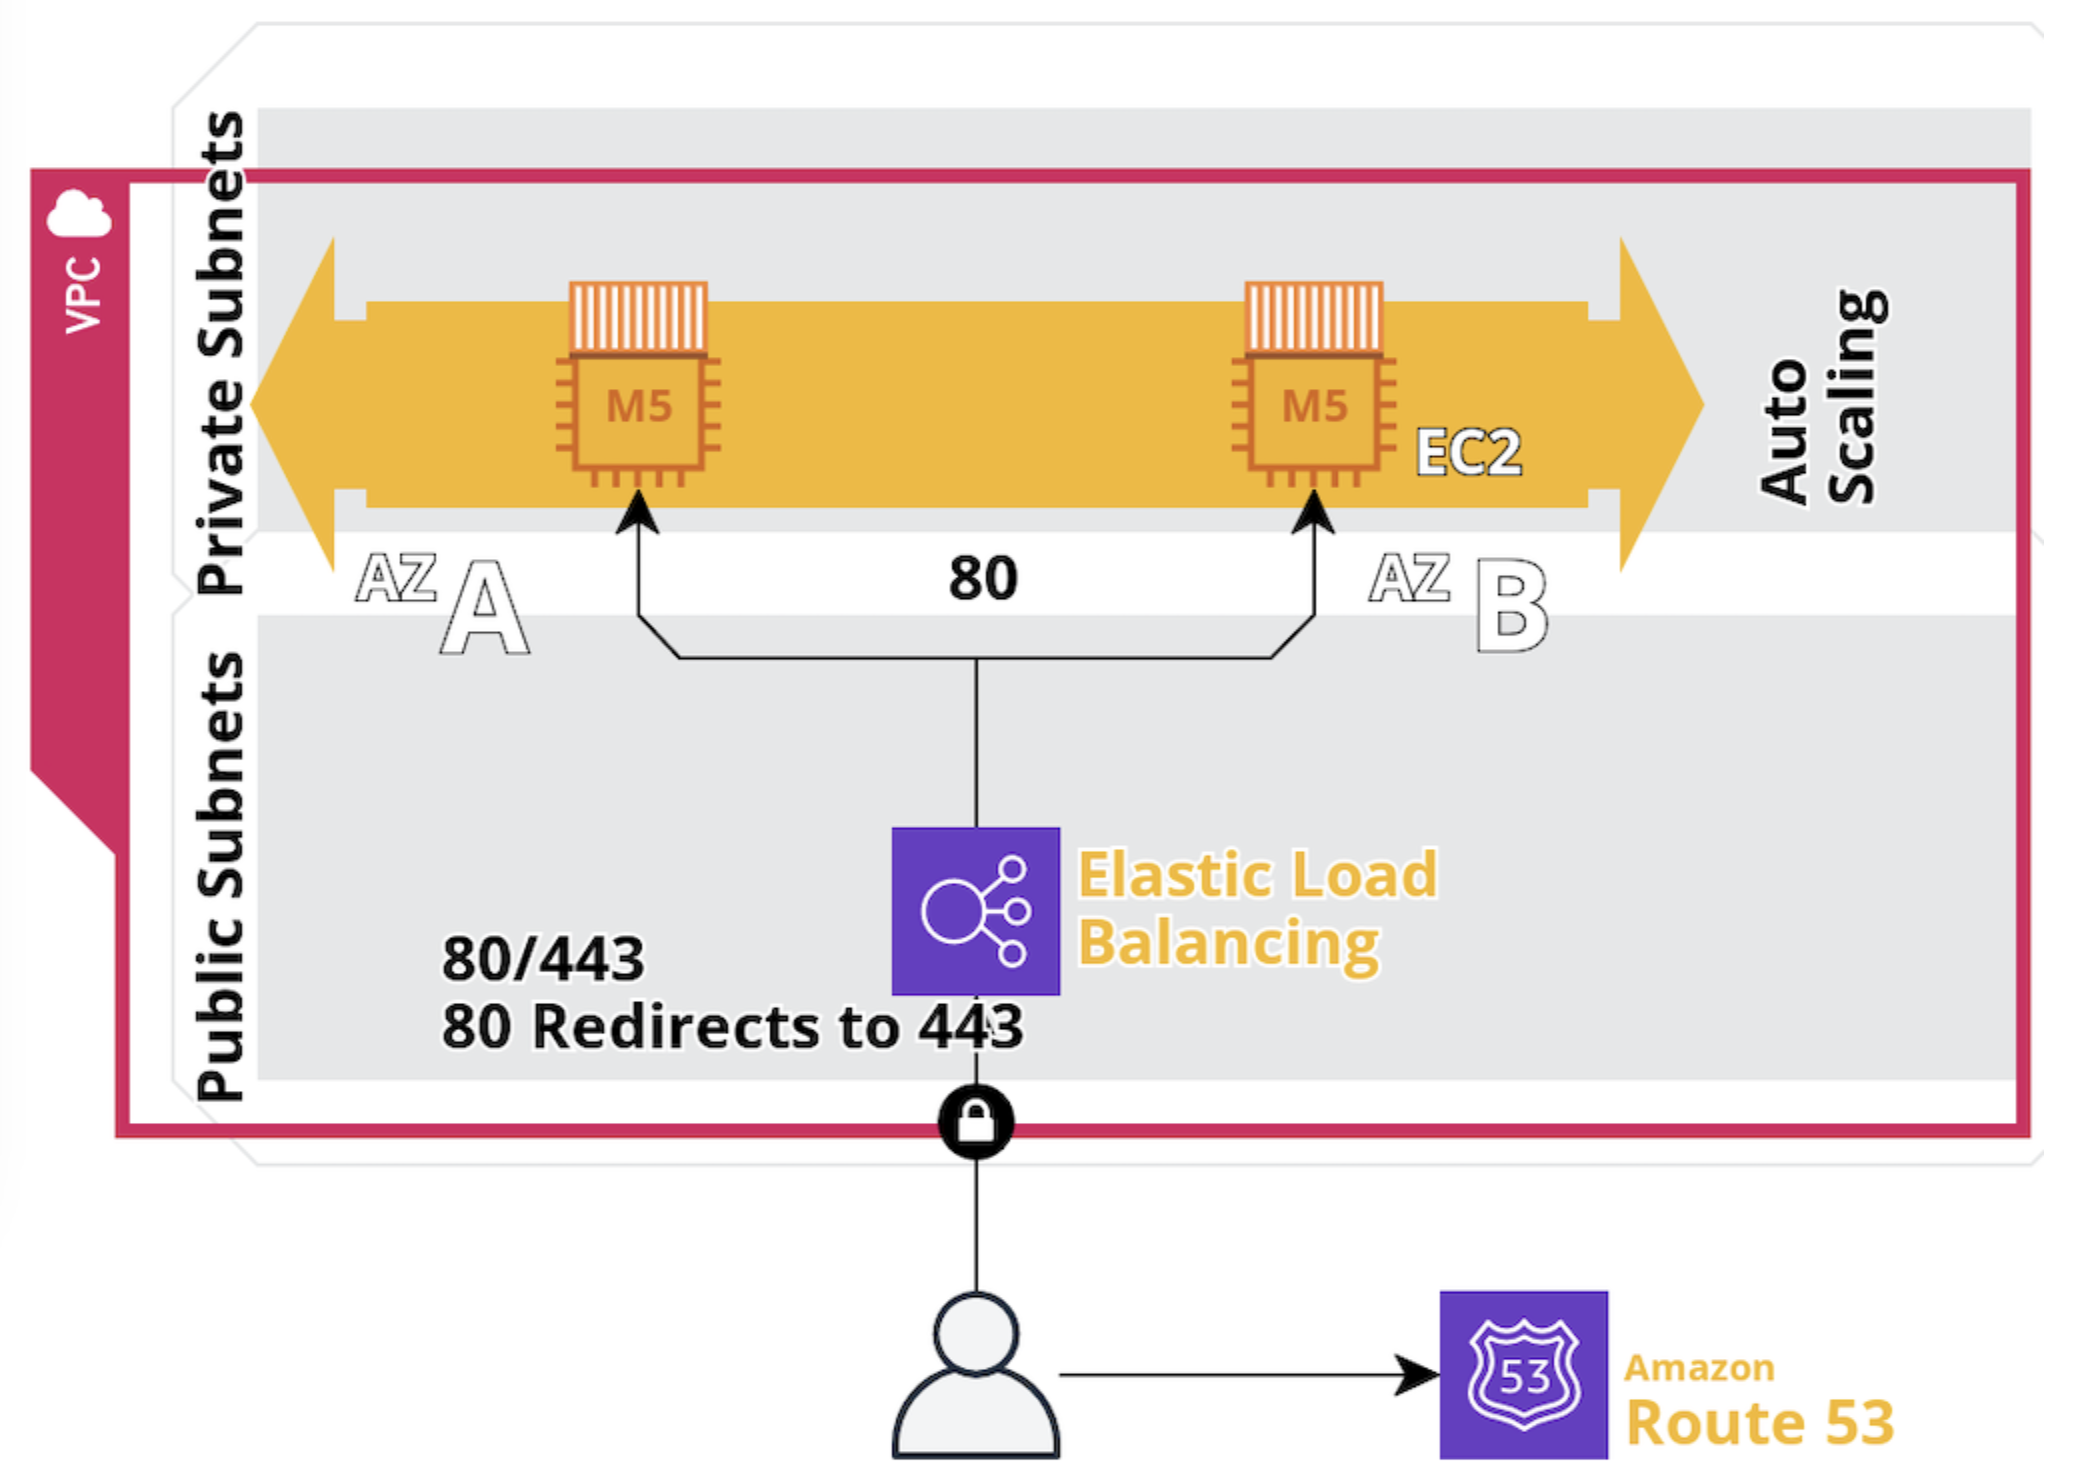
*Estimated time to complete: 30 minutes* The requirements are as follows. 1. **An AWS account**: * If you have an existing account, log in: [https://aws.amazon.com/](https://aws.amazon.com) > **Sign In to the Console**. * If you do not have an existing account, create one: [https://aws.amazon.com/free](https://aws.amazon.com/free) > **Create a Free Account**. 2. **IAM permissions**: In a later step, AWS CloudFormation creates required infrastructure in your account. To learn how to create the associated role, see [Creating IAM Roles with AWS CloudFormation](https://blog.awsfundamentals.com/aws-iam-roles-with-aws-cloudformation#heading-creating-iam-roles-with-aws-cloudformation). 3. **SSH key pair**: For secure access to the Amazon EC2 instance that CloudFormation creates in a later step, create an SSH key pair. To learn how, see [Create a key pair for your Amazon EC2 instance](https://docs.aws.amazon.com/AWSEC2/latest/UserGuide/create-key-pairs.html). ## Part I: Setting up the Virtual Private Cloud (VPC) *Note: If you have already configured a Virtual Private Cloud (VPC) for your organization that meets the requirements for deploying the Unstructured API, you may skip this part and proceed to the Part II. Ensure that your existing VPC setup includes the necessary subnets, internet gateway, and route tables as outlined in this guide.* In Part I, you will construct a resilient and secure infrastructure within AWS by setting up a Virtual Private Cloud (VPC). Your VPC will encompass a dual-tiered subnet model consisting of both **public** and **private** subnets across multiple Availability Zones (AZs). You will establish the foundational network structure for deploying the Unstructured API by creating two public subnets and one private subnet within your VPC. The public subnets will host resources that require direct access to the internet, such as a load balancer, enabling them to communicate with external users. The private subnet is designed for resources that should not be directly accessible from the internet, like EC2 Compute Engine. ![Infrastructure Diagram](https://mintlify.s3.us-west-1.amazonaws.com/unstructured-53/img/api/Infrastructure_Diagram.png) 1. **Access the VPC dashboard**: a. In the AWS Management Console, in the top menu bar, click **Services > Networking & Content Delivery > VPC**.
b. In the sidebar, click **Your VPCs**, and then click **Create VPC**.
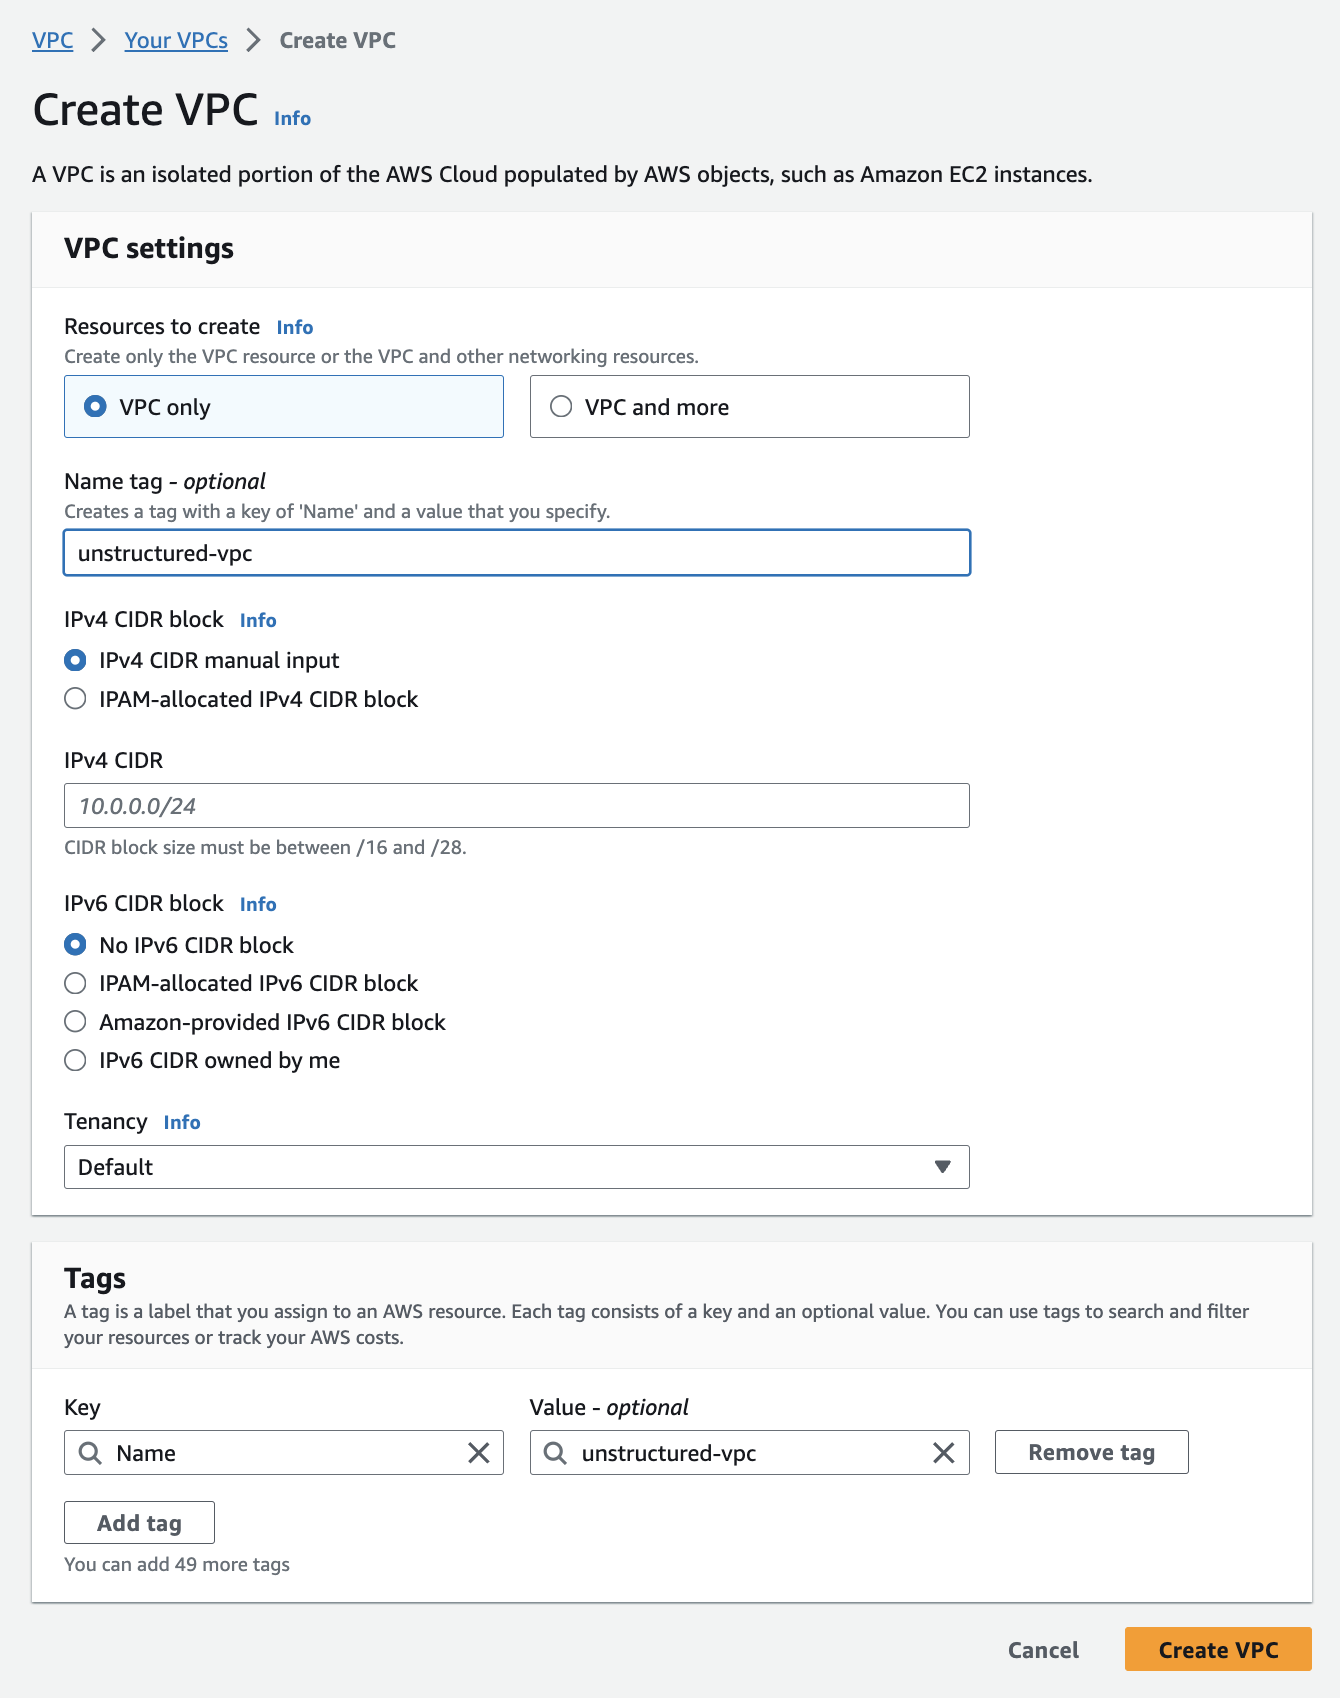
2. **Create the VPC**: a. Select **VPC only**.
b. Enter a **Name tag** for your VPC.
c. Specify the **IPv4 CIDR block** (for example, `10.0.0.0/16`).
d. You may leave **IPv6 CIDR block**, **Tenancy**, and **Tags** settings at their defaults.
e. Click **Create VPC**. ![create vpc](https://mintlify.s3.us-west-1.amazonaws.com/unstructured-53/img/api/VPC_Step2.png) 3. **Create the subnets**: a. After creating the VPC, in the sidebar, click **Subnets**.
b. Click **Create subnet**.
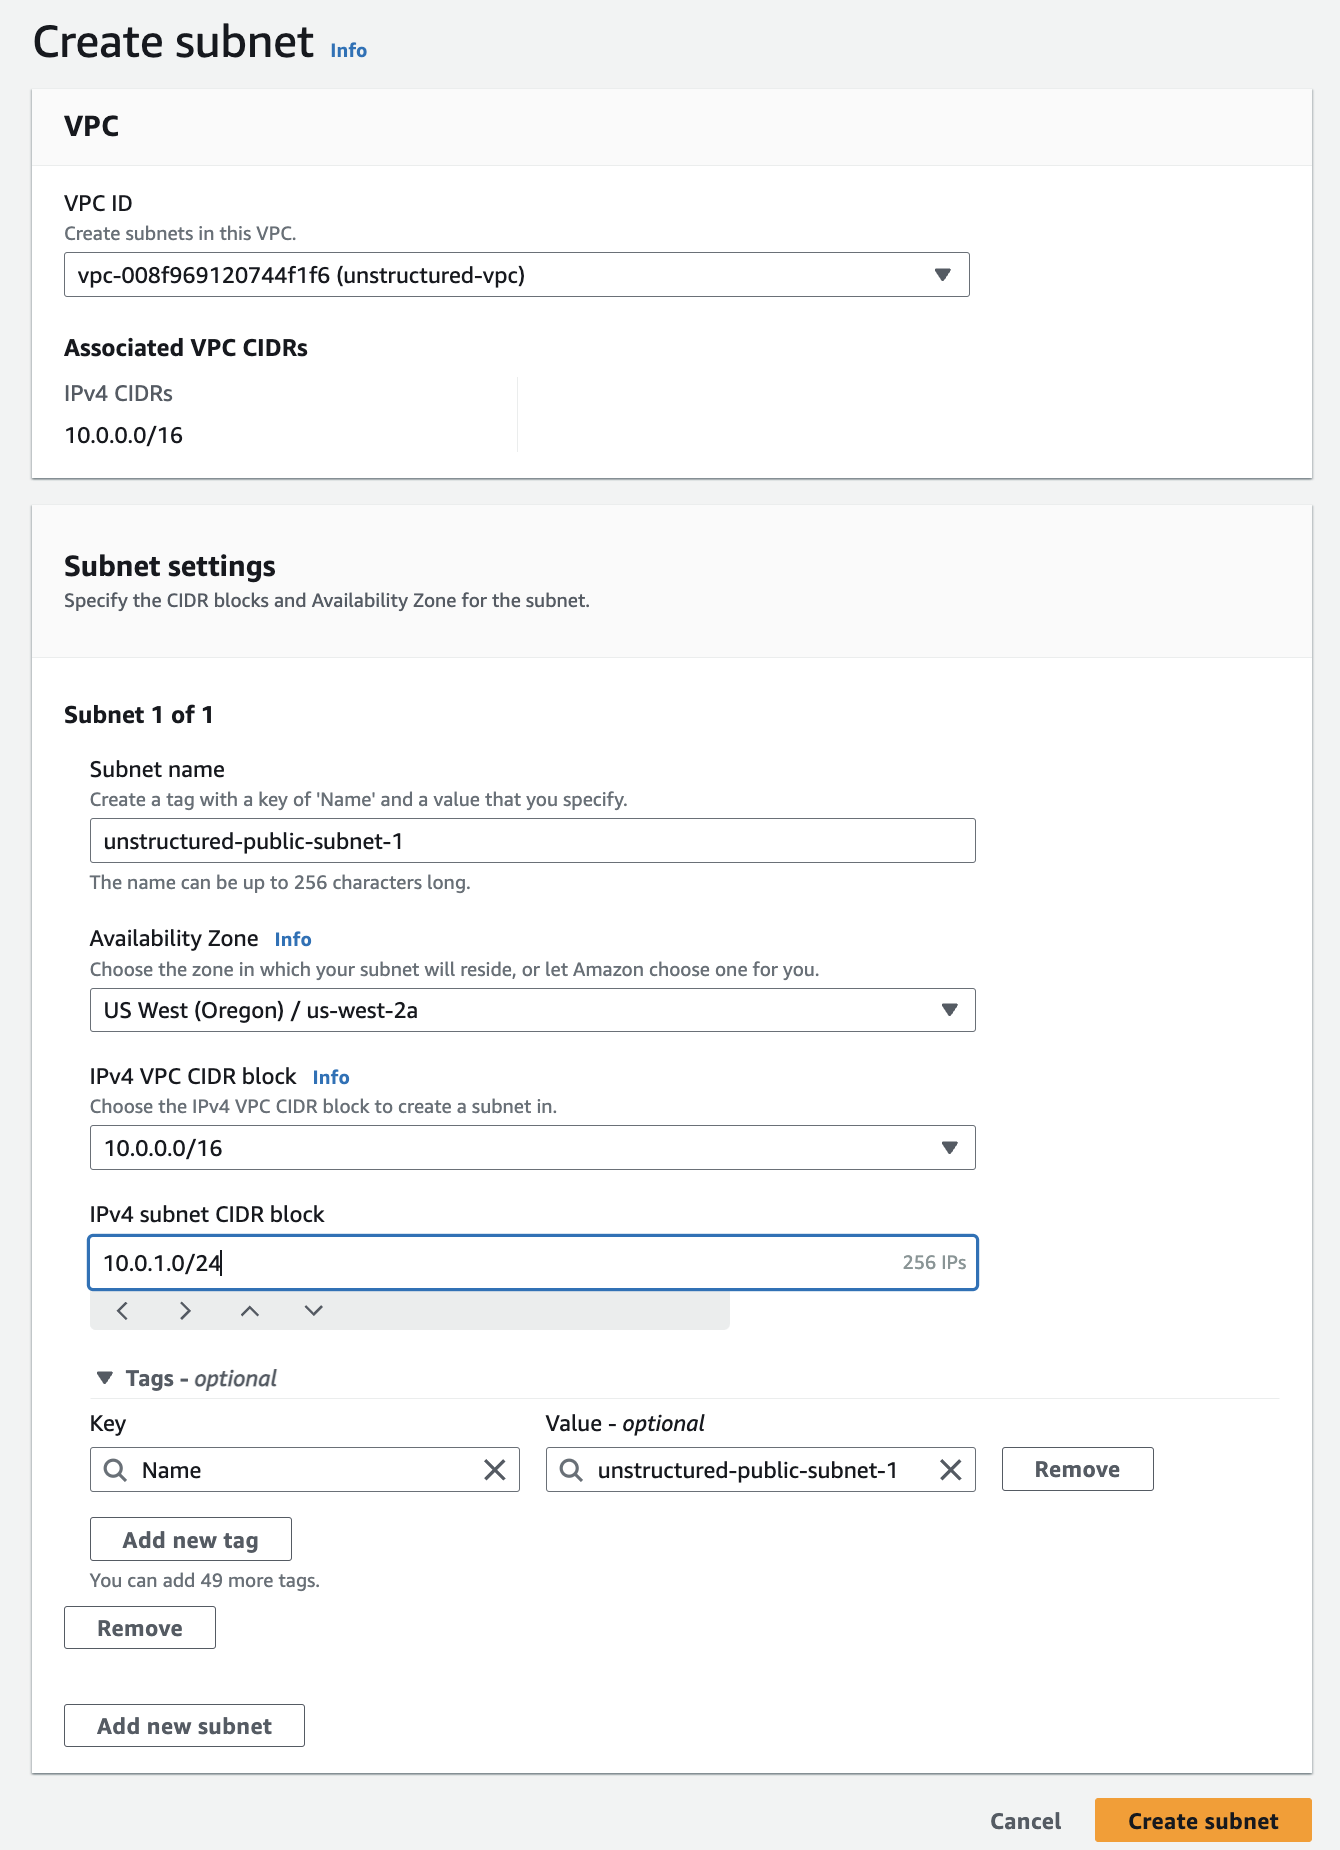
c. In the **VPC ID** dropdown menu. select the VPC that you just created.
d. For the first public subnet:
* Enter a **Subnet name**. * Select an **Availability Zone**. * Specify the **IPv4 CIDR block** (for example, `10.0.0.0/16`). * Specify the **IPv4 subnet CIDR block** (for example, `10.0.1.0/24`). * You may leave the **Tags** setting at its default. * Click **Add new subnet**. (Do not click **Create subnet** yet.) e. Repeat the process for the second public subnet with a different **Availability Zone** and **IPv4 subnet CIDR block** (for example, `10.0.2.0/24`).
* *Note: Each subnet must reside entirely within one Availability Zone and cannot span zones. If you specify the same Availability Zone or IPv4 subnet CIDR block as the first public subnet, AWS CloudFormation might fail in a later step*. * To learn more, see [Subnet basics](https://docs.aws.amazon.com/vpc/latest/userguide/configure-subnets.html#subnet-basics). * Click **Add new subnet**. (Do not click **Create subnet** yet.) f. Repeat the process for the private subnet with a different **Availability Zone** and **IPv4 subnet CIDR block** (for example, `10.0.3.0/24`).
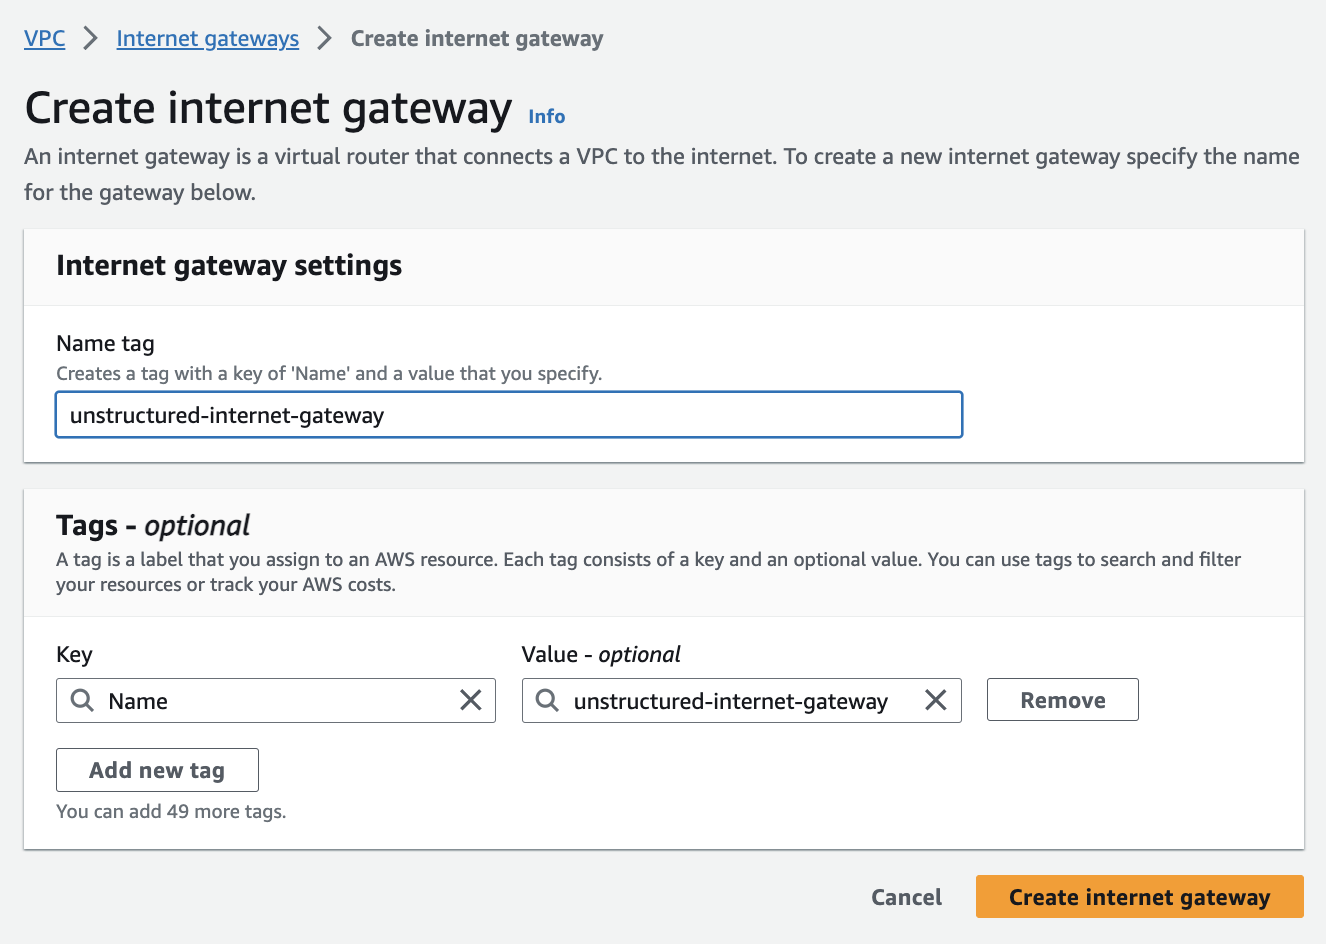
* *Note: Each subnet must reside entirely within one Availability Zone and cannot span zones. If you specify the same Availability Zone or IPv4 subnet CIDR block as the first or second public subnets, AWS CloudFormation might fail in a later step*. g. Click **Create subnet**. ![create subnet](https://mintlify.s3.us-west-1.amazonaws.com/unstructured-53/img/api/VPC_Step3.png) 4. **Create the internet gateway (for the public subnets)**: a. In the sidebar, click **Internet gateways**.
b. Click **Create internet gateway**, enter a **Name tag**, and click **Create internet gateway**.
c. In the sidebar, click **Internet gateways** again.
d. Click the **Internet gateway ID** for the internet gateway that you just created.
e. Click **Actions > Attach to VPC**.
f. In the **Available VPCs** dropdown list, select the VPC from *Step 2 - Create the VPC*.
g. Click **Attach internet gateway**.
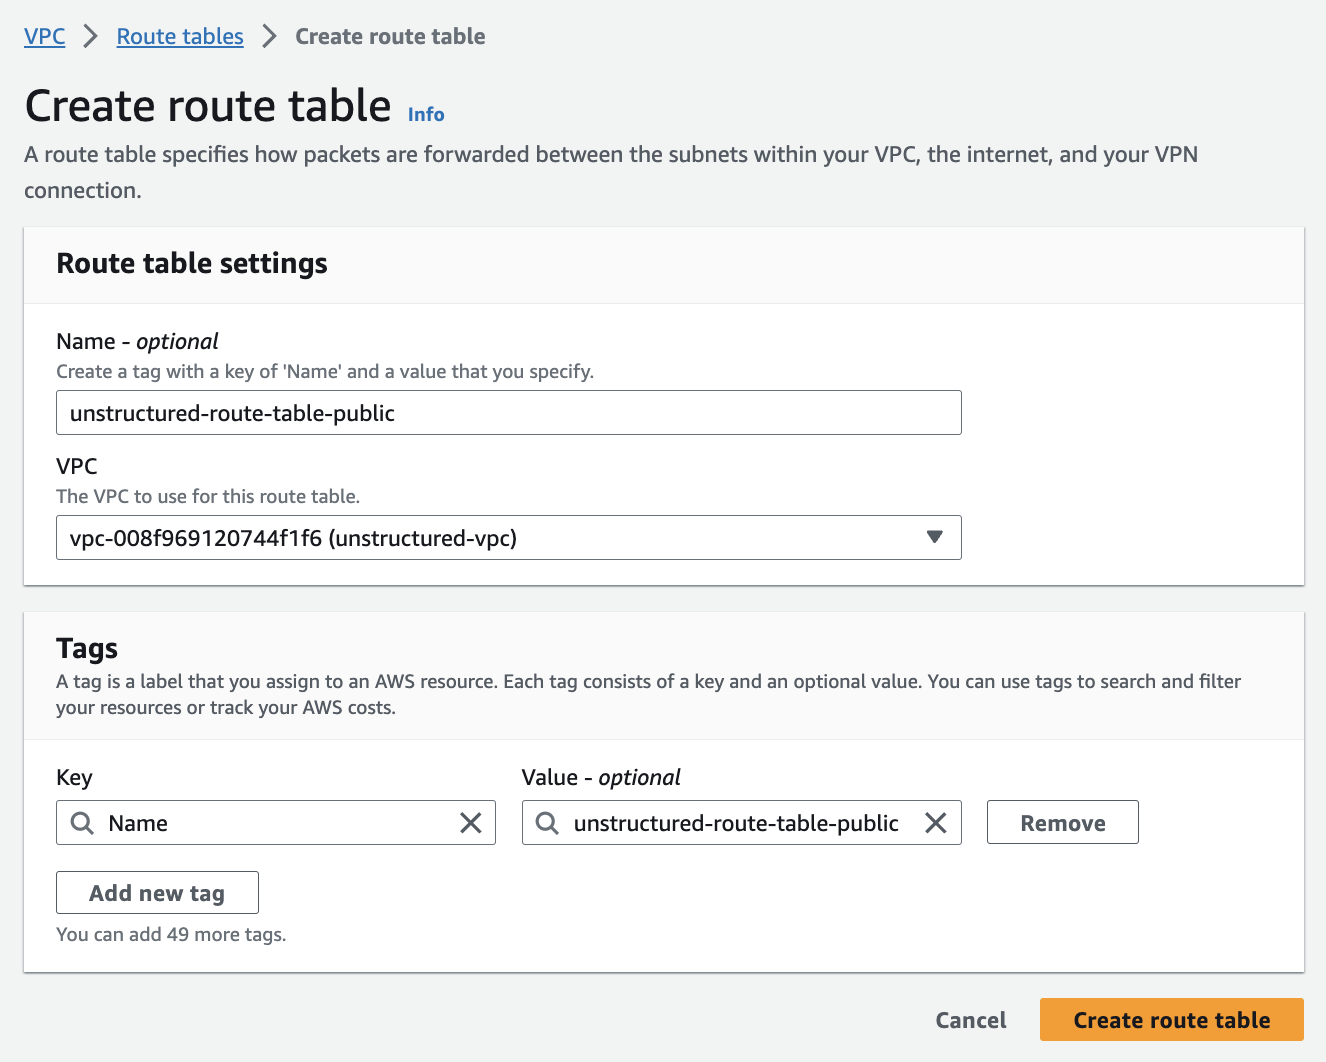
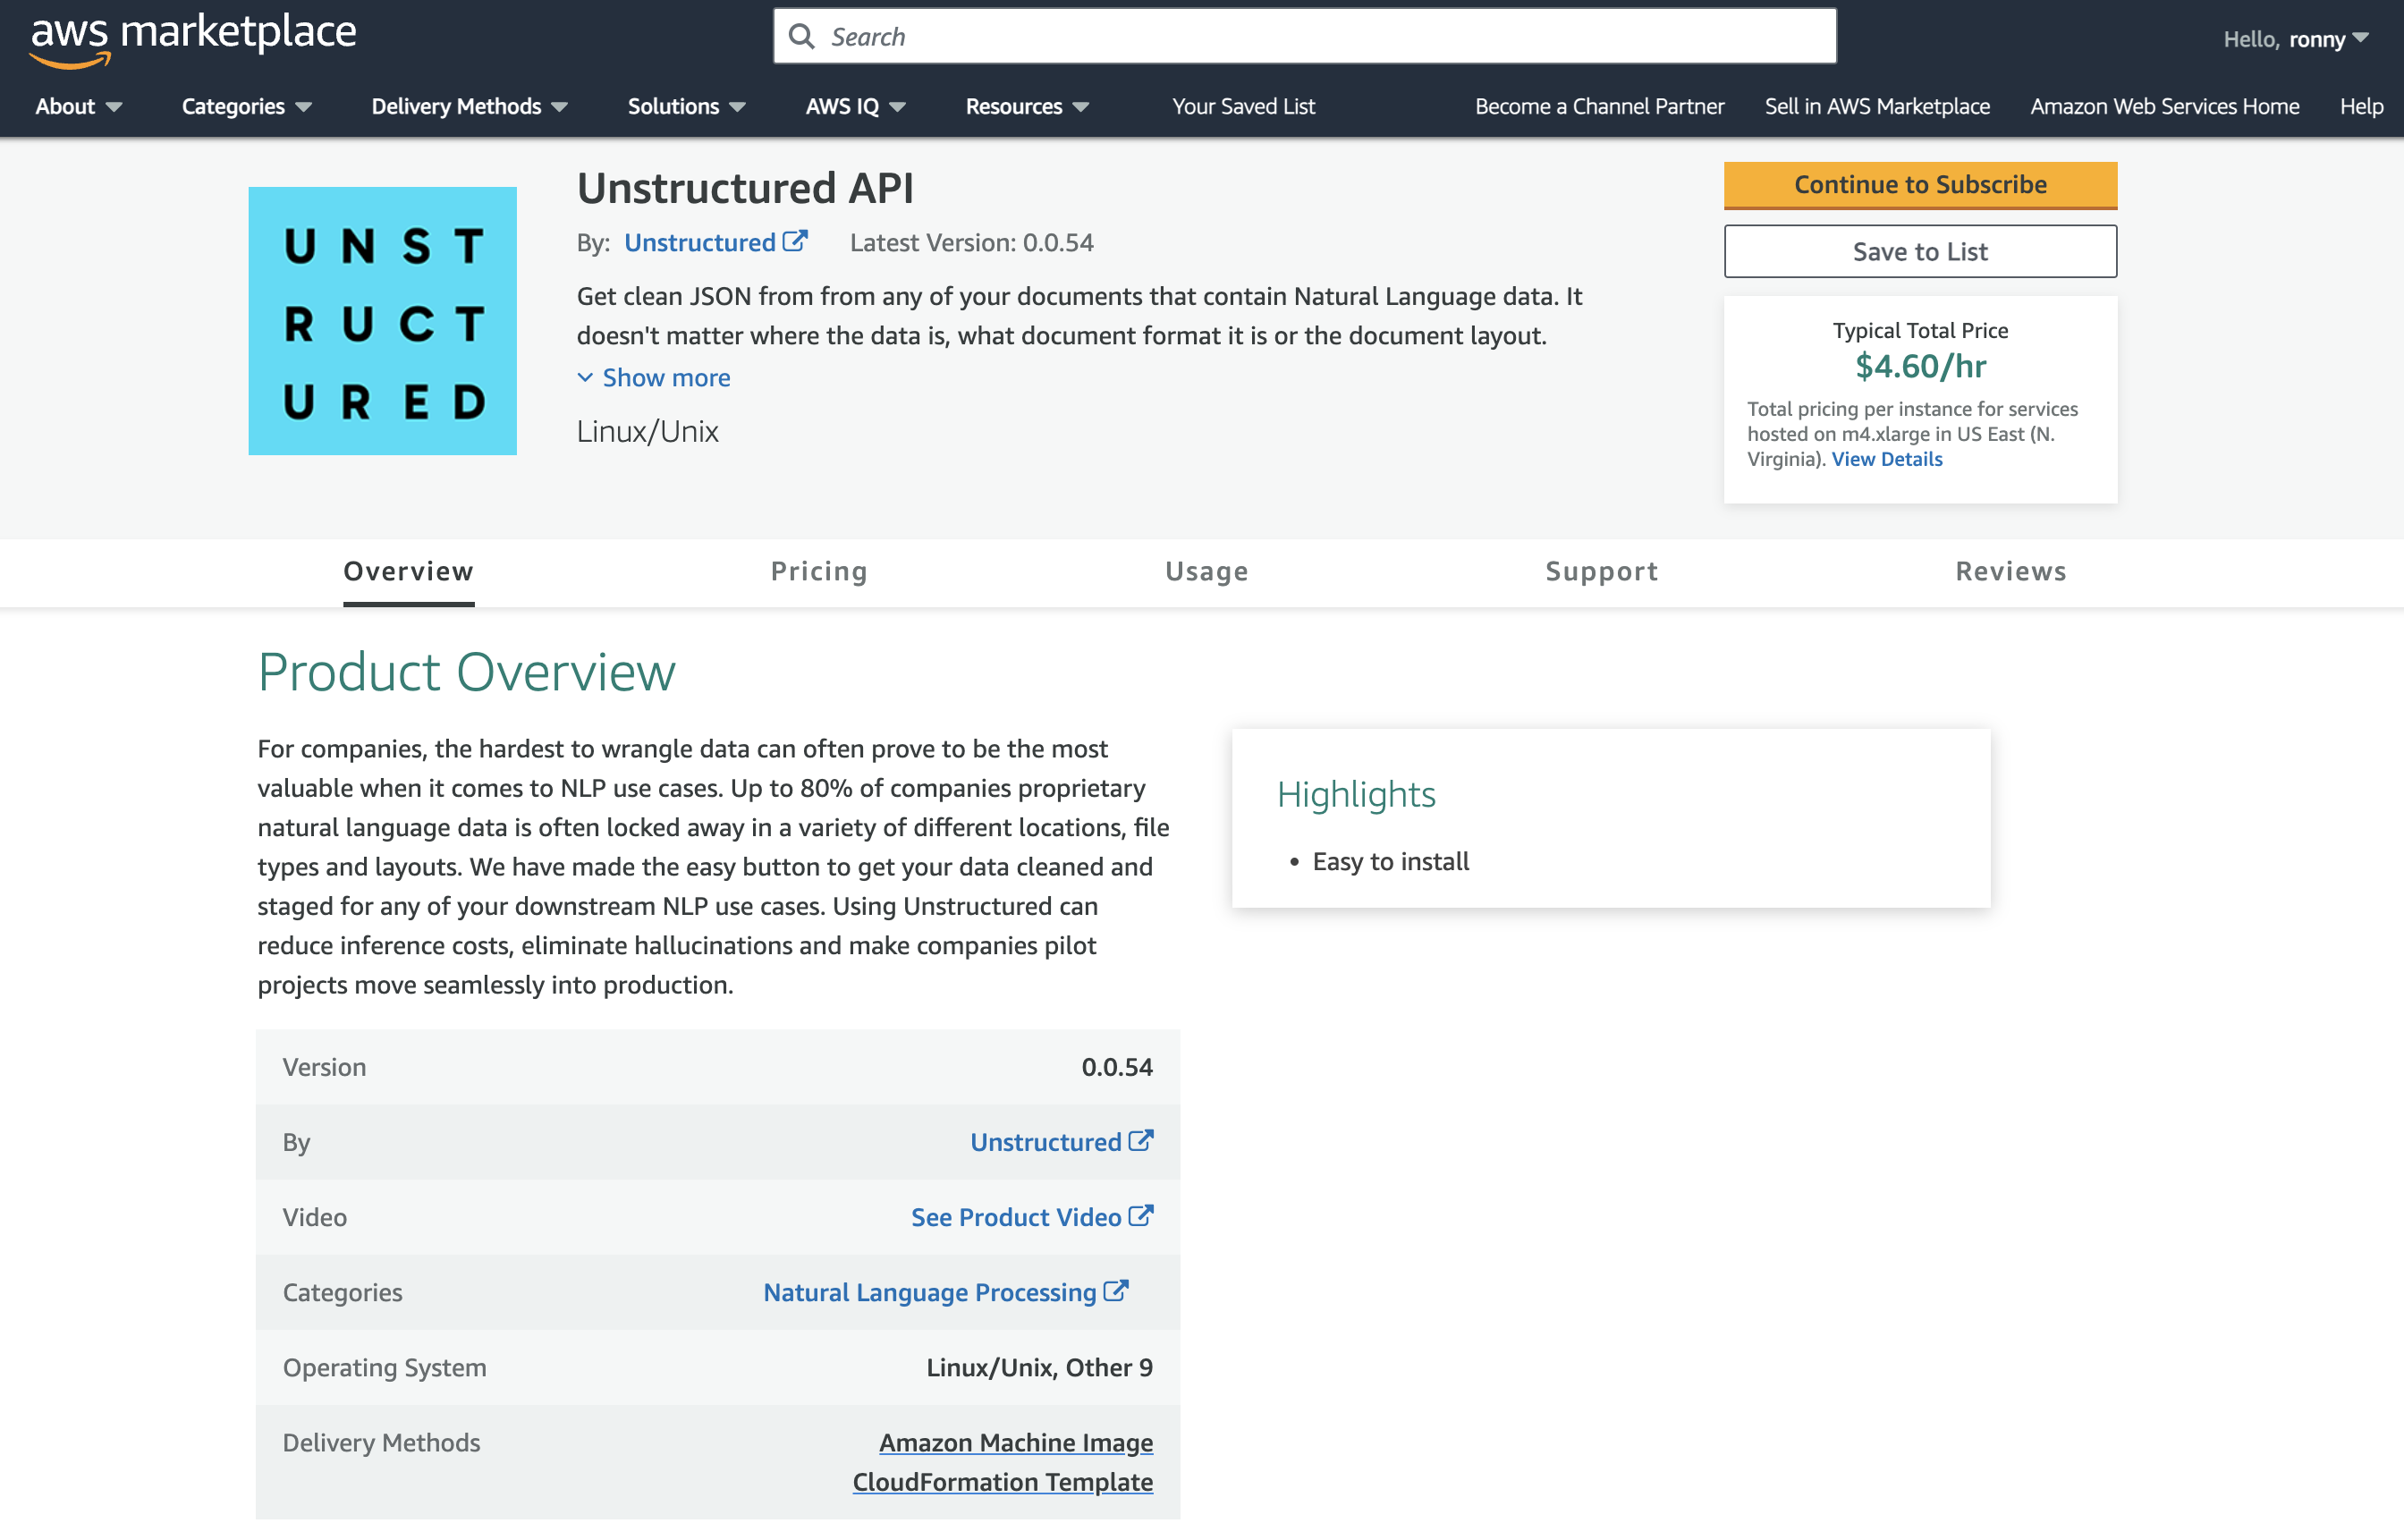
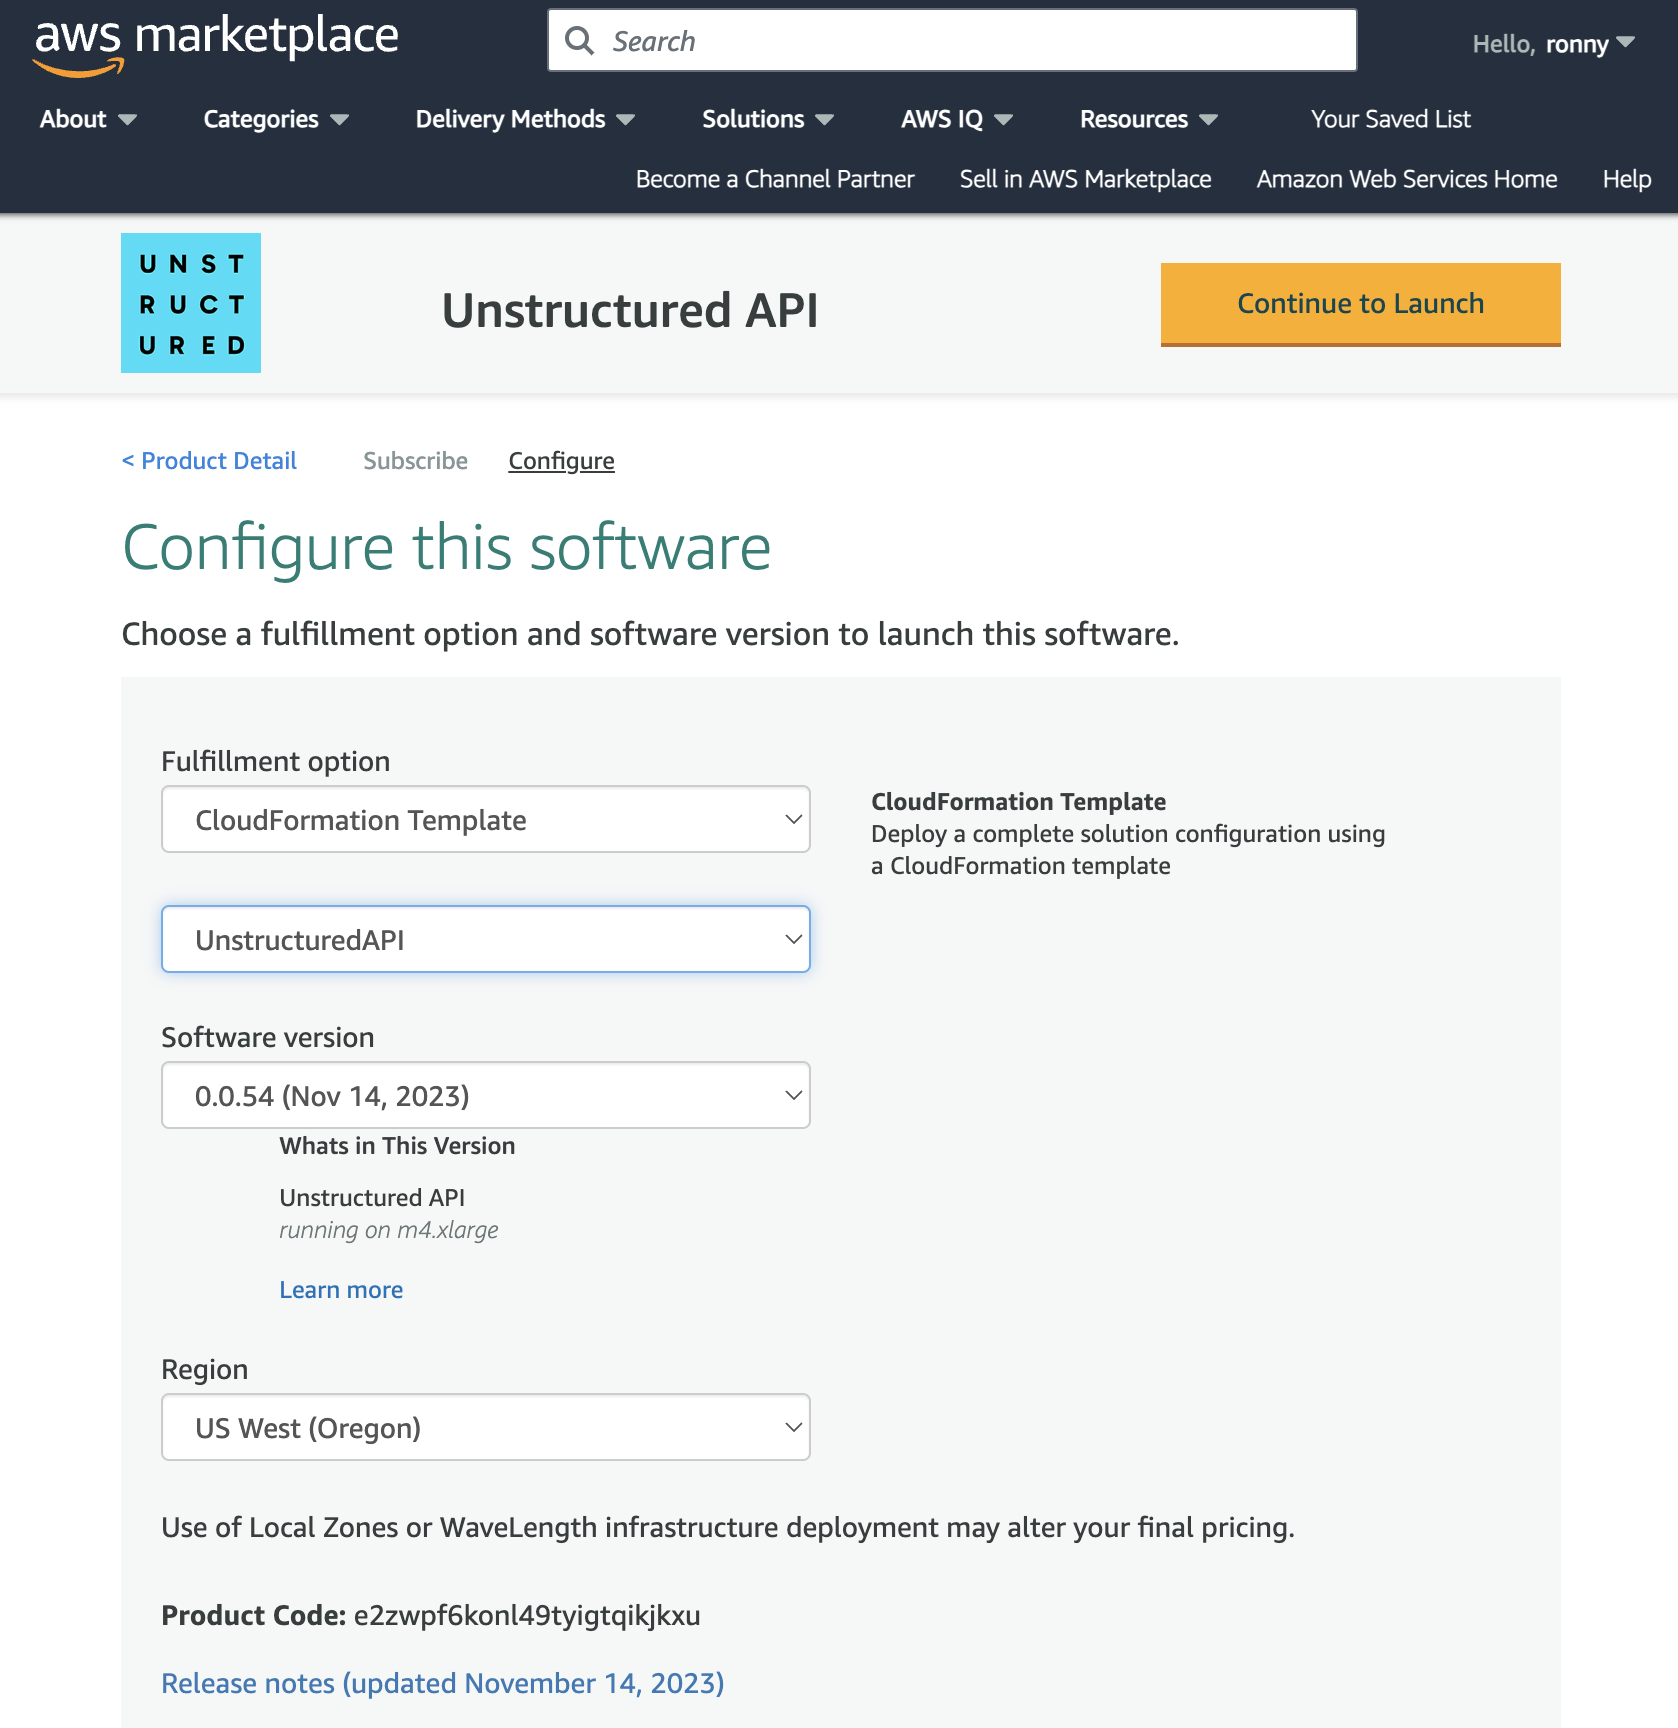
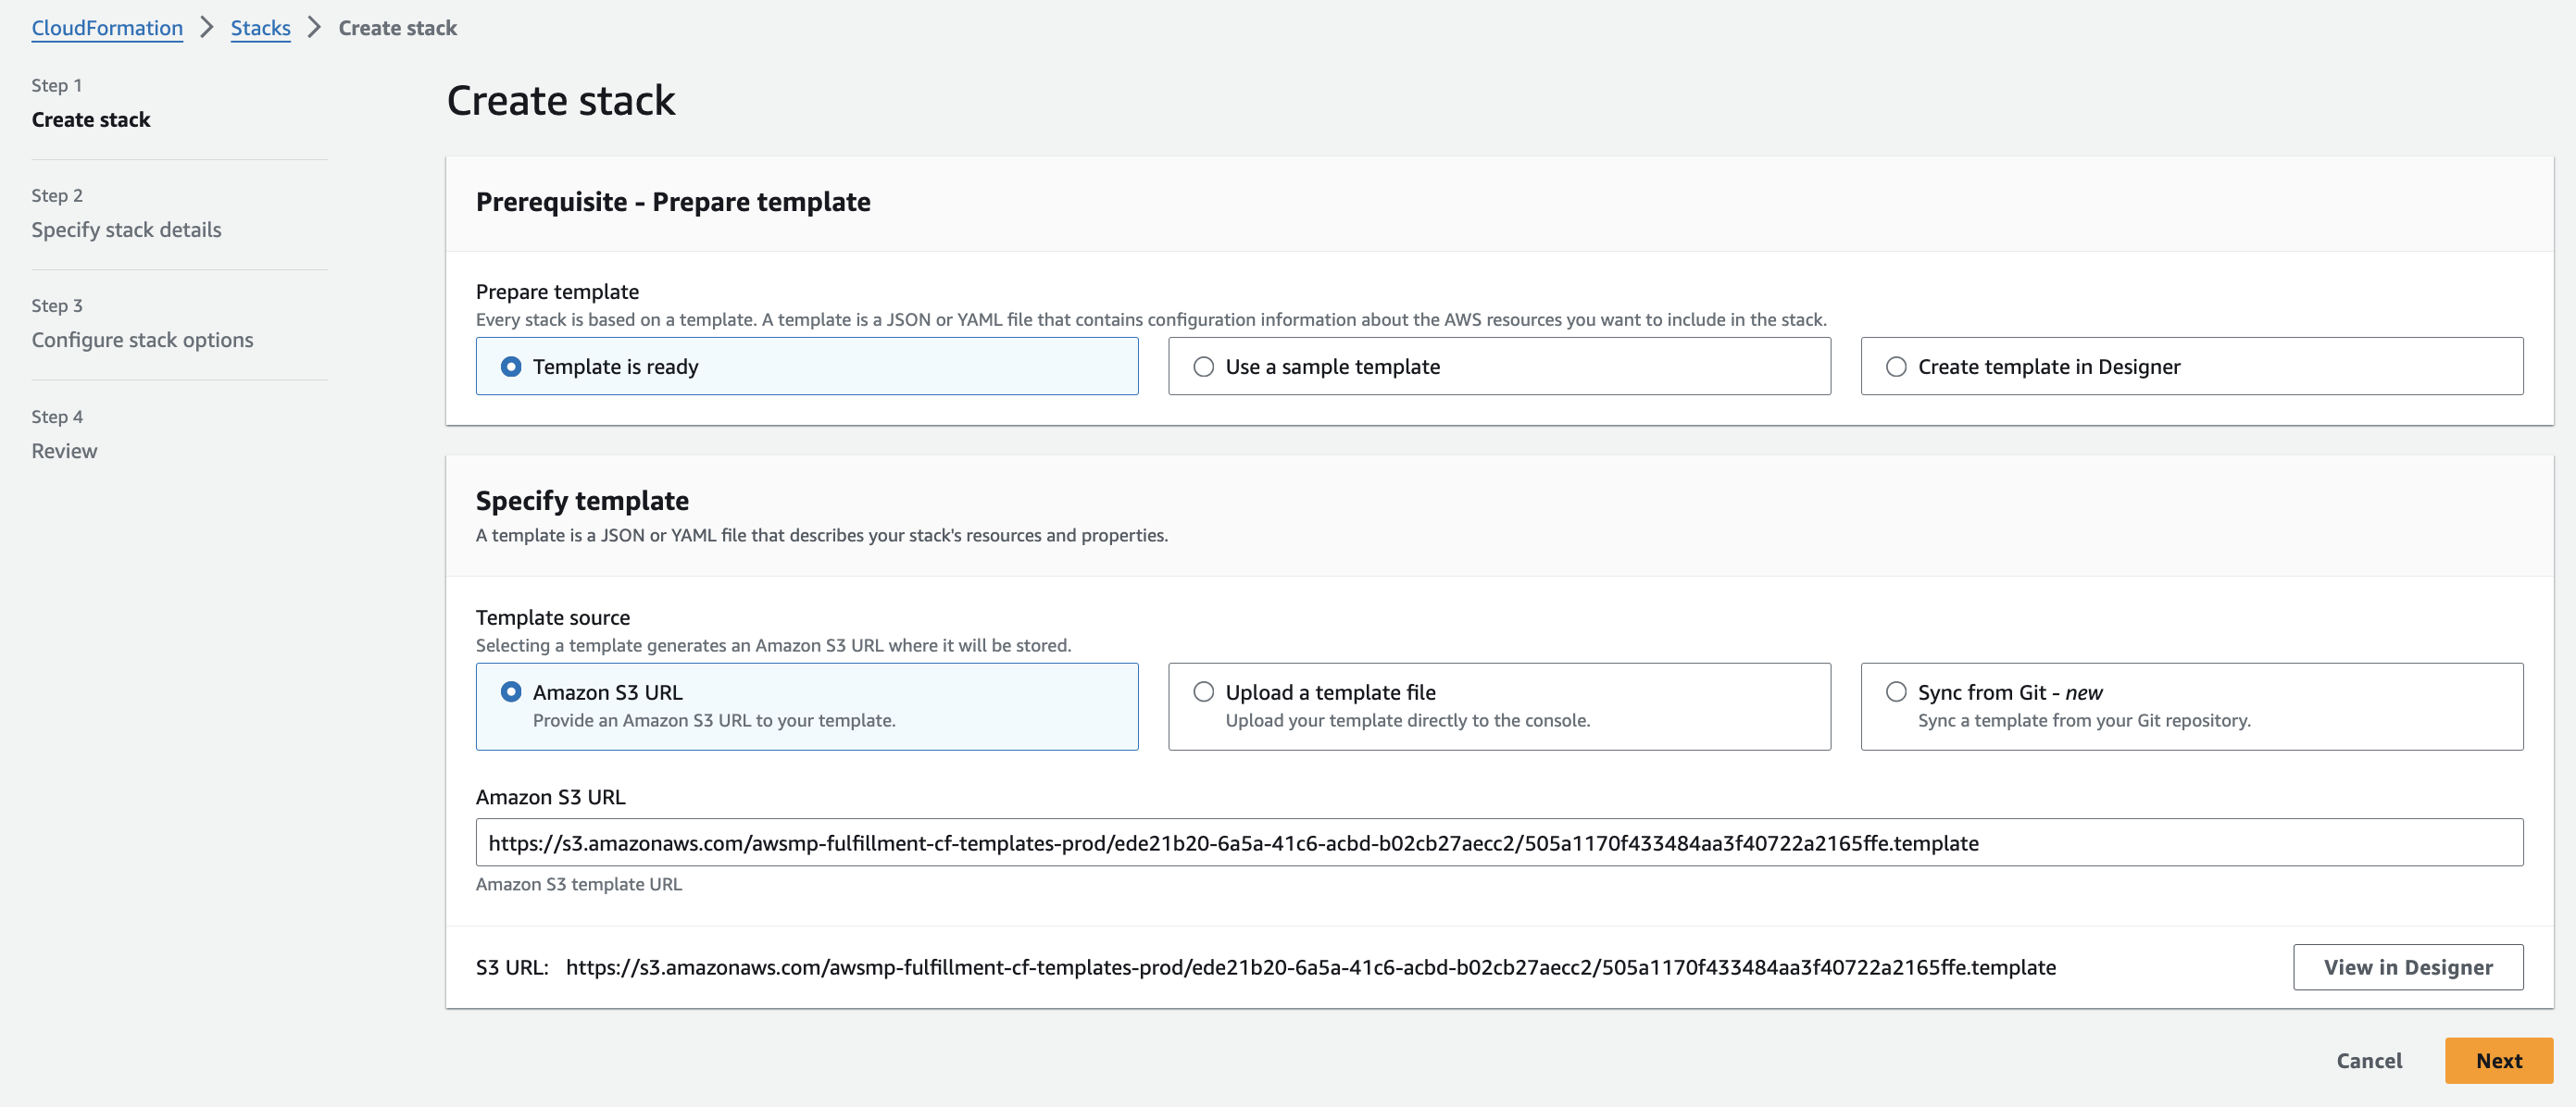
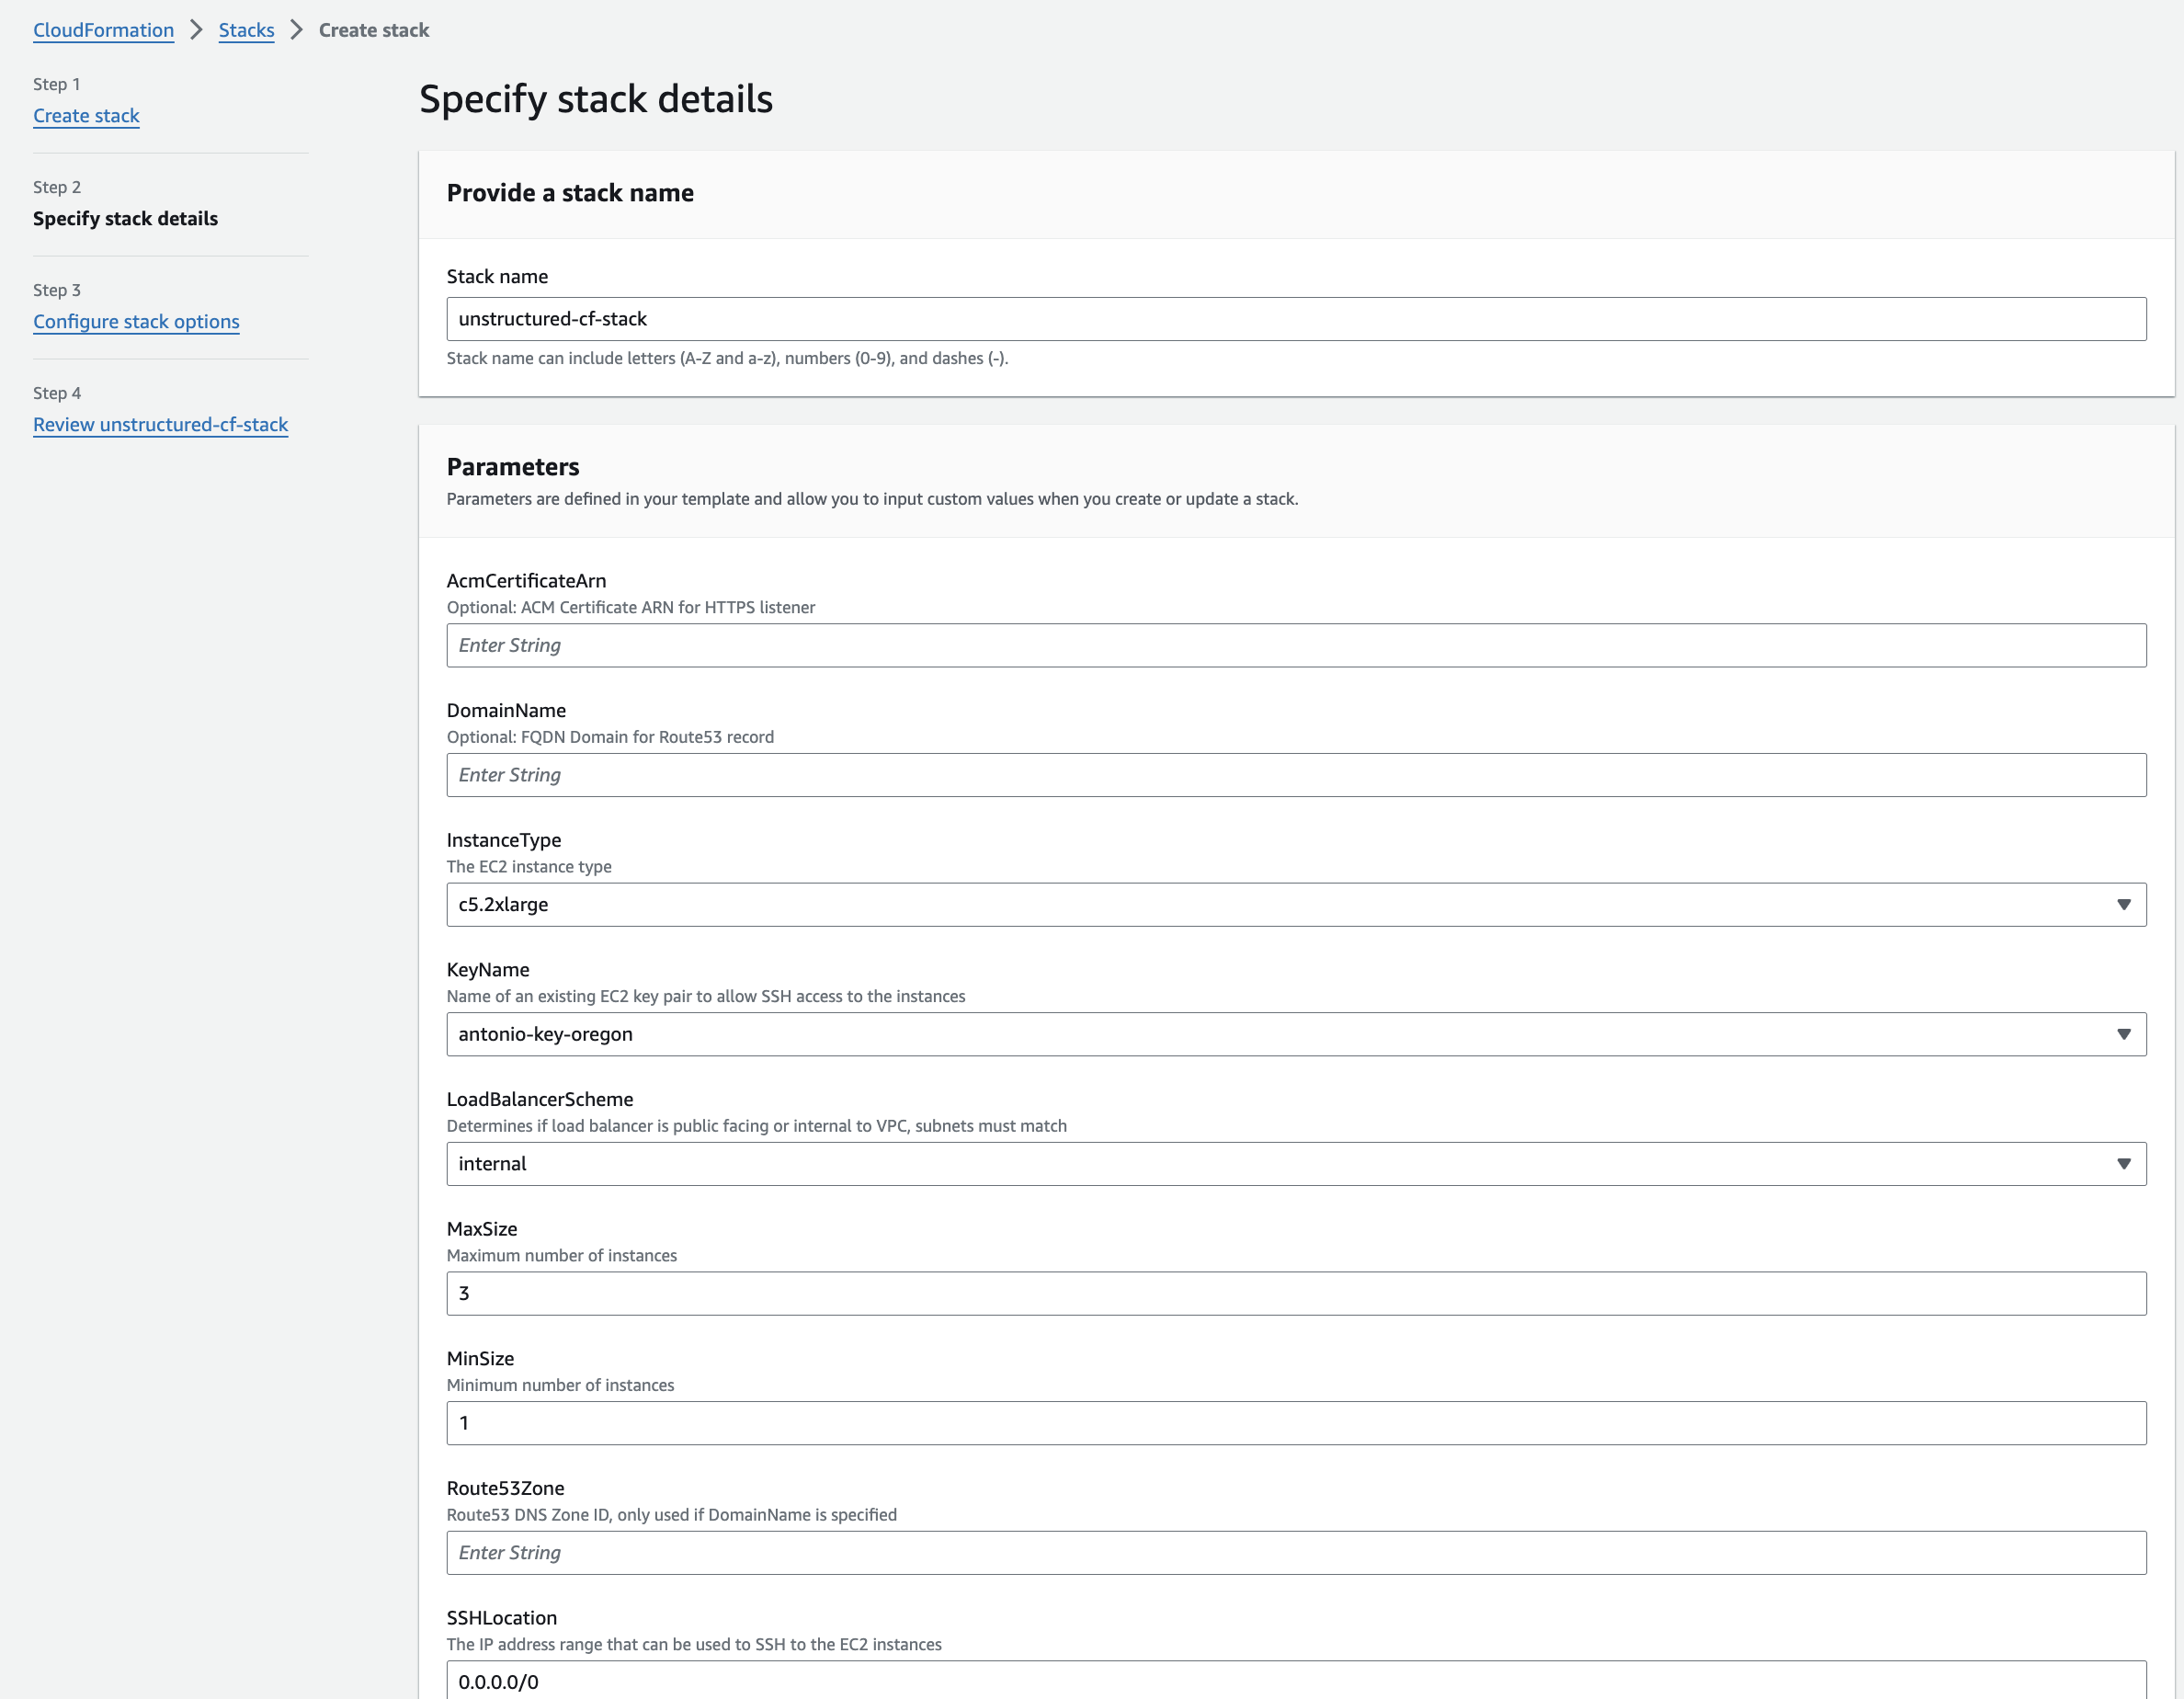
![create internet gateway](https://mintlify.s3.us-west-1.amazonaws.com/unstructured-53/img/api/VPC_Step4.png) 5. **Set up route tables (for the public subnets)**: AWS automatically created a default route table in *Step 3 - Create the subnets*. To tailor your network architecture, you will create a new route table specifically for your public subnets, which will include a route to the internet gateway from *Step 4 - Create the internet gateway (for the public subnets)*. a. In the sidebar, click *Route tables*. b. Click **Create route table**. c. Enter a **Name**. d. Select the **VPC** from *Step 2 - Create the VPC*. e. Click **Create route table**. ![create route table](https://mintlify.s3.us-west-1.amazonaws.com/unstructured-53/img/api/VPC_Step5.png) 6. **Associate public subnets to the route table and internet gateway**: a. Connect the **public subnets** to the **route table** from *Step 5 - Set up route tables (for the public subnets)*:
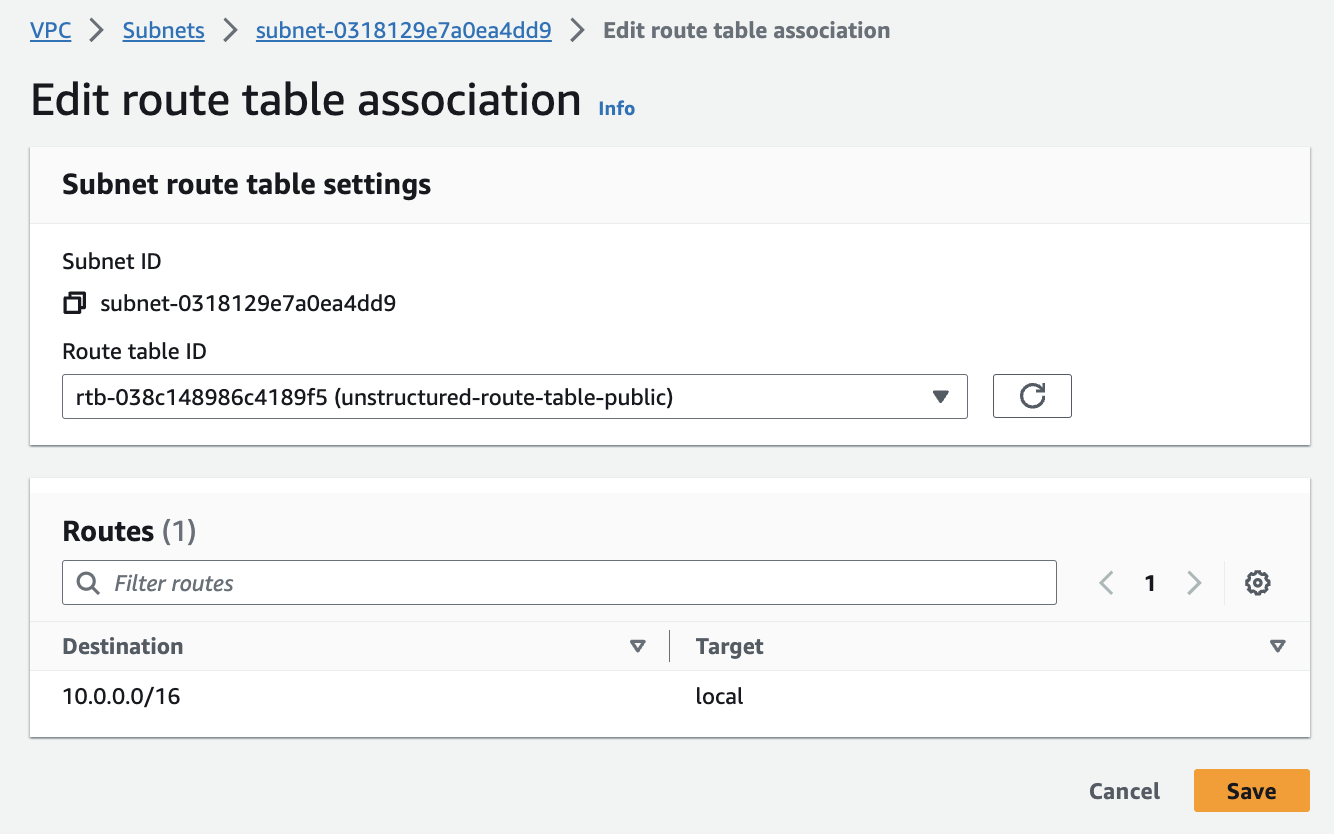
* In the sidebar, click **Subnets**. * Select the first public subnet from *Step 3 - Create the subnets*. * Click **Actions > Edit route table association**. * In the **Route table ID** dropdown list, select the route table from *Step 5 - Set up route tables (for the public subnets)*, and then click **Save**. * Repeat the process for the second public subnet. b. Now, you’ll ensure that the two public subnets can access the internet by connecting the route table to the internet gateway:
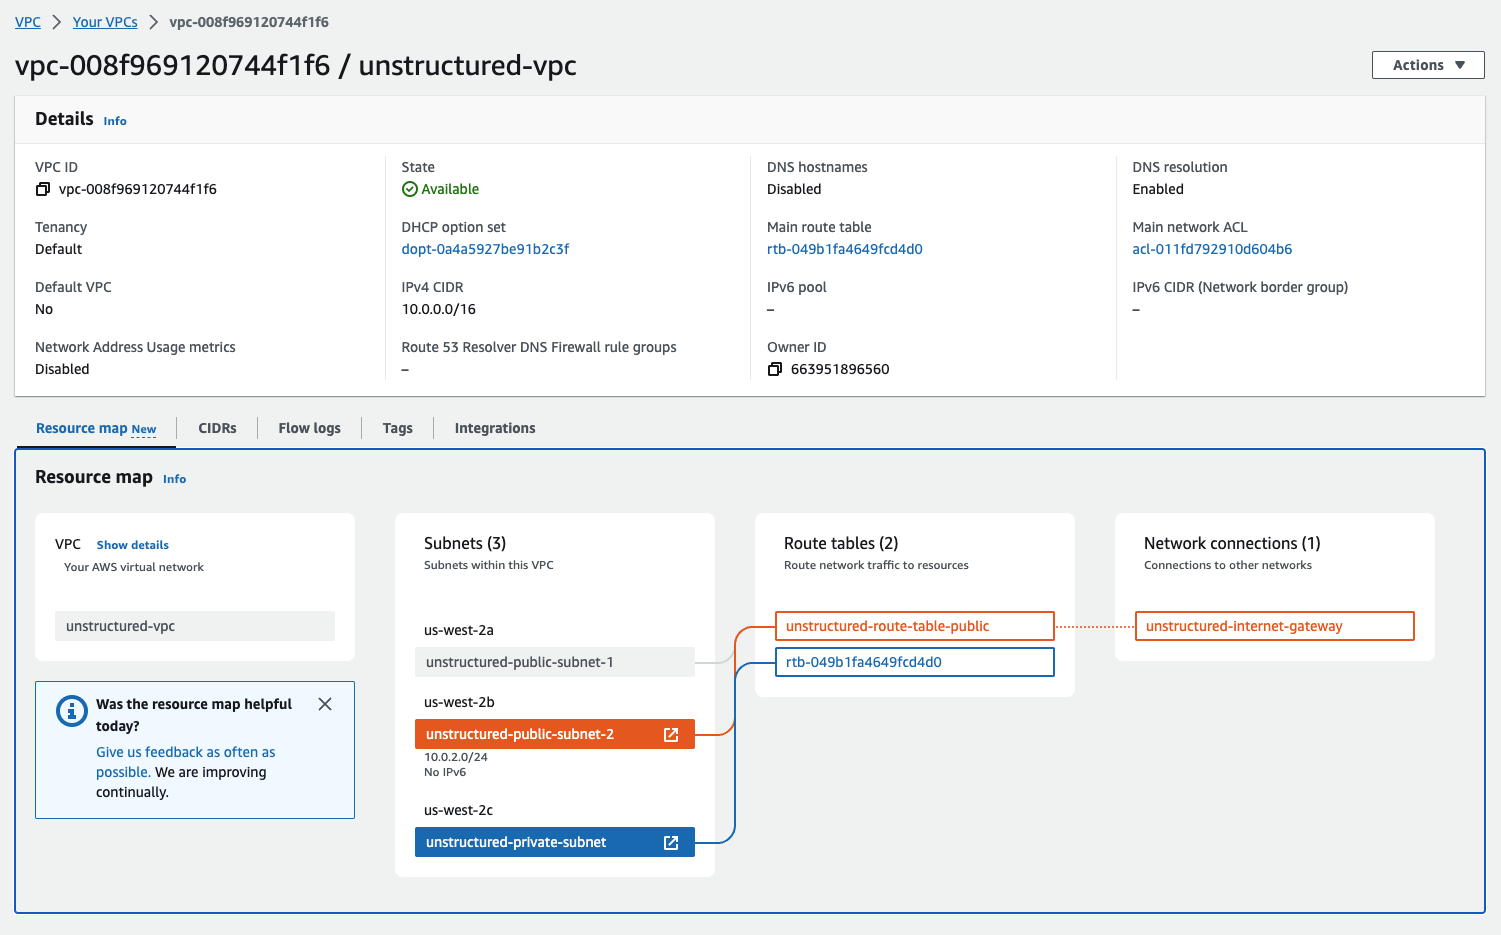
* In the sidebar, click **Route tables**. * Select the route table from *Step 5 - Set up route tables (for the public subnets)*. * Click **Actions > Edit routes**. * Click **Add route**, in the destination box, enter `0.0.0.0/0`, which represents all IP addresses. In the **Target** dropdown list, select **Internet Gateway**, and select the internet gateway from *Step 4 - Create the internet gateway (for the public subnets)*. * Click **Save changes** to establish the route, granting internet access to the first and second public subnets at the same time. c. For the **private subnet**: * In the sidebar, click **Subnets**. * Select the private subnet from *Step 3 - Create the subnets*. * Click **Actions > Edit route table association**. * In the **Route table ID** dropdown list, select the main route table, or create and then select a new route table without a route to the internet gateway. * Click **Save**. ![connect public subnet to route table](https://mintlify.s3.us-west-1.amazonaws.com/unstructured-53/img/api/VPC_Step6.png) ![edit routes](https://mintlify.s3.us-west-1.amazonaws.com/unstructured-53/img/api/VPC_Step7.png) 7. **Inspect the VPC resource map**: You can check the configurations from the resource maps on the VPC details dashboard by clicking **Your VPCs** in the sidebar, clicking the **VPC ID** for your VPC, and then clicking the **Resource map** tab. ![VPC Resource Maps](https://mintlify.s3.us-west-1.amazonaws.com/unstructured-53/img/api/VPC_Step8.png) ## Part II: Deploying the Unstructured API from the AWS Marketplace 8. **Go to the Unstructured API page on AWS Marketplace**: a. Leaving the VPC dashboard from Part I open, in a separate web browser tab, go to the [Unstructured API](http://aws.amazon.com/marketplace/pp/prodview-fuvslrofyuato) product page in the AWS Marketplace. b. Click **Continue to Subscribe**. c. Review the terms and conditions. d. Click **Continue to Configuration**. ![Unstructured API on AWS Marketplace](https://mintlify.s3.us-west-1.amazonaws.com/unstructured-53/img/api/Marketplace_Step8.png) 9. **Configure the CloudFormation template**: a. In the **Fulfillment option** dropdown list, select **CloudFormation Template**. b. For **Fulfillment option** and **Software version**, leave the default `UnstructuredAPI` template and software version. c. In the **Region** dropdown list, select the Region that corresponds to the VPC from Part I. * *Note: You must select the same Region where you set up the VPC in Part I. To find the Region, on the VPC dashboard tab from Part I that you left open, with your VPC displayed, find the VPC's Region name next to your username in the top navigation bar.* d. Click **Continue to Launch**. e. In the **Choose Action** dropdown list, select **Launch CloudFormation**. f. Click **Launch**. ![CloudFormation Configuration](https://mintlify.s3.us-west-1.amazonaws.com/unstructured-53/img/api/Marketplace_Step9.png) 10. **Create the CloudFormation stack**: After you click **Launch**, the **Create stack** page appears in CloudFormation. **Step 1: Create the stack** a. Leave **Choose an existing template** selected. b. Leave **Amazon S3 URL** selected and the default **Amazon S3 URL** value unchanged. c. Click **Next**. ![Create Stack](https://mintlify.s3.us-west-1.amazonaws.com/unstructured-53/img/api/Marketplace_Step10a.png) **Step 2: Specify the stack's details** a. Enter some unique **Stack name**. b. In the **Parameters** section, in the **InstanceType** drop-down list, select **m5.xlarge**. c. In the **KeyName** drop-down list, select the name of the SSH key pair from the beginning of this article. d. In the **LoadBalancerScheme** dropdown list, select **internet-facing**. e. For **SSHLocation**, enter `0.0.0.0/0`, but only if you allow public access on the internet. * **Note**: It is generally recommended to limit SSH access to a specific IP range for enhanced security. This can be done by setting the `SSHLocation` to the IP address or range associated with your organization. Please consult your IT department or VPN vendor to obtain the correct IP information for these settings. * AWS provides `AWS Client VPN`, which is a managed client-based VPN service that enables secure access AWS resources and resources in your on-premises network. To learn more, see [Getting started with AWS Client VPN](https://docs.aws.amazon.com/vpn/latest/clientvpn-admin/cvpn-getting-started.html). f. In the **Subnets** dropdown multiselect list, select the two public subnets and the private subnet from Part I. g. In the **VPC** dropdown list, select the VPC from Part I. h. You can leave the default values for all of the other **Parameters** fields. i. Click **Next**. ![Specify stack details](https://mintlify.s3.us-west-1.amazonaws.com/unstructured-53/img/api/Marketplace_Step10b.png) **Step 3: Configure the stack's options** a. You can leave the default values, or specify any non-default stack options. b. Click **Next**. ![Specify stack options](https://mintlify.s3.us-west-1.amazonaws.com/unstructured-53/img/api/Marketplace_Step10c.png) **Step 4: Review** a. Review the stack's settings. b. Click **Submit**. ![Review stack](https://mintlify.s3.us-west-1.amazonaws.com/unstructured-53/img/api/Marketplace_Step10d.png) 11. **Get the Unstructured API endpoint**: a. The CloudFormation details page for the stack appears. If you do not see it, on the sidebar, click **Stacks**, and then click the name of your stack. b. Check the status of the CloudFormation stack. A successful deployment will show a **CREATE\_COMPLETE** value for the **Status** field on the **Stack Info** tab on this stack's details page. The deployment can take several minutes. c. After a successful deployment, click the **Resources** tab on this stack's details page. Then click the **Physical ID** link next to **ApplicationLoadBalancer** on this tab. d. On the **EC2 > Load balancers > (Load balancer ID)** page that appears, copy the **DNS Name** value, which is shown as an **(A Record)** and ends with `.elb.amazonaws.com`. * Note: You will use this **DNS Name** to replace the `` for the following healthcheck and data processing steps. ![Unstructured API Endpoint](https://mintlify.s3.us-west-1.amazonaws.com/unstructured-53/img/api/Marketplace_Step11.png) ## Healthcheck Perform a health check by running this [curl](https://curl.se/) command from a terminal on your local machine, replacing `` with your application load balancer's DNS name. This health check can take several minutes: ```bash curl http:///healthcheck ``` ![Healthcheck](https://mintlify.s3.us-west-1.amazonaws.com/unstructured-53/img/api/healthcheck.png) ## Data processing For example, run one of the following, setting the following environment variables to make your code more portable: * Set `UNSTRUCTURED_API_URL` to `http://`, followed by your load balancer's DNS name, followed by `/general/v0/general`. You can now use this value (`http://`, followed by your load balancer's DNS name, followed by `/general/v0/general`) in place of calling the [Unstructured Partition Endpoint](/api-reference/partition/overview) URL as described elsewhere in the Unstructured API documentation. * Set `LOCAL_FILE_INPUT_DIR` to the path on your local machine to the files for the Unstructured API to process. If you do not have any input files available, you can download any of the ones from the [example-docs](https://github.com/Unstructured-IO/unstructured-ingest/tree/main/example-docs) folder in GitHub. * Set `LOCAL_FILE_OUTPUT_DIR` to the path on your local machine for Unstructured API to send the processed output in JSON format: You must first [install the Unstructured Ingest CLI](/ingestion/overview#unstructured-ingest-cli). Because you are calling a private API and therefore do not need an Unstructured API key, you can omit the command-line option `--api-key` Or, for better code portability, it is recommended that you first set the environment variable `UNSTRUCTURED_API_KEY` to an empty string and then include the command-line option `--api-key`. ```bash CLI unstructured-ingest \ local \ --input-path $LOCAL_FILE_INPUT_DIR \ --output-dir $LOCAL_FILE_OUTPUT_DIR \ --partition-by-api \ --api-key $UNSTRUCTURED_API_KEY \ --partition-endpoint $UNSTRUCTURED_API_URL \ --strategy hi_res \ --additional-partition-args="{\"split_pdf_page\":\"true\", \"split_pdf_allow_failed\":\"true\", \"split_pdf_concurrency_level\": 15}" ``` You must first [install the Unstructured Ingest Python library](/ingestion/python-ingest). Because you are calling a private API and therefore do not need an Unstructured API key, you can omit the parameter `api_key`. Or, for better code portability, it is recommended that you first set the environment variable `UNSTRUCTURED_API_KEY` to an empty string and then include the parameter `api_key`. ```python Python Ingest import os from unstructured_ingest.pipeline.pipeline import Pipeline from unstructured_ingest.interfaces import ProcessorConfig from unstructured_ingest.processes.connectors.local import ( LocalIndexerConfig, LocalDownloaderConfig, LocalConnectionConfig, LocalUploaderConfig ) from unstructured_ingest.processes.partitioner import PartitionerConfig if __name__ == "__main__": Pipeline.from_configs( context=ProcessorConfig(), indexer_config=LocalIndexerConfig(input_path=os.getenv("LOCAL_FILE_INPUT_DIR")), downloader_config=LocalDownloaderConfig(), source_connection_config=LocalConnectionConfig(), partitioner_config=PartitionerConfig( partition_by_api=True, api_key=os.getenv("UNSTRUCTURED_API_KEY"), partition_endpoint=os.getenv("UNSTRUCTURED_API_URL"), strategy="hi_res", additional_partition_args={ "split_pdf_page": True, "split_pdf_allow_failed": True, "split_pdf_concurrency_level": 15 } ), uploader_config=LocalUploaderConfig(output_dir=os.getenv("LOCAL_FILE_OUTPUT_DIR")) ).run() ``` ## Accessing the hosting EC2 instance If you need to access the Amazon EC2 instance that hosts the Unstructured API, do the following: 1. In the CloudFormation console, open the details page for the stack from Part II. If you do not see it, on the CloudFormation console's sidebar, click **Stacks**, and then click the name of your stack. 2. Click the **Resources** tab on this stack's details page. Then click the **Physical ID** link next to **EC2TargetGroup** on this tab. 3. On the **EC2 > Target groups > (CloudFormation stack name)** page that appears, on the **Targets** tab, click the **Instance ID** link. 4. In the list of instances that appears, click the **Instance ID** link. 5. Click **Connect**, and then follow any of the on-screen options to access the EC2 instance. ## Manage related AWS account costs After you run the CloudFormation stack that you created in Part II, charges will begin accruing to your AWS account on an ongoing basis for related AWS resources. The amounts of these charges vary based on where these resource are located, which resources are covered by AWS Free Tier offerings, the extent to which you customize these resources' settings, how much you use these resources, and other factors. Stopping or terminating the related Amazon EC2 instances alone will not eliminate these ongoing charges. To stop these charges from accruing, [delete the CloudFormation stack](https://docs.aws.amazon.com/AWSCloudFormation/latest/UserGuide/cfn-console-delete-stack.html) that you created and ran in Part II. This stops and deletes all of the related AWS resources. Before you delete the stack, note the following: * You should click the **Resources** tab on the stack's details page to be aware of the associated resources that will be deleted. * You should note any resource dependencies, resources with deletion protection or termination protection enabled, or nested stacks that might prevent stack deletion, and resolve these issues that could prevent stack deletion. To find these kinds of issues: * On the **Template** tab on the stack's details page, look for occurences of the `DependsOn` attribute, which are set to the name of the resource dependency. * On the **Template** tab on the stack's details page, look for occurences of the `DeletionPolicy` attribute set to `Retain` or the `UpdateReplacePolicy` attribute set to `Retain`. The associated resources have deletion protection enabled. * On the **Stack info** tab on the stack's details page, look for the **Termination protection** field. If it is set to **Activated**, termination protection is enabled. * On the **Resources** tab on the stack's details page, look for resources with their **Type** set to `AWS::CloudFormation::Stack`. These indicate nested stacks. After you delete the stack, you should check your [AWS Billing and Cost Management dashboard](https://docs.aws.amazon.com/awsconsolehelpdocs/latest/gsg/billinginfo.html) to confirm that associated charges are no longer accruing. # Unstructured API on Azure Source: https://docs.unstructured.io/api-reference/legacy-api/azure The Unstructured API on Azure is deprecated. It is no longer supported and is not being actively updated. Unstructured is now available on the Azure Marketplace as a private offering. To explore supported options for running Unstructured within your virtual private cloud (VPC), email Unstructured Sales at [sales@unstructured.io](mailto:sales@unstructured.io). This page is not being actively updated. It might contain out-of-date information. This page is provided for legacy reference purposes only. Follow these steps to deploy the Unstructured API service into your Azure account. This article describes how to create several interrelated resources in your Azure account. Your Azure account will be charged on an ongoing basis for these resources, even if you are not actively using them.

Manually shutting down the associated Azure virtual machine when you are not using it can help reduce—but not fully eliminate—these ongoing charges.

To stop accruing all related ongoing charges, you must delete all of the associated Azure resources.
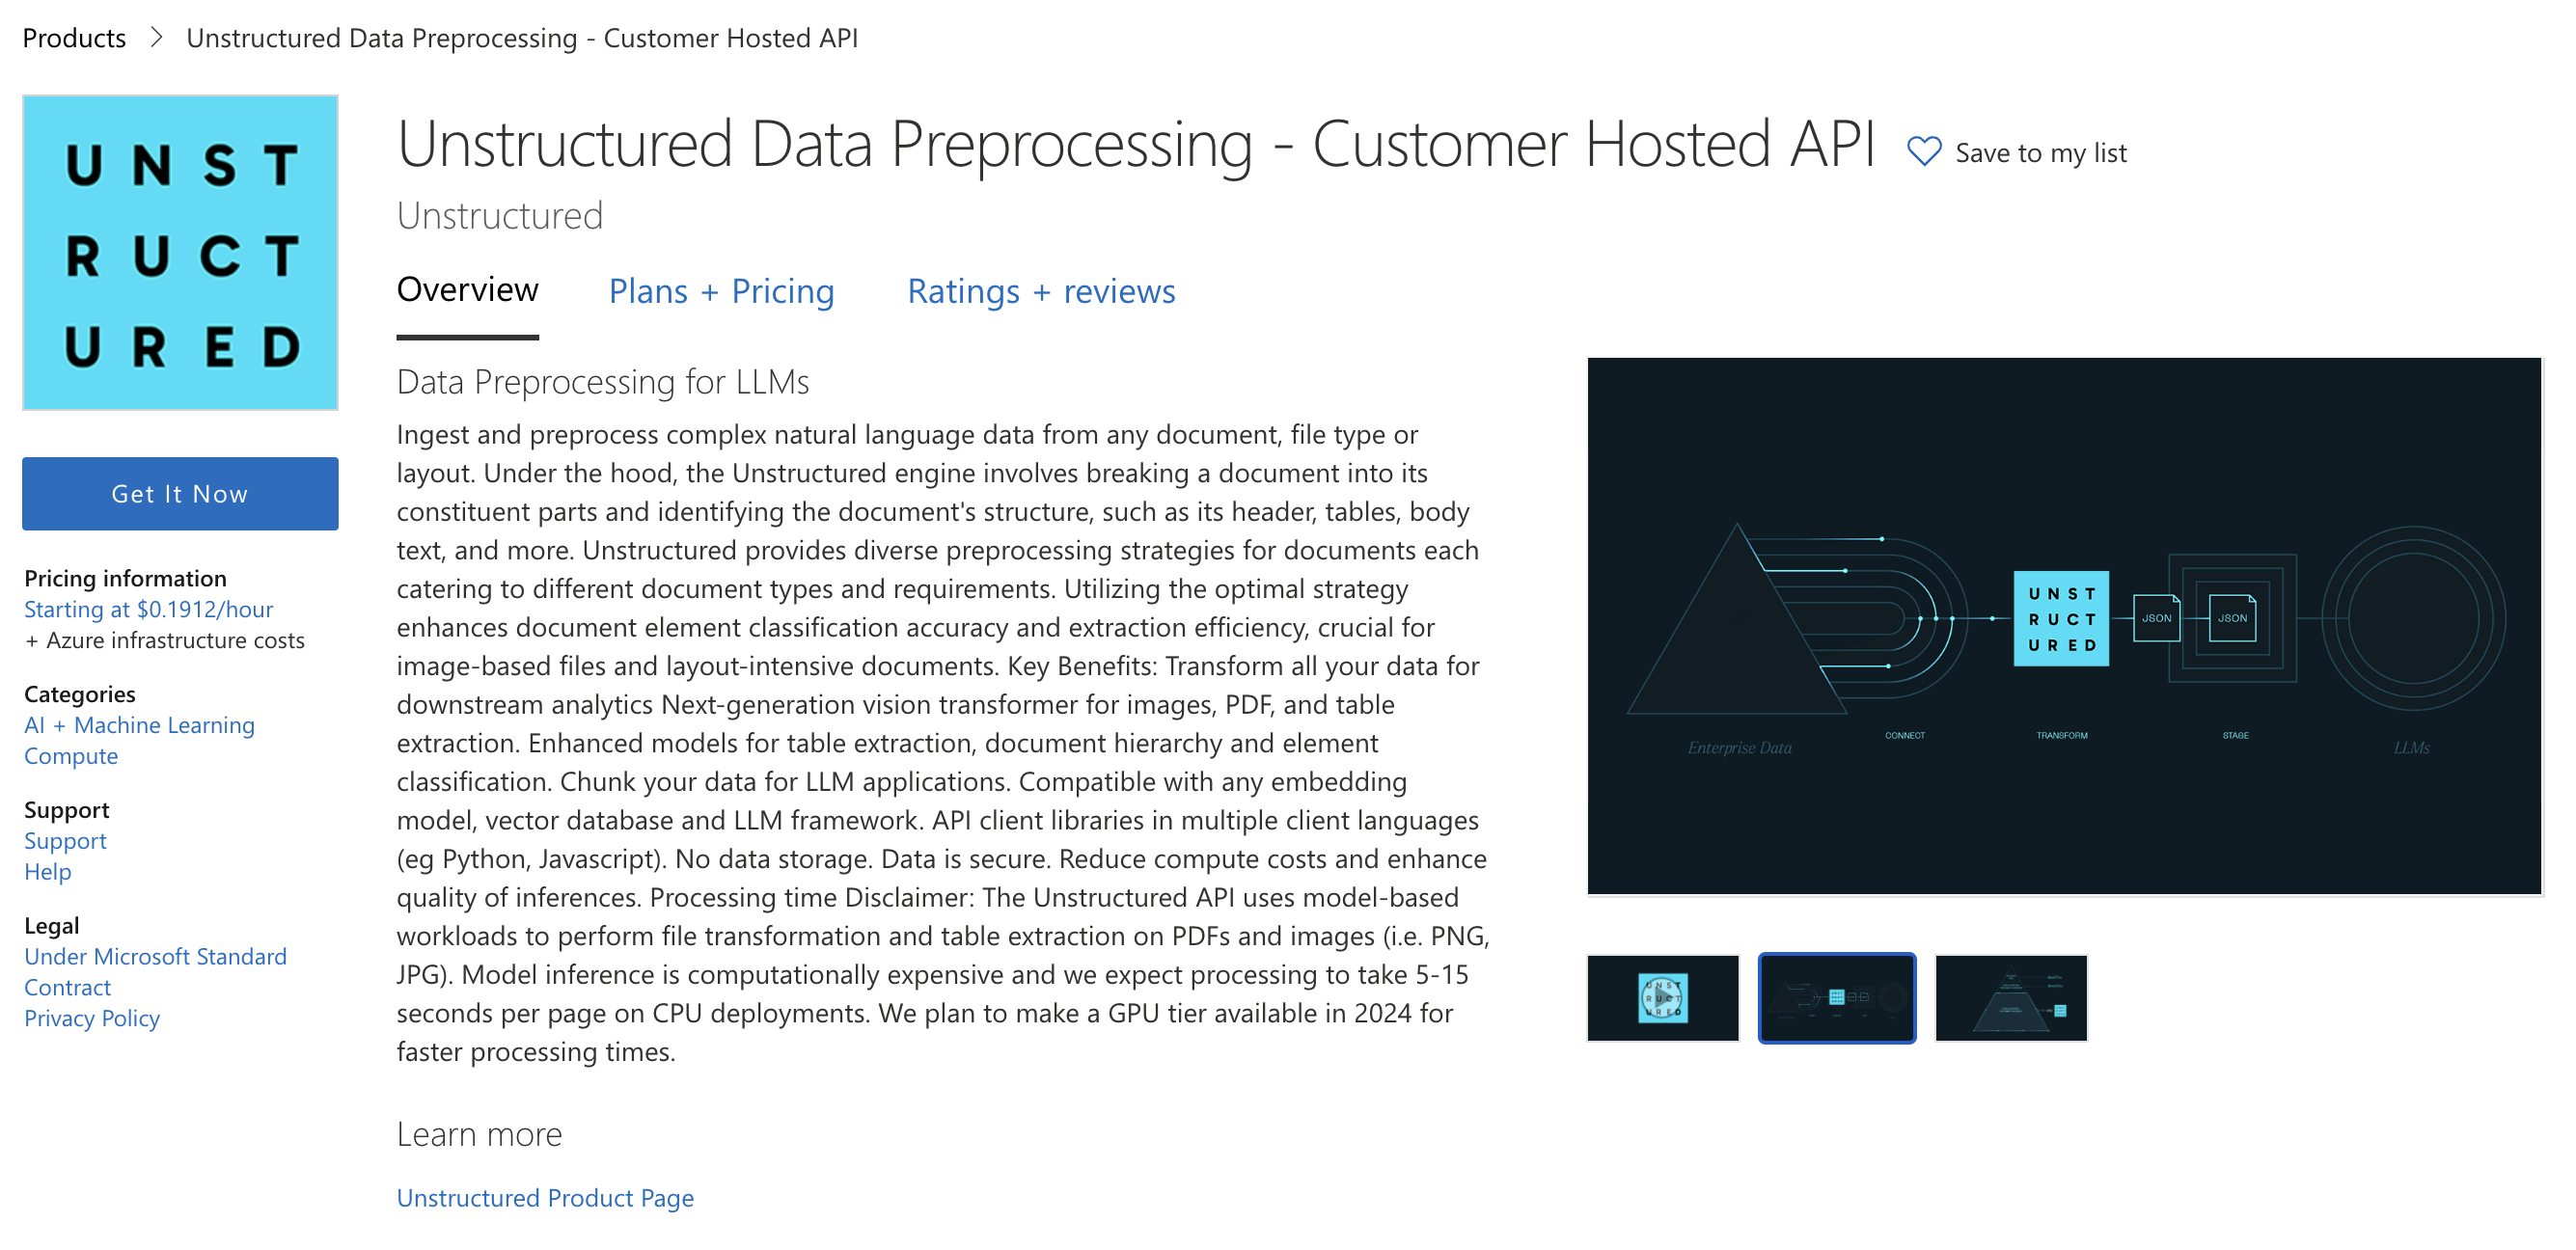
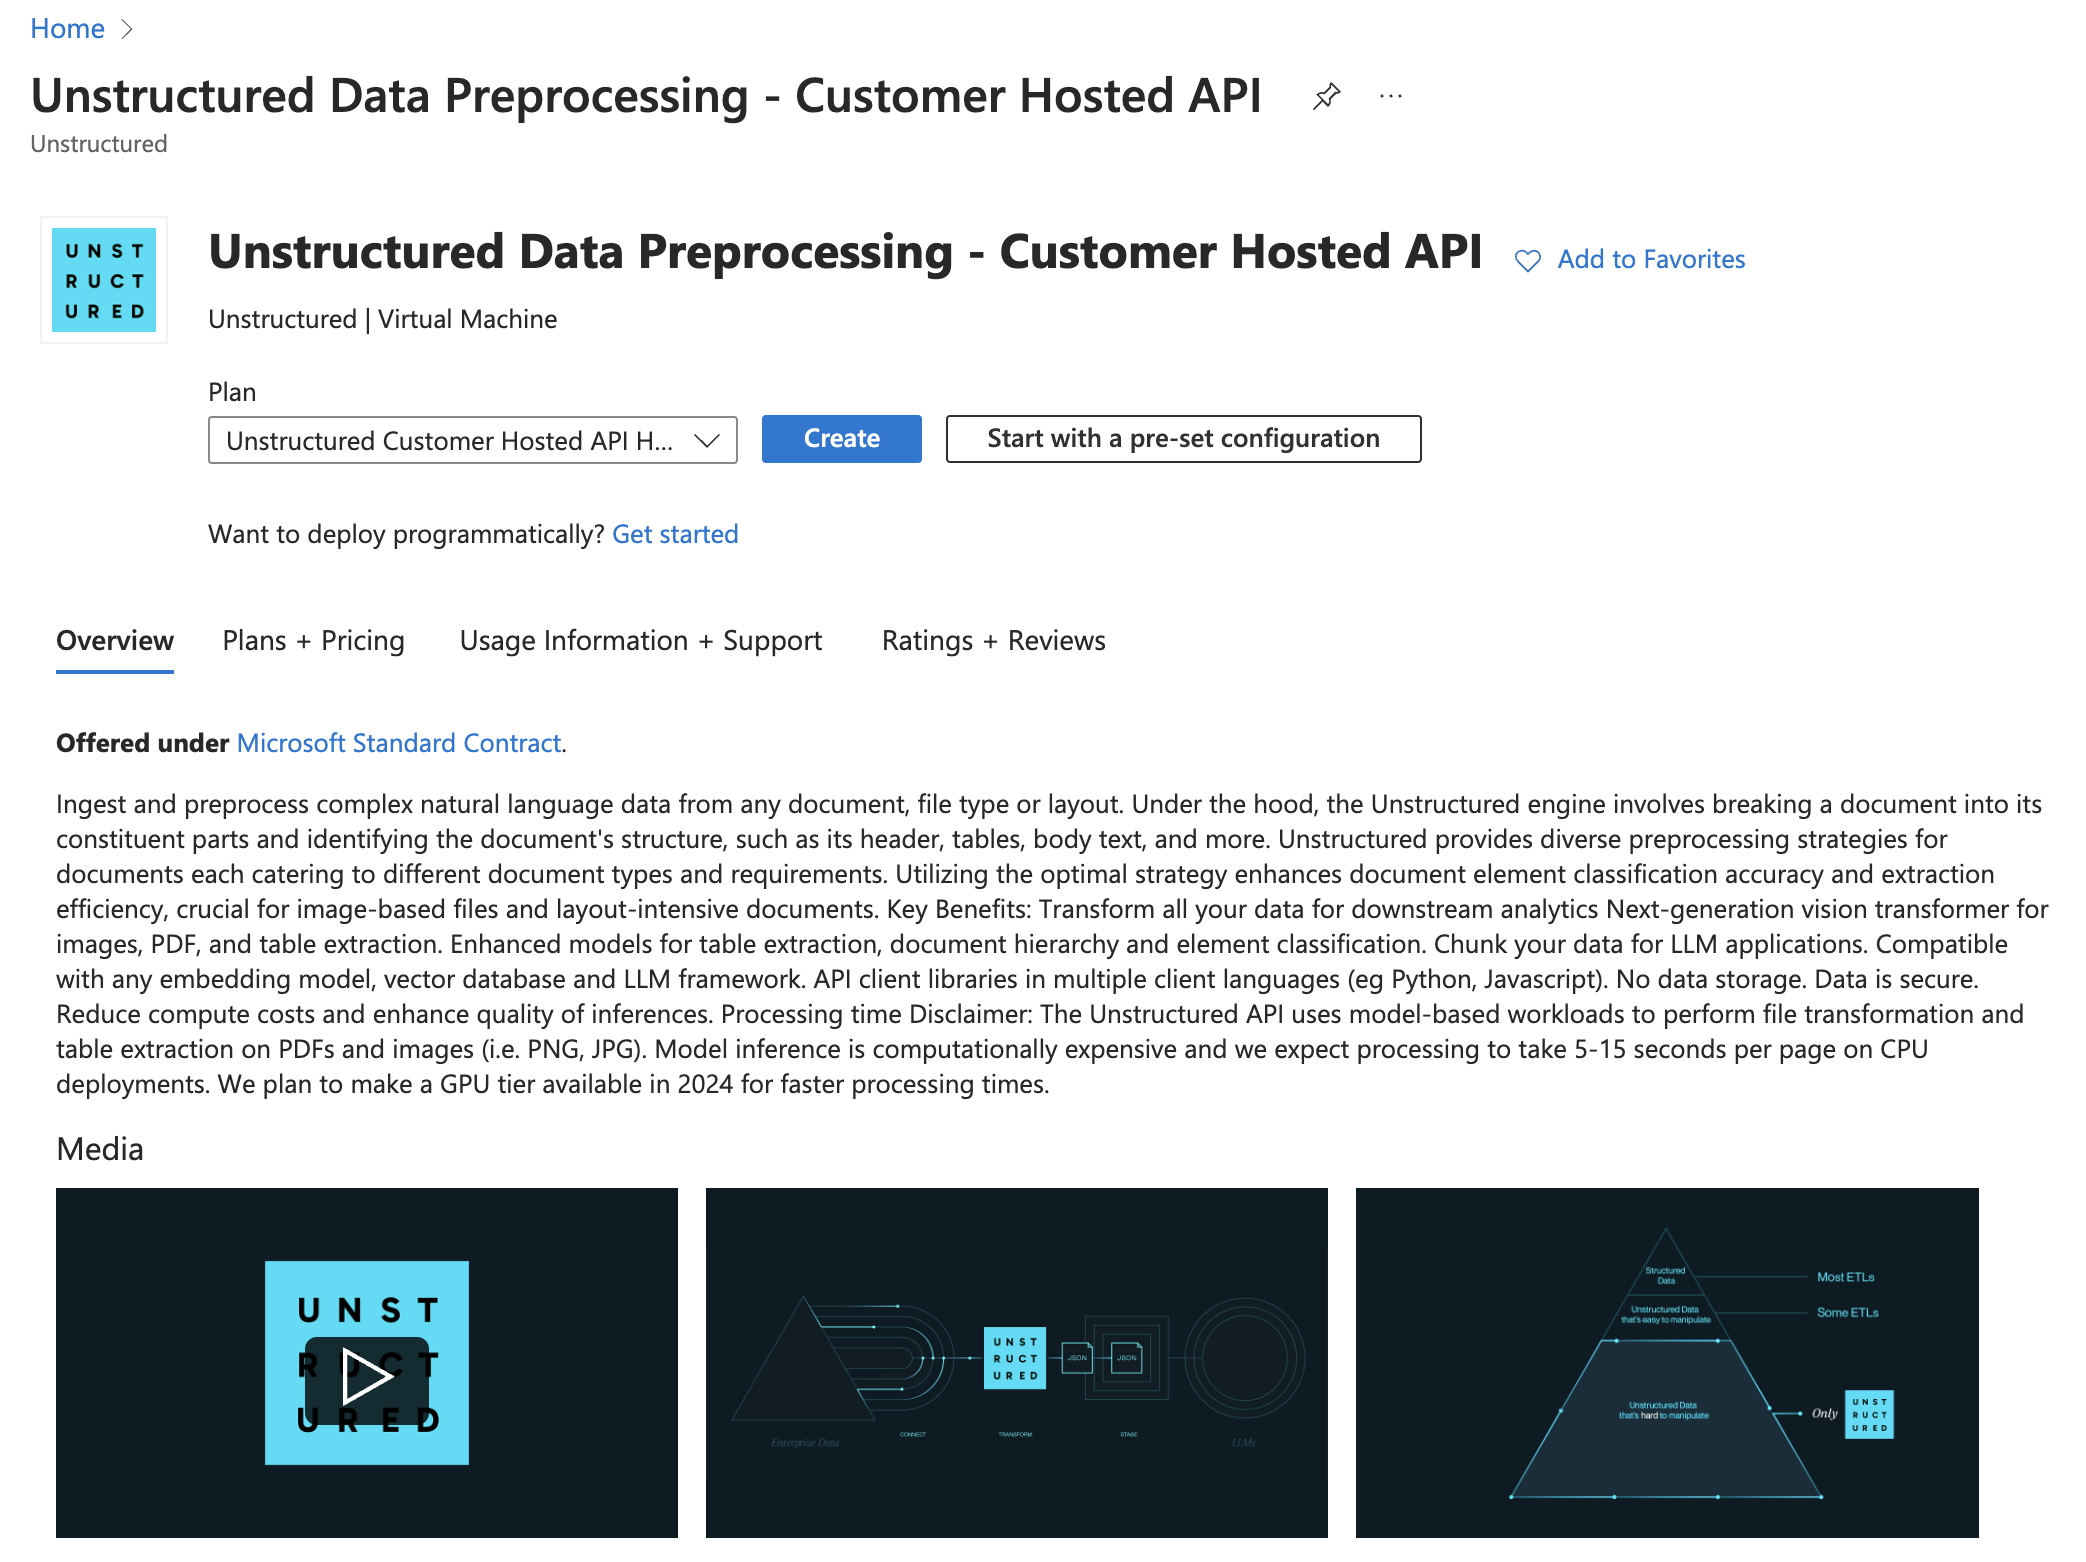
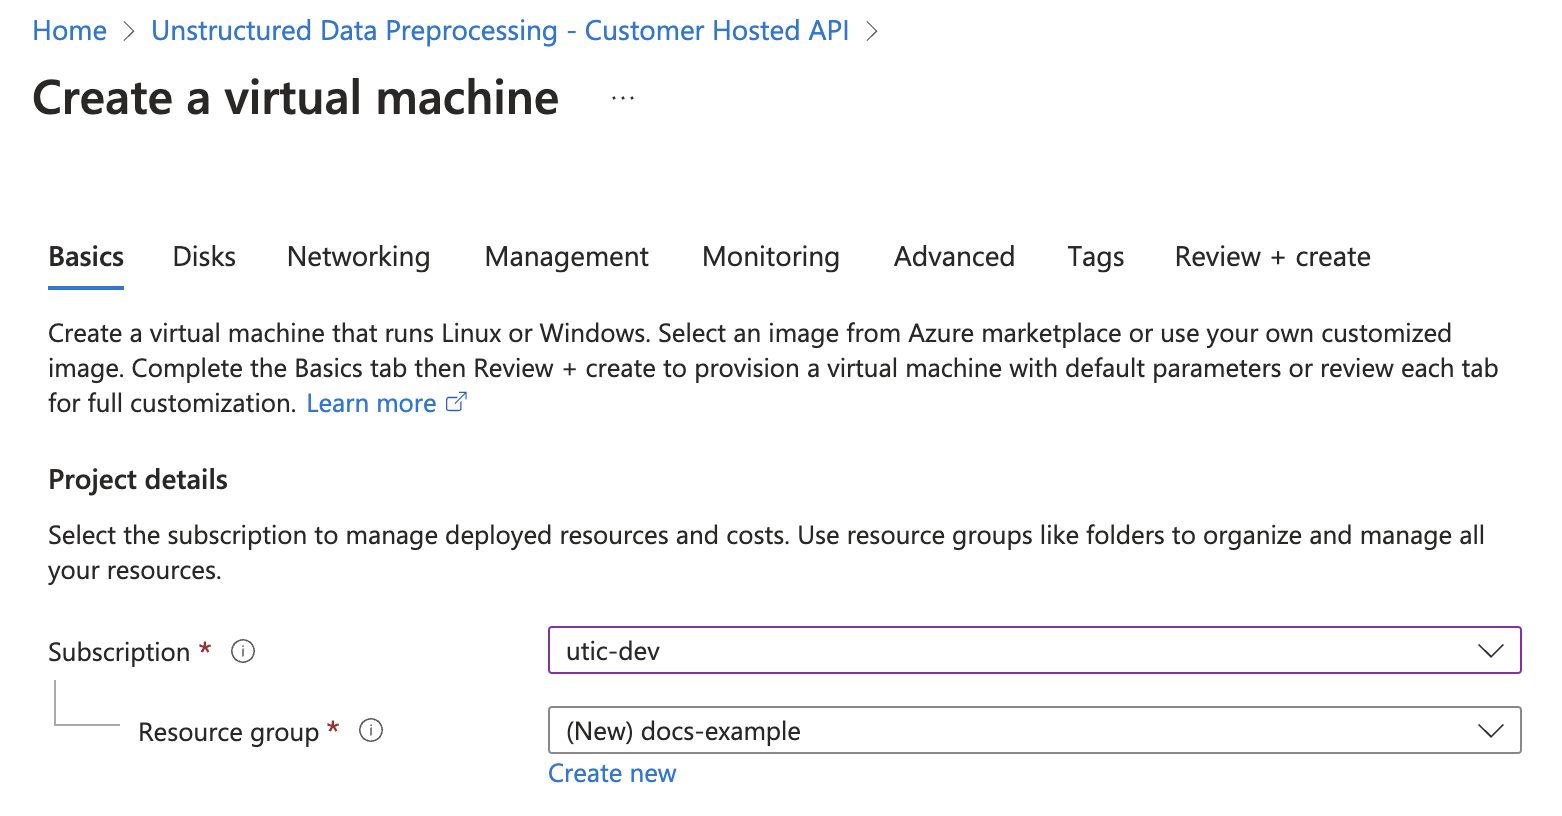
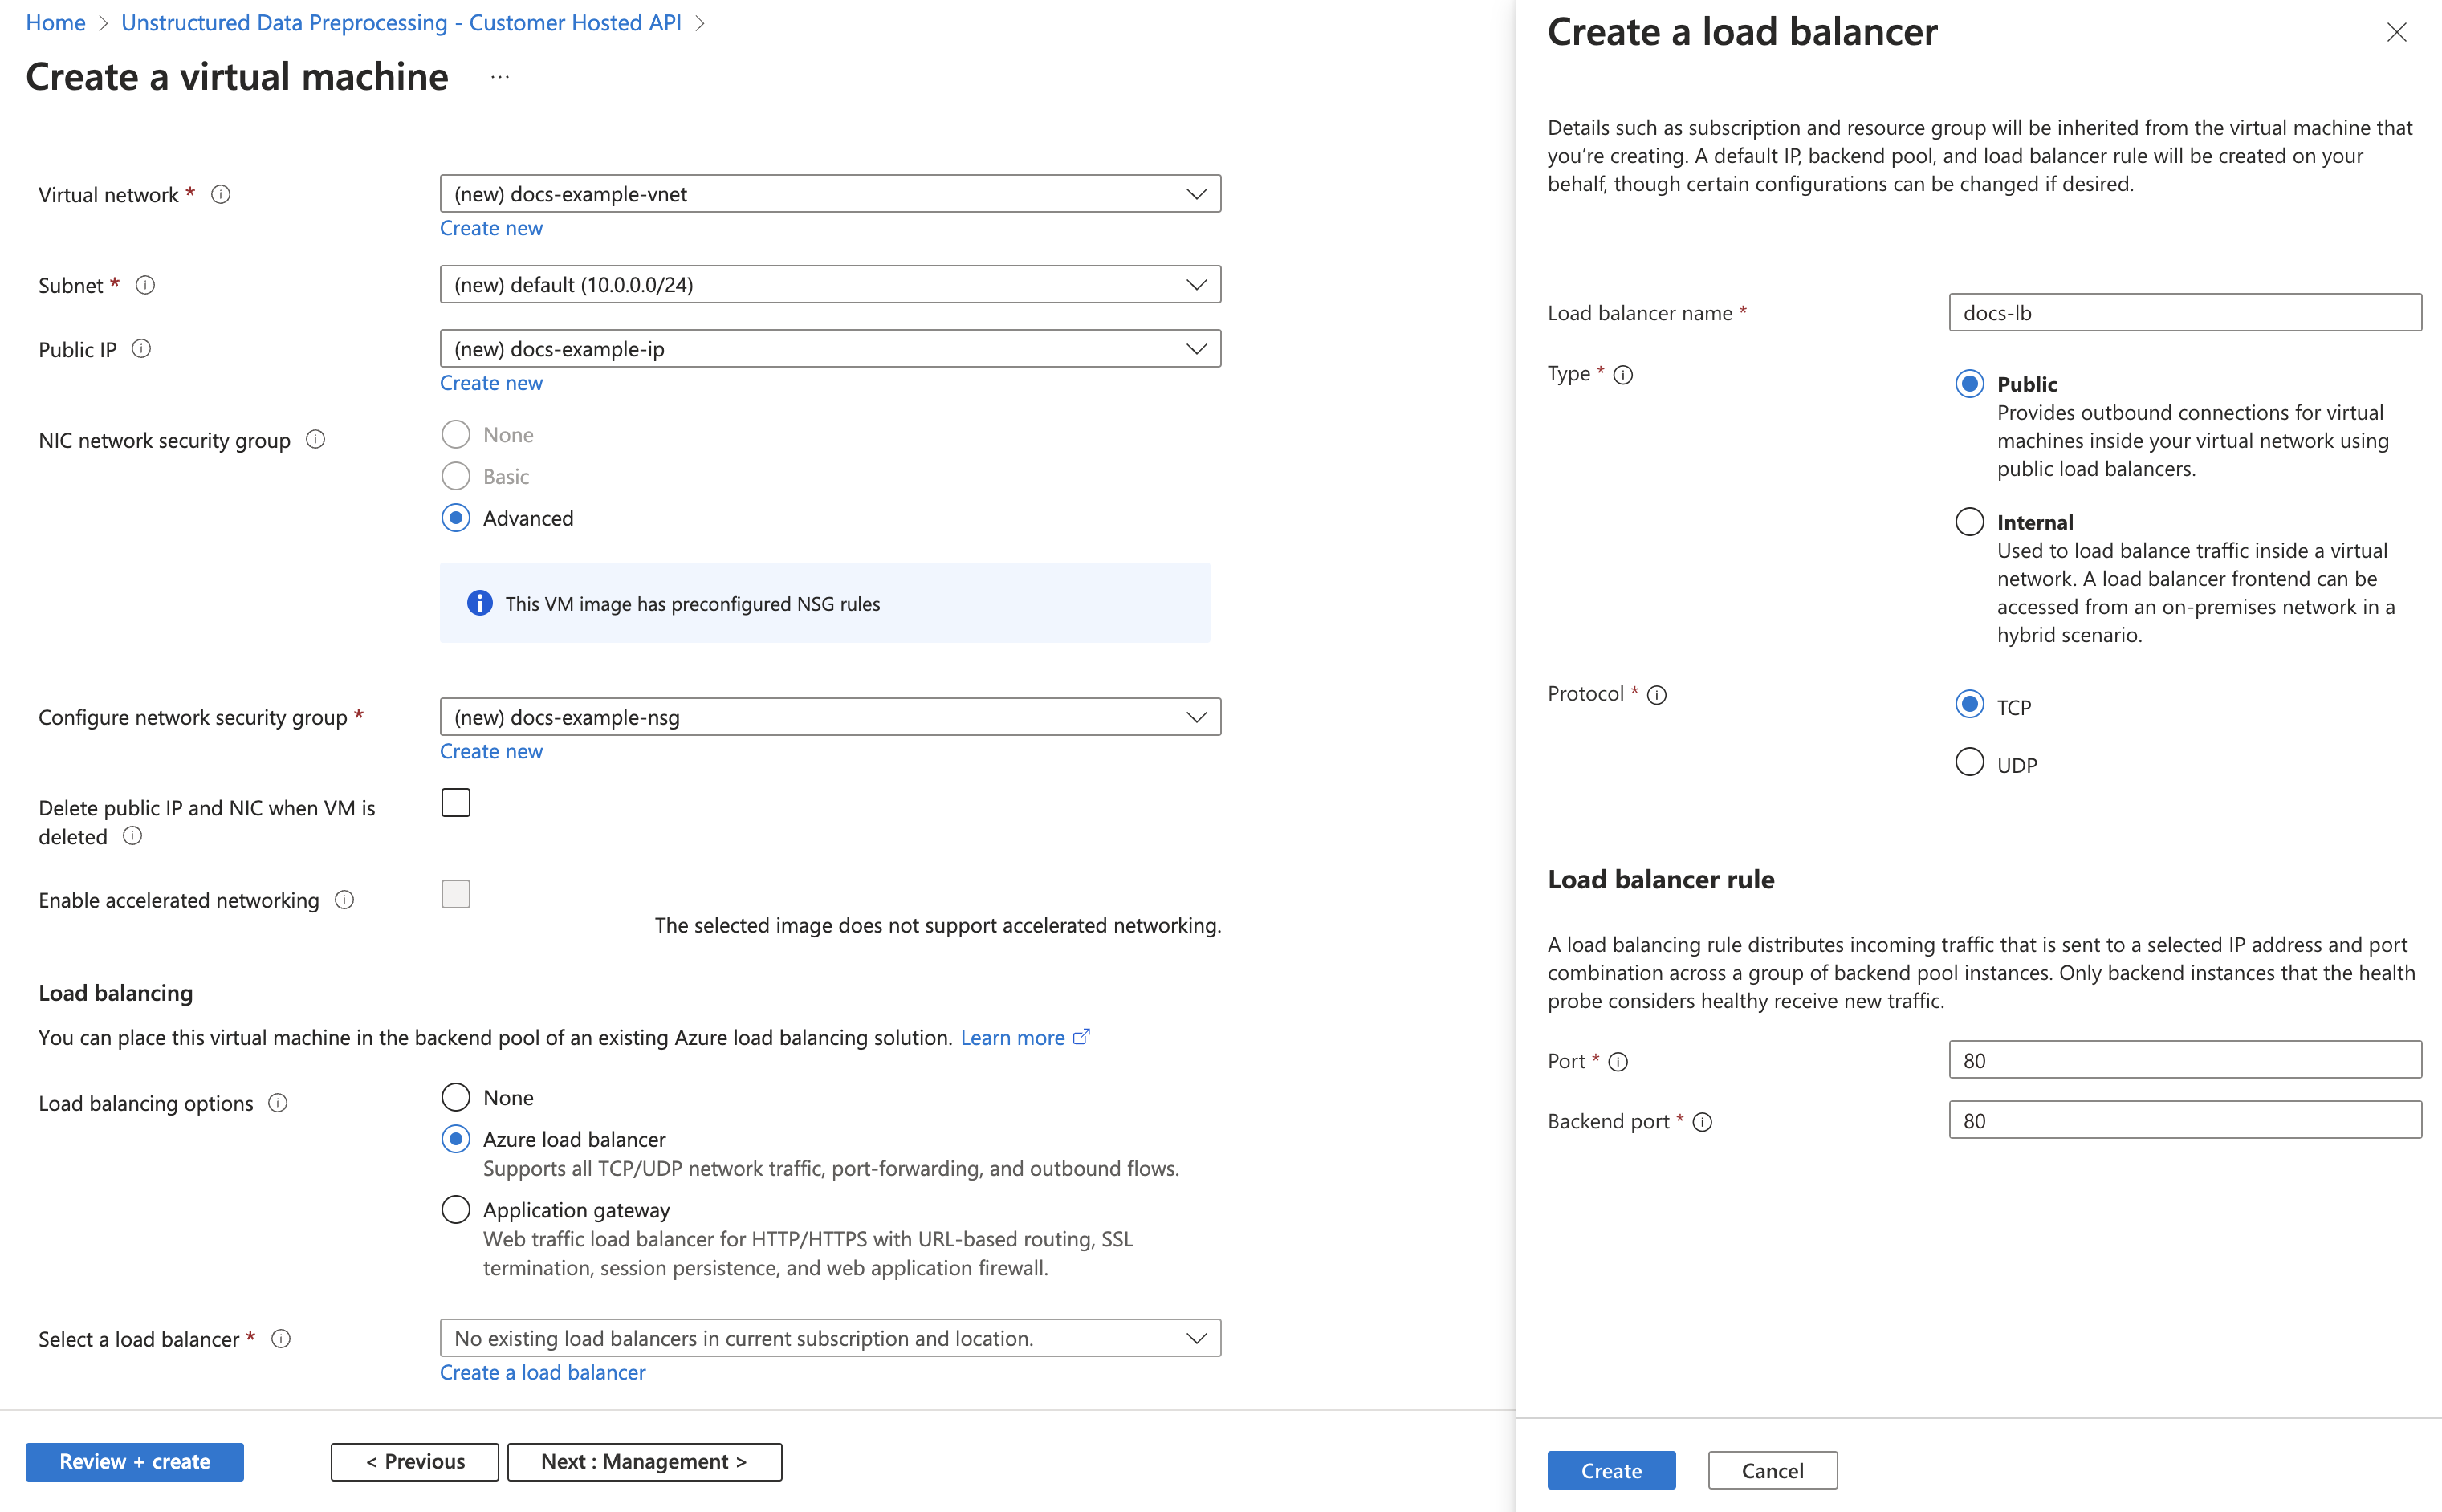
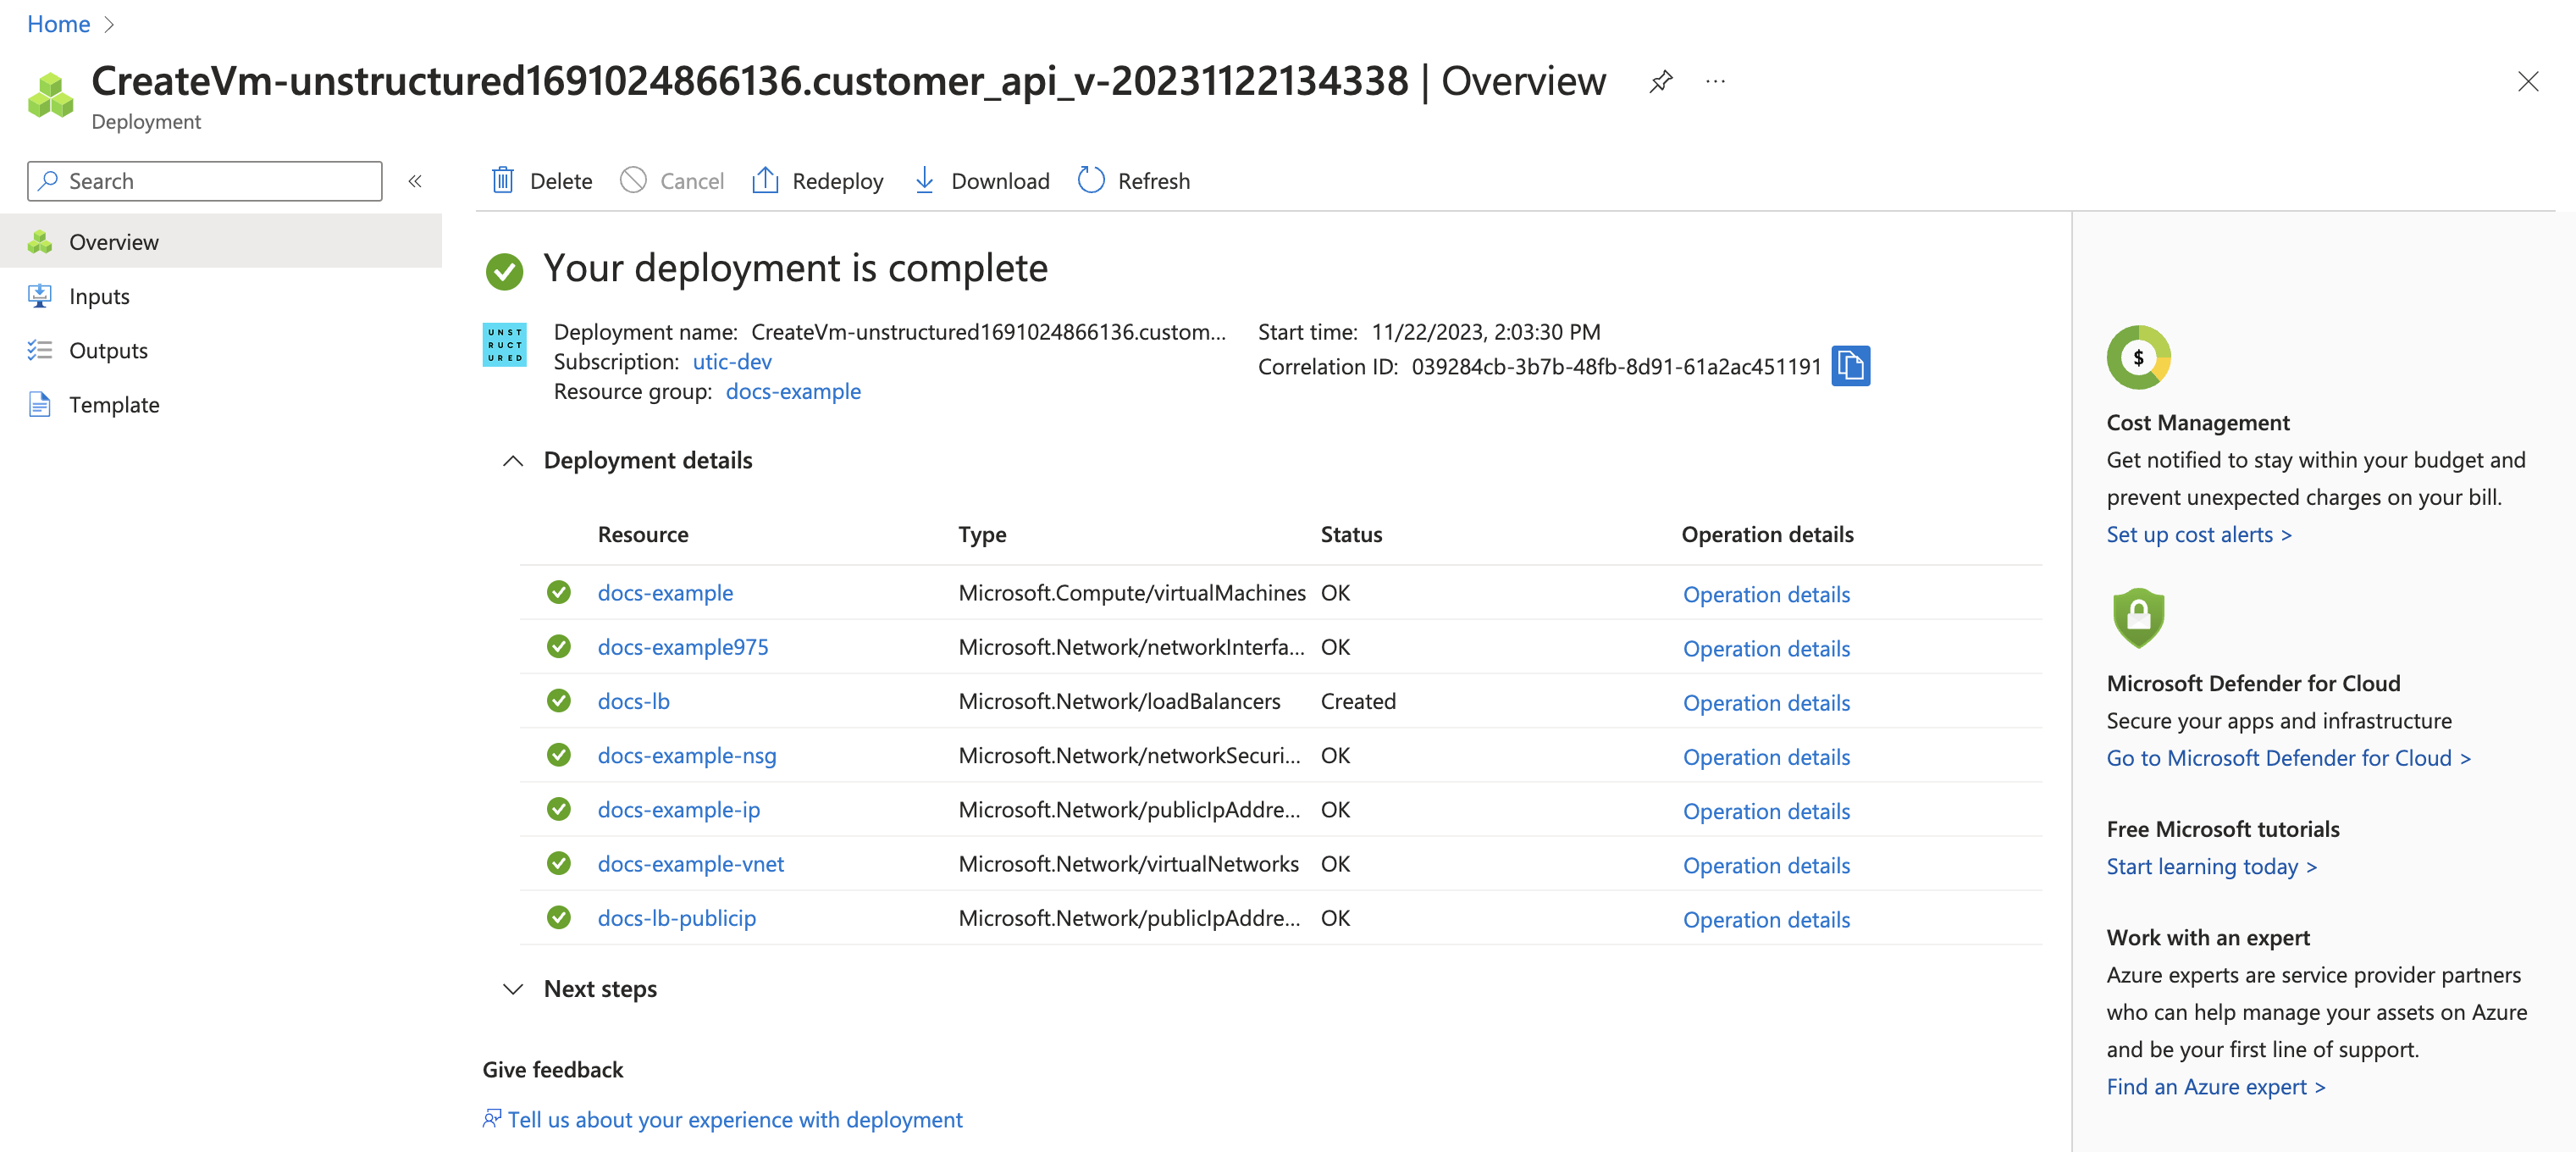
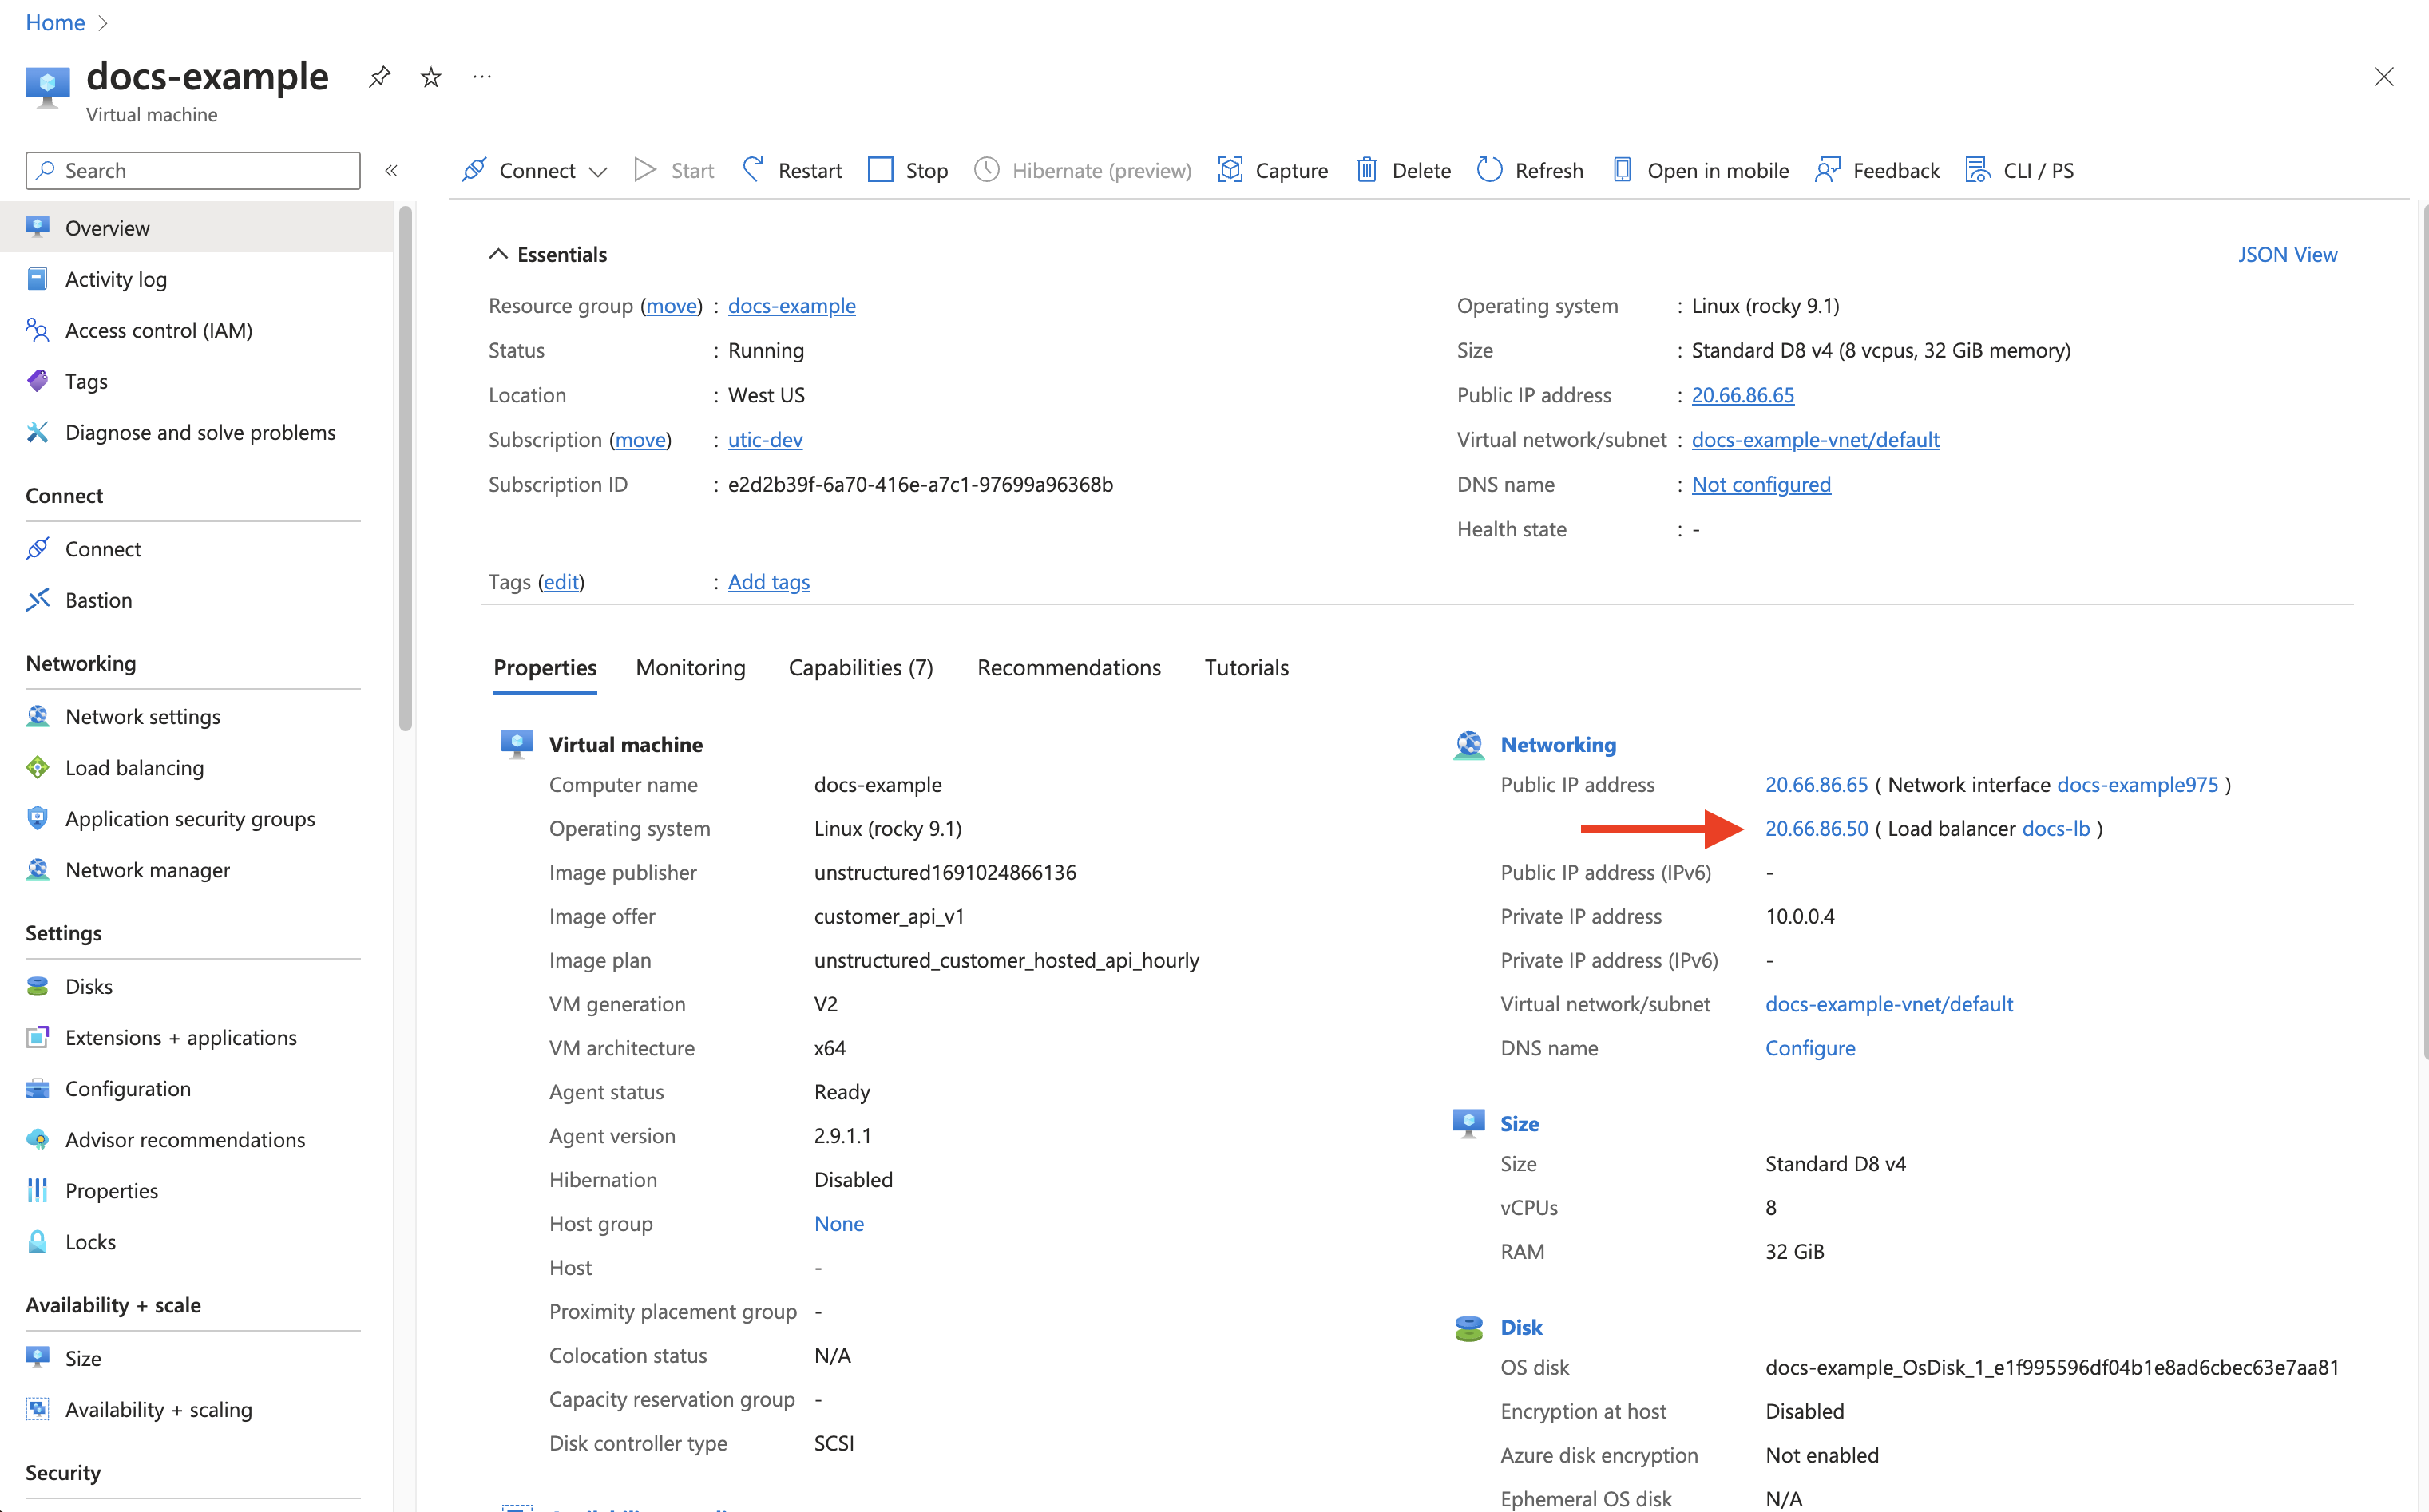
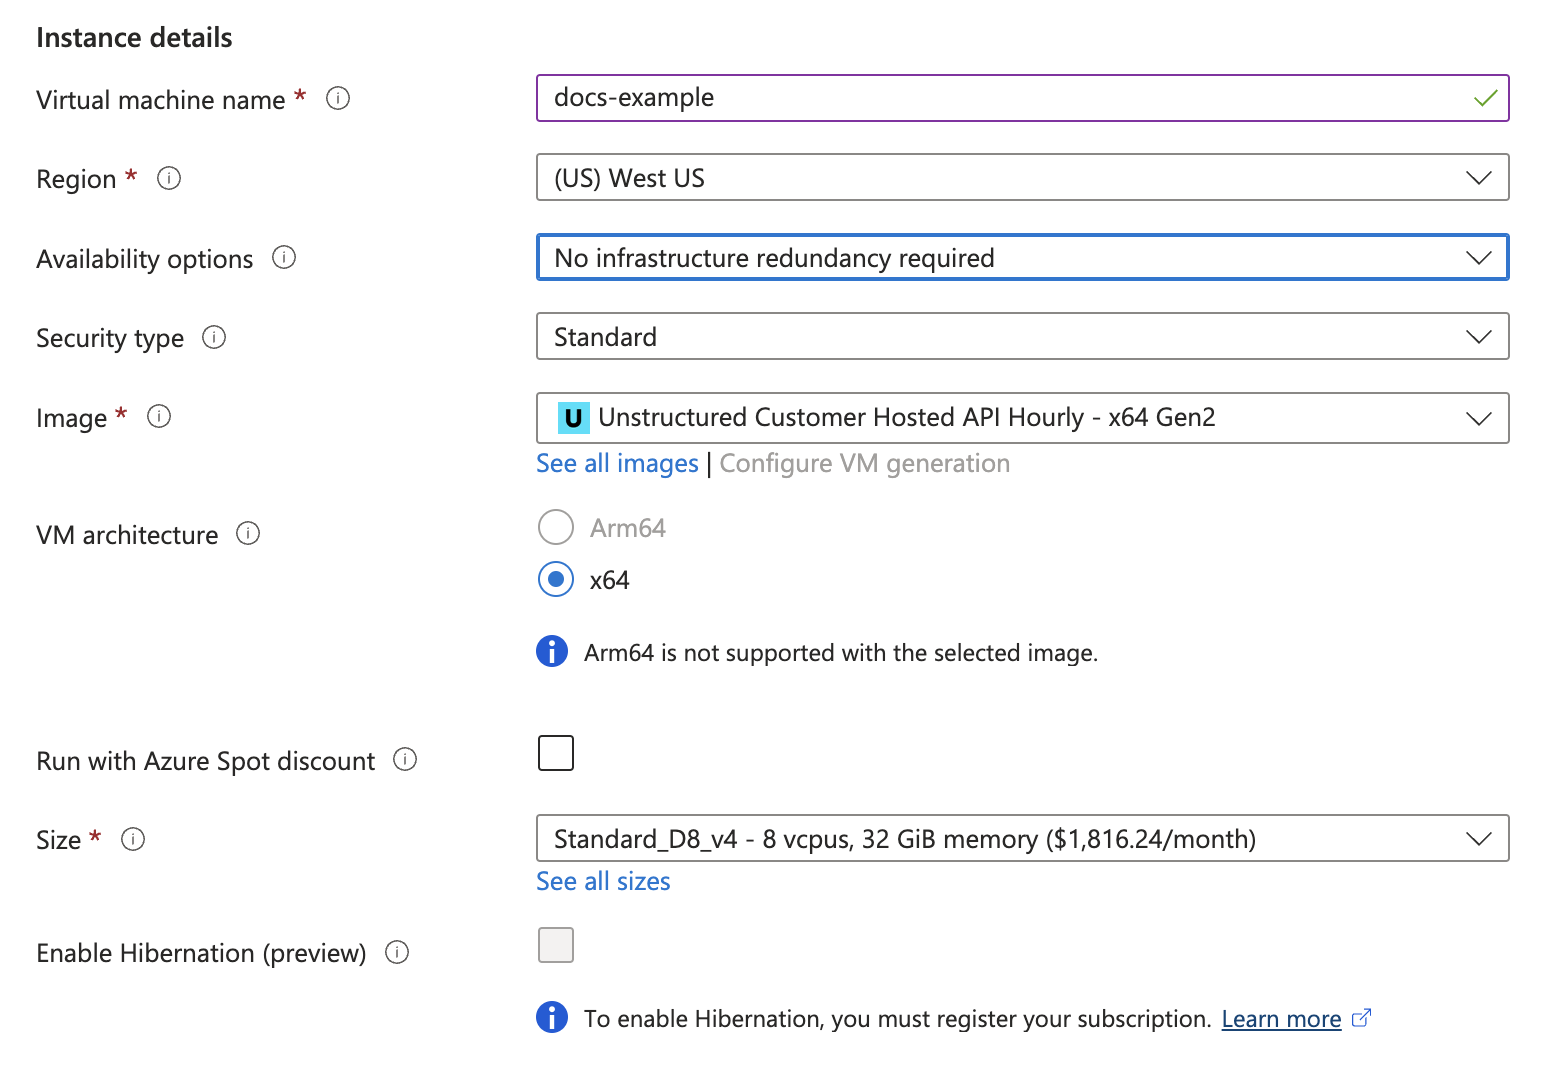
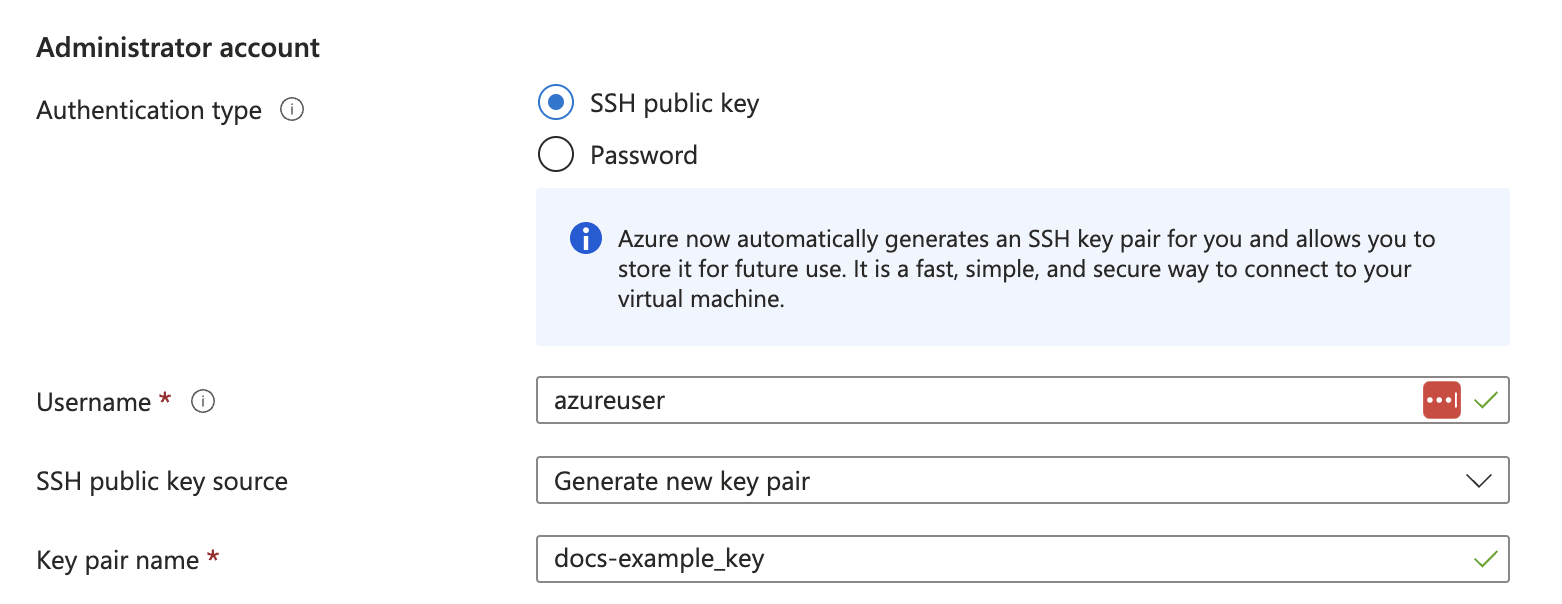
Go to [https://portal.azure.com](https://portal.azure.com/). Go to the [Unstructured Data Preprocessing - Customer Hosted API](https://azuremarketplace.microsoft.com/en-us/marketplace/apps/unstructured1691024866136.customer_api_v1?tab=Overview/) offering in the Azure Marketplace. ![Azure Marketplace](https://mintlify.s3.us-west-1.amazonaws.com/unstructured-53/img/api/Azure_Step2.png) 1. Click **Get It Now** and fill out the form. 2. Read the terms and click **Continue**. 3. Click **Create**. ![Deployment Process](https://mintlify.s3.us-west-1.amazonaws.com/unstructured-53/img/api/Azure_Step3.png) 1. On the **Create a virtual machine** page, click the **Basics** tab. 2. In the **Project details** section, select an existing **Subscription**, and select an **Resource group** from the dropdown menus, or create a new resource group by clicking **Create new**. ![project details](https://mintlify.s3.us-west-1.amazonaws.com/unstructured-53/img/api/Azure_Step4a.png) 3. In the **Instance details** section, enter a name in the **Virtual machine name** field. Note this name, as you will need it later steps. 4. Select a **Region** from the dropdown menu. 5. For **Image**, select **Unstructured Customer Hosted API Hourly - x64 Gen2** (*default*). 6. For **Size**, select a VM size from the dropdown menu, or leave the default VM size selection. To learn more, see [Azure VM comparisons](https://azure.microsoft.com/en-us/pricing/details/virtual-machines/linux/). ![instance details](https://mintlify.s3.us-west-1.amazonaws.com/unstructured-53/img/api/Azure_Step4b.png) 7. In the **Administrator account** section, for **Authentication type**, select **SSH public key** or **Password**. 8. Enter the credential settings, depending on the authentication type. ![administrator account](https://mintlify.s3.us-west-1.amazonaws.com/unstructured-53/img/api/Azure_Step4c.png) Do not click **Review + create** yet. You must still set up the load balancer. 1. Click the **Networking** tab. 2. In the **Networking interface** section, fill out the following fields: * **Virtual network**: Click **Create new**, or select an existing virtual network from the dropdown menu. To learn more, see [Quickstart: Use the Azure portal to create a virtual network](https://learn.microsoft.com/en-us/azure/virtual-network/quick-create-portal). * **Subnet**: Click **Manage subnet configuration**, or select a new or existing subnet from the dropdown menu. To learn more, see [Add, change, or delete a virtual network subnet](https://learn.microsoft.com/en-us/azure/virtual-network/virtual-network-manage-subnet?tabs=azure-portal). * **Configure network security group**: Click **Create new**, or select an existing security group from the dropdown menu. To learn more, see [Create, change, or delete a network security group](https://learn.microsoft.com/en-us/azure/virtual-network/manage-network-security-group?tabs=network-security-group-portal). 3. In the **Load balancing** section, fill out the following fields: * **Load balancing options**: Select **Azure load balancer**. * **Select a load balancer**: Click **Create a load balancer** and fill out the following fields in the pop-up window, or select an existing load balancer from the dropdown menu and note this name as you will need it in later steps: * Enter a **Load balancer name**. Note this name, as you will need it in later steps. * For **Type**, select **Public** or **Internal**. * For **Protocol**, select **TCP** or **UDP**. * Set both **Port** and **Backend port** to **80**. ![load balancer](https://mintlify.s3.us-west-1.amazonaws.com/unstructured-53/img/api/Azure_Step5.png) 4. Click **Create**. 1. Click **Review + create**. 2. Wait for validation. 3. Click **Create**. ![deployment](https://mintlify.s3.us-west-1.amazonaws.com/unstructured-53/img/api/Azure_Step6.png) 1. Go to your load balancer: in the Azure portal's **Search resources, services and docs** box, enter and then select **Load balancers**. 2. Search for and open the new load balancer that you created earlier, or the existing load balancer that you chose earlier. 3. Make any necessary settings updates to your new or existing load balancer, based on the recommended configurations in the [Load balancer network settings](#load-balancer-network-settings) section, later on this page. 1. Go to your virtual machine: in the Azure portal's **Search resources, services and docs** box, enter and then select **Virtual machines**. 2. Search for and open the new virtual machine that you created earlier, using the name that you entered earlier. 3. On the **Overview** tab, under **Properties**, note the **Public IP address** for the **Load balancer**. ![retrieve public ip](https://mintlify.s3.us-west-1.amazonaws.com/unstructured-53/img/api/Azure_Step7.png) 4. The deployed endpoint URL is **http\://\/general/v0/general**. Note this endpoint URL, as you will need it later to call the Unstructured API. Note the API environment variables in the [API environment variables](#api-environment-variables) section, later on this page. If you need to set any of these in the Docker container on the virtual machine, do the following: 1. If the virtual machine is not already running from earlier, click the **Start** icon. 2. After the virtual machine starts, click the **Connect** icon, and then click **Connect** from the drop-down list. 3. Follow the on-screen directions for one of the available options to connect to the virtual machine and display a connected terminal. 4. Stop the running container in the virtual machine, so that you can restart it later with the environment variables set: In the connected terminal, run the following command: `sudo docker container ls`. 5. Note the `CONTAINER ID` value for the running container. 6. Run the following command, replacing `` with the `CONTAINER ID` value: ```bash sudo docker container rm --force ``` 7. Now run the container again, setting the environment variables at the same time: Run the following command: `sudo docker image ls`. 8. Note the `REPOSITORY` and `TAG` value for the Docker image. 9. Run the following command, replacing `` and `` with the `REPOSITORY` and `TAG` values for the Docker image, and replacing `=`, `=` and so on with the environment variable name and value pairs: ```bash sudo docker run -d --restart unless-stopped \ -p 80:5000 \ -e = -e = -e = \ : ``` 10. Verify that the environment variables were set correctly: Run the following command: ```bash sudo docker container ls ``` 11. Note the `CONTAINER ID` value for the running container. 12. Run the following command, replacing `` with the `CONTAINER ID` value: ```bash sudo docker exec bash -c 'printenv' ``` 14. The environment variables should be in the list that appears. To help manage your overall costs, you should click the **Stop** icon whenever you are not using this virtual machine to call the Unstructured API. You can now use the running virtual machine to call the Unstructured API. For example, run one of the following, setting the following environment variables to make your code more portable: * Set `UNSTRUCTURED_API_URL` to `http://`, followed by your load balancer's public IP address, followed by `/general/v0/general`. * Set `LOCAL_FILE_INPUT_DIR` to the path on your local machine to the files for the Unstructured API to process. If you do not have any input files available, you can download any of the ones from the [example-docs](https://github.com/Unstructured-IO/unstructured-ingest/tree/main/example-docs) folder in GitHub. * Set `LOCAL_FILE_OUTPUT_DIR` to the path on your local machine for Unstructured API to send the processed output in JSON format. You must first [install the Unstructured Ingest CLI](/ingestion/overview#unstructured-ingest-cli). Because you are calling a private API and therefore do not need an Unstructured API key, you can omit the command-line option `--api-key` Or, for better code portability, it is recommended that you first set the environment variable `UNSTRUCTURED_API_KEY` to an empty string and then include the command-line option `--api-key`. ```bash CLI unstructured-ingest \ local \ --input-path $LOCAL_FILE_INPUT_DIR \ --output-dir $LOCAL_FILE_OUTPUT_DIR \ --partition-by-api \ --api-key $UNSTRUCTURED_API_KEY \ --partition-endpoint $UNSTRUCTURED_API_URL \ --strategy hi_res \ --additional-partition-args="{\"split_pdf_page\":\"true\", \"split_pdf_allow_failed\":\"true\", \"split_pdf_concurrency_level\": 15}" ``` You must first [install the Unstructured Ingest Python library](/ingestion/python-ingest). Because you are calling a private API and therefore do not need an Unstructured API key, you can omit the parameter `api_key`. Or, for better code portability, it is recommended that you first set the environment variable `UNSTRUCTURED_API_KEY` to an empty string and then include the parameter `api_key`. ```python Python Ingest import os from unstructured_ingest.pipeline.pipeline import Pipeline from unstructured_ingest.interfaces import ProcessorConfig from unstructured_ingest.processes.connectors.local import ( LocalIndexerConfig, LocalDownloaderConfig, LocalConnectionConfig, LocalUploaderConfig ) from unstructured_ingest.processes.partitioner import PartitionerConfig if __name__ == "__main__": Pipeline.from_configs( context=ProcessorConfig(), indexer_config=LocalIndexerConfig(input_path=os.getenv("LOCAL_FILE_INPUT_DIR")), downloader_config=LocalDownloaderConfig(), source_connection_config=LocalConnectionConfig(), partitioner_config=PartitionerConfig( partition_by_api=True, api_key=os.getenv("UNSTRUCTURED_API_KEY"), partition_endpoint=os.getenv("UNSTRUCTURED_API_URL"), strategy="hi_res", additional_partition_args={ "split_pdf_page": True, "split_pdf_allow_failed": True, "split_pdf_concurrency_level": 15 } ), uploader_config=LocalUploaderConfig(output_dir=os.getenv("LOCAL_FILE_OUTPUT_DIR")) ).run() ``` To help manage your overall costs, you should stop running the associated virtual machine whenever you are not using it to call the Unstructured API. ## Load balancer network settings Unstructured recommends the following load balancer settings, which you should set on your deployment's load balancer soon after you finalize and deploy it. On the load balancer's **Overview** tab in the Azure portal: * **SKU**: **Standard** On the load balancer's **Settings** tab in the Azure portal: * **Frontend IP configuration**: Private IP * **Backend pools**: VMSS * **Health probes**: * **Protocol**: **HTTP**, or **HTTPS** (this requires setting up a reverse proxy on the VMSS set to do TLS termination) * **Port**: `80` or `443` (this can be any port that the backend VMs are listening on) * **Path**: `/healthcheck` * **Interval (seconds)**: `5` * **Load balancing rules**: * **Protocol**: **TCP** * **Port**: `443` for HTTPS, or `80` for HTTP * **Backend port**: `443` for HTTPS, or `80` for HTTP * **Idle timeout (minutes)**: `60` * **Enable TCP Reset** box: Checked * **Inbound NAT rules**: * **Frontend Port**: `443` for HTTPS, or `80` for HTTP * **Backend port**: `443` for HTTPS, or `80` for HTTP * **Protocol**: **TCP** * **Enable TCP Reset** box: Checked * **Idle timeout (minutes)**: `60` ## API environment variables Unstructured supports the following environment variables, which you can set in the Docker image on the virtual machine, as needed: * `ALLOW_ORIGINS`: CORS-allowed origins. * `UNSTRUCTURED_ALLOWED_MIMETYPE`: The list of allowed MIME types, if you want to limit the file types that can be processed. * `UNSTRUCTURED_API_KEY`: The default Unstructured API key to use. * `UNSTRUCTURED_MEMORY_FREE_MINIMUM_MB`: The minimum amount of free memory in MB to allow for processing a file. If this memory is too low, the server will return a `503` error. * `UNSTRUCTURED_PDF_HI_RES_MAX_PAGES`: The maximum number of pages in a PDF file that the Unstructured API will not reject, if the `hi_res` strategy is used. The default is `300`. * `UNSTRUCTURED_REDIRECT_ROOT_URL`: If this is set, redirect a `GET` request to the Unstructured API to use this URL instead. # Overview Source: https://docs.unstructured.io/api-reference/legacy-api/overview Unstructured has deprecated the following APIs: * The [Unstructured API on AWS](/api-reference/legacy-api/aws) is deprecated. It is no longer supported and is not being actively updated. Unstructured is now available on the AWS Marketplace as a private offering. To explore supported options for running Unstructured within your virtual private cloud (VPC), email Unstructured Sales at [sales@unstructured.io](mailto:sales@unstructured.io). * The [Unstructured API on Azure](/api-reference/legacy-api/azure) is deprecated. It is no longer supported and is not being actively updated. Unstructured is now available on the AWS Marketplace as a private offering. To explore supported options for running Unstructured within your virtual private cloud (VPC), email Unstructured Sales at [sales@unstructured.io](mailto:sales@unstructured.io). These pages are not being actively updated. They might contain out-of-date information. These pages are provided for legacy reference purposes only. # Overview Source: https://docs.unstructured.io/api-reference/overview The Unstructured API consists of two parts: * The [Unstructured Workflow Endpoint](/api-reference/workflow/overview) enables a full range of partitioning, chunking, embedding, and enrichment options for your files and data. It is designed to batch-process files and data in remote locations; send processed results to various storage, databases, and vector stores; and use the latest and highest-performing models on the market today. It has built-in logic to deliver the highest quality results at the lowest cost. [Learn more](/api-reference/workflow/overview). * The [Unstructured Partition Endpoint](/api-reference/partition/overview) is intended for rapid prototyping of Unstructured's various partitioning strategies, with limited support for chunking. It is designed to work only with processing of local files, one file at a time. Use the [Unstructured Workflow Endpoint](/api-reference/workflow/overview) for production-level scenarios, file processing in batches, files and data in remote locations, generating embeddings, applying post-transform enrichments, using the latest and highest-performing models, and for the highest quality results at the lowest cost. [Learn more](/api-reference/partition/overview). # Benefits over open source The Unstructured API provides the following benefits beyond the [Unstructured open source library](/open-source/introduction/overview) offering: * Designed for production scenarios. * Significantly increased performance on document and table extraction. * Access to newer and more sophisticated vision transformer models. * Access to Unstructured's fine-tuned OCR models. * Access to Unstructured's by-page and by-similarity chunking strategies. * Adherence to security and SOC2 Type 1, SOC2 Type 2, and HIPAA compliance standards. * Authentication and identity management. * Incremental data loading. * Image extraction from documents. * More sophisticated document hierarchy detection. * Unstructured manages code dependencies, for instance for libraries such as Tesseract. * Unstructured manages its own infrastructure, including parallelization and other performance optimizations. ## Get support Should you require any assistance or have any questions regarding the Unstructured API, please [contact us directly](https://unstructured.io/contact). # Partition Endpoint parameters Source: https://docs.unstructured.io/api-reference/partition/api-parameters The Unstructured Partition Endpoint provides parameters to customize the processing of documents. These parameters include: The only required parameter is `files` - the file you wish to process. [//]: # "TODO: In the future we should automatically generate this table to make sure it's up to date" | POST, Python | JavaScript/TypeScript | Description | | ------------------------------------------ | ---------------------------------------- | ------------------------------------------------------------------------------------------------------------------------------------------------------------------------------------------------------------------------------------------------------------------------------------------------------------------------------------------- | | `files` (*shared.Files*) | `files` (*File*, *Blob*, *shared.Files*) | The file to process. | | `chunking_strategy` (*str*) | `chunkingStrategy` (*string*) | Use one of the supported strategies to chunk the returned elements after partitioning. When no chunking strategy is specified, no chunking is performed and any other chunking parameters provided are ignored. Supported strategies: `basic`, `by_title`, `by_page`, and `by_similarity`. [Learn more](/api-reference/partition/chunking). | | `content_type` (*str*) | `contentType` (*string*) | A hint to Unstructured about the content type to use (such as `text/markdown`), when there are problems processing a specific file. This value is a MIME type in the format `type/subtype`. For available MIME types, see [model.py](https://github.com/Unstructured-IO/unstructured/blob/main/unstructured/file_utils/model.py). | | `coordinates` (*bool*) | `coordinates` (*boolean*) | True to return bounding box coordinates for each element extracted with OCR. Default: false. [Learn more](/api-reference/partition/examples#saving-bounding-box-coordinates). | | `encoding` (*str*) | `encoding` (*string*) | The encoding method used to decode the text input. Default: `utf-8`. | | `extract_image_block_types` (*List\[str]*) | `extractImageBlockTypes` (*string\[]*) | The types of elements to extract, for use in extracting image blocks as Base64 encoded data stored in element metadata fields, for example: `["Image","Table"]`. Supported filetypes are image and PDF. [Learn more](/api-reference/partition/extract-image-block-types). | | `gz_uncompressed_content_type` (*str*) | `gzUncompressedContentType` (*string*) | If file is gzipped, use this content type after unzipping. Example: `application/pdf` | | `hi_res_model_name` (*str*) | `hiResModelName` (*string*) | The name of the inference model used when strategy is `hi_res`. Options are `layout_v1.1.0` and `yolox`. Default: `layout_v1.1.0`. [Learn more](/api-reference/partition/examples#changing-partition-strategy-for-a-pdf). | | `include_page_breaks` (*bool*) | `includePageBreaks` (*boolean*) | True for the output to include page breaks if the filetype supports it. Default: false. | | `languages` (*List\[str]*) | `languages` (*string\[]*) | The languages present in the document, for use in partitioning and OCR. [View the list of available languages](https://github.com/tesseract-ocr/tessdata). [Learn more](/api-reference/partition/examples#specifying-the-language-of-a-document-for-better-ocr-results). | | `output_format` (*str*) | `outputFormat` (*string*) | The format of the response. Supported formats are `application/json` and `text/csv`. Default: `application/json`. | | `pdf_infer_table_structure` (*bool*) | `pdfInferTableStructure` (*boolean*) | **Deprecated!** Use `skip_infer_table_types` instead. If true and `strategy` is `hi_res`, any `Table` elements extracted from a PDF will include an additional metadata field, `text_as_html`, where the value (string) is a just a transformation of the data into an HTML table. | | `skip_infer_table_types` (*List\[str]*) | `skipInferTableTypes` (*string\[]*) | The document types that you want to skip table extraction for. Default: `[]`. | | `starting_page_number` (*int*) | `startingPageNumber` (*number*) | The page number to be be assigned to the first page in the document. This information will be included in elements' metadata and can be be especially useful when partitioning a document that is part of a larger document. | | `strategy` (*str*) | `strategy` (*string*) | The strategy to use for partitioning PDF and image files. Options are `auto`, `vlm`, `hi_res`, `fast`, and `ocr_only`. Default: `auto`. [Learn more](/api-reference/partition/partitioning). | | `unique_element_ids` (*bool*) | `uniqueElementIds` (*boolean*) | True to assign UUIDs to element IDs, which guarantees their uniqueness (useful when using them as primary keys in database). Otherwise a SHA-256 of the element's text is used. Default: false. | | `vlm_model` (*str*) | (Not yet available) | Applies only when `strategy` is `vlm`. The name of the vision language model (VLM) provider to use for partitioning. `vlm_model_provider` must also be specified. For a list of allowed values, see the end of this article. | | `vlm_model_provider` (*str*) | (Not yet available) | Applies only when `strategy` is `vlm`. The name of the vision language model (VLM) to use for partitioning. `vlm_model` must also be specified. For a list of allowed values, see the end of this article. | | `xml_keep_tags` (*bool*) | `xmlKeepTags` (*boolean*) | True to retain the XML tags in the output. Otherwise it will just extract the text from within the tags. Only applies to XML documents. | The following parameters only apply when a chunking strategy is specified. Otherwise, they are ignored. [Learn more](/api-reference/partition/chunking). | POST, Python | JavaScript/TypeScript | Description | | -------------------------------- | --------------------------------- | ---------------------------------------------------------------------------------------------------------------------------------------------------------------------------------------------------------------------------------------------------------------------------------------------------------------------------------------------------------------------------------------------- | | `combine_under_n_chars` (*int*) | `combineUnderNChars` (*number*) | Applies only when the chunking strategy is set to `by_title`. Use this parameter to combines small chunks until the combined chunk reaches a length of `n` characters. This can mitigate the appearance of small chunks created by short paragraphs, not intended as section headings, being identified as `Title` elements in certain documents. Default: the same value as `max_characters`. | | `include_orig_elements` (*bool*) | `includeOrigElements` (*boolean*) | True (the default) to have the elements that are used to form a chunk appear in `.metadata.orig_elements` for that chunk. | | `max_characters` (*int*) | `maxCharacters` (*number*) | Cut off new sections after reaching a length of `n` characters. (This is a hard maximum.) Default: 500. | | `multipage_sections` (*bool*) | `multipageSections` (*boolean*) | Applies only when the chunking strategy is set to `by_title`. Determines if a chunk can include elements from more than one page. Default: true. | | `new_after_n_chars` (*int*) | `newAfterNChars` (*number*) | Applies only when the chunking strategy is specified. Cuts off new sections after reaching a length of `n` characters. (This is a soft maximum.) Default: 1500. | | `overlap` (*int*) | `overlap` (*number*) | A prefix of this many trailing characters from the prior text-split chunk is applied to second and later chunks formed from oversized elements by text-splitting. Default: none. | | `overlap_all` (*bool*) | `overlapAll` (*boolean*) | True to have an overlap also applied to "normal" chunks formed by combining whole elements. Use with caution, as this can introduce noise into otherwise clean semantic units. Default: none. | | `similarity_threshold` (*float*) | `similarityThreshold` (*number*) | Applies only when the chunking strategy is set to `by_similarity`. The minimum similarity text in consecutive elements must have to be included in the same chunk. Must be between 0.0 and 1.0, exclusive (0.01 to 0.99, inclusive). Default: 0.5. | The following parameters are specific to the Python and JavaScript/TypeScript clients and are not sent to the server. [Learn more](/api-reference/partition/sdk-python#page-splitting). | POST, Python | JavaScript/TypeScript | Description | | ------------------------------------- | ------------------------------------- | ---------------------------------------------------------------------------------------------------------------------------------------------------------------------------------------------------------------------------------------------------- | | `split_pdf_page` (*bool*) | `splitPdfPage` (*boolean*) | True to split the PDF file client-side. [Learn more](/api-reference/partition/sdk-python#page-splitting). | | `split_pdf_allow_failed` (*bool*) | `splitPdfAllowFailed` (*boolean*) | When `true`, a failed split request will not stop the processing of the rest of the document. The affected page range will be ignored in the results. When `false`, a failed split request will cause the entire document to fail. Default: `false`. | | `split_pdf_concurrency_level` (*int*) | `splitPdfConcurrencyLevel` (*number*) | The number of split files to be sent concurrently. Default: 5. Maximum: 15. | | `split_pdf_page_range` (*List\[int]*) | `splitPdfPageRange` (*number\[]*) | A list of 2 integers within the range `[1, length_of_pdf]`. When pdf splitting is enabled, this will send only the specified page range to the API. | Need help getting started? Check out the [Examples page](/api-reference/partition/examples) for some inspiration. Allowed values for `vlm_model_provider` and `vlm_model` pairs include the following: | `vlm_model_provider` | `vlm_model` | | -------------------- | ---------------------------------------------- | | `anthropic` | `claude-3-5-sonnet-20241022` | | `anthropic_bedrock` | `claude-3-5-sonnet-20241022` | | `bedrock` | `us.amazon.nova-lite-v1:0` | | `bedrock` | `us.amazon.nova-pro-v1:0` | | `bedrock` | `us.anthropic.claude-3-5-sonnet-20241022-v2:0` | | `bedrock` | `us.anthropic.claude-3-haiku-20240307-v1:0` | | `bedrock` | `us.anthropic.claude-3-opus-20240229-v1:0` | | `bedrock` | `us.anthropic.claude-3-sonnet-20240229-v1:0` | | `bedrock` | `us.meta.llama3-2-11b-instruct-v1:0` | | `bedrock` | `us.meta.llama3-2-90b-instruct-v1:0` | | `openai` | `gpt-4o` | | `vertexai` | `gemini-2.0-flash-001` | # Endpoint validation errors Source: https://docs.unstructured.io/api-reference/partition/api-validation-errors This section details the structure of HTTP validation errors returned by the Unstructured Partition Endpoint. ## HTTPValidationError **Type**: object **Title**: HTTPValidationError **Detail** * **Type**: array * **Description**: An array of ValidationError items, providing detailed information about the validation errors encountered. ## ValidationError **Type**: object **Title**: ValidationError **Required Fields**: loc, msg, type * **Location (loc)** * **Type**: array * **Description**: The location of the validation error in the request. Each item in the array can be either a string (e.g., field name) or an integer (e.g., array index). * **Message (msg)** * **Type**: string * **Description**: A descriptive message about the validation error. * **Error Type (type)** * **Type**: string * **Description**: The type of validation error, categorizing the nature of the error. # Chunking strategies Source: https://docs.unstructured.io/api-reference/partition/chunking Chunking functions use metadata and document elements detected with partition functions to split a document into appropriately-sized chunks for uses cases such as Retrieval Augmented Generation (RAG). If you are familiar with chunking methods that split long text documents into smaller chunks, you'll notice that Unstructured methods slightly differ, since the partitioning step already divides an entire document into its structural elements. Individual elements will only be split if they exceed the desired maximum chunk size. Two or more consecutive text elements that will together fit within `max_characters` will be combined. After chunking, you will only have elements of the following types: * `CompositeElement`: Any text element will become a `CompositeElement` after chunking. A composite element can be a combination of two or more original text elements that together fit within the maximum chunk size. It can also be a single element that doesn't leave room in the chunk for any others but fits by itself. Or it can be a fragment of an original text element that was too big to fit in one chunk and required splitting. * `Table`: A table element is not combined with other elements and if it fits within `max_characters` it will remain as is. * `TableChunk`: large tables that exceed `max_characters` chunk size are split into special `TableChunk` elements. ### "basic" chunking strategy * The basic strategy combines sequential elements to maximally fill each chunk while respecting both the specified `max_characters` (hard-max) and `new_after_n_chars` (soft-max) option values. * A single element that by itself exceeds the hard-max is isolated (never combined with another element) and then divided into two or more chunks using text-splitting. * A `Table` element is always isolated and never combined with another element. A `Table` can be oversized, like any other text element, and in that case is divided into two or more `TableChunk` elements using text-splitting. * If specified, `overlap` is applied between chunks formed by splitting oversized elements and is also applied between other chunks when `overlap_all` is `True`. ### "by\_title" chunking strategy The `by_title` chunking strategy preserves section boundaries and optionally page boundaries as well. “Preserving” here means that a single chunk will never contain text that occurred in two different sections. When a new section starts, the existing chunk is closed and a new one started, even if the next element would fit in the prior chunk. In addition to the behaviors of the `basic` strategy above, the `by_title` strategy has the following behaviors: * **Detect section headings.** A `Title` element is considered to start a new section. When a `Title` element is encountered, the prior chunk is closed and a new chunk started, even if the `Title` element would fit in the prior chunk. * **Respect page boundaries.** Page boundaries can optionally also be respected using the `multipage_sections` argument. This defaults to `True` meaning that a page break does *not* start a new chunk. Setting this to `False` will separate elements that occur on different pages into distinct chunks. * **Combine small sections.** In certain documents, partitioning may identify a list-item or other short paragraph as a `Title` element even though it does not serve as a section heading. This can produce chunks substantially smaller than desired. This behavior can be mitigated using the `combine_text_under_n_chars` argument. This defaults to the same value as `max_characters` such that sequential small sections are combined to maximally fill the chunking window. Setting this to `0` will disable section combining. ### "by\_page" chunking strategy Only available in the Unstructured UI and API. The `by_page` chunking strategy ensures the content from different pages do not end up in the same chunk. When a new page is detected, the existing chunk is completed and a new one is started, even if the next element would fit in the prior chunk. ### "by\_similarity" chunking strategy Only available in Unstructured API and Platform. The `by_similarity` chunking strategy employs the `sentence-transformers/multi-qa-mpnet-base-dot-v1` embedding model to identify topically similar sequential elements and combine them into chunks. As with other strategies, chunks will never exceed the hard-maximum chunk size set by `max_characters`. For this reason, not all elements that share a topic will necessarily appear in the same chunk. However, with this strategy you can guarantee that two elements with low similarity will not be combined in a single chunk. You can control the level of topic similarity you require for elements to have by setting the `similarity_threshold` parameter. `similarity_threshold` expects a value between 0.0 and 1.0 specifying the minimum similarity text in consecutive elements must have to be included in the same chunk. The default is 0.5. ### ## Learn more   [Chunking for RAG: best practices](https://unstructured.io/blog/chunking-for-rag-best-practices) # Document elements and metadata Source: https://docs.unstructured.io/api-reference/partition/document-elements `unstructured` simplifies and streamline the preprocessing of structured and unstructured documents for downstream tasks. What that means is no matter where your data is and no matter what format that data is in, Unstructured's toolkit will transform and preprocess that data into an easily digestible and usable format that is uniform across data formats. When you partition a document with Unstructured, the result is a list of document `Element` objects. These element objects represent different components of the source document. ## Element example Here's an example of what an element might look like: ``` {'type': 'NarrativeText', 'element_id': '5ef1d1117721f0472c1ad825991d7d37', 'text': 'The Unstructured API documentation covers the following API services:', 'metadata': {'last_modified': '2024-05-01T14:15:22', 'page_number': 1, 'languages': ['eng'], 'parent_id': '56f24319ae258b735cac3ec2a271b1d9', 'file_directory': '/content', 'filename': 'Unstructured - Unstructured.html', 'filetype': 'text/html'}} ``` As you can see, every element will have a `type`, an `element_id`, the extracted `text`, and some `metadata` which may vary depending on the element type, document structure, and some additional parameters used during partitioning and/or chunking. Let's explore some of these document element components in more detail. ## Element type Instead of treating all documents like a wall of plain text, Unstructured preserves the semantic structure of the documents. This gives you more control and flexibility over how you further use the processed documents and allows you to take their structure into consideration. At the same time, normalizing data from various file formats to the Unstructured element type scheme lets you treat all documents the same in your downstream processing, regardless of source format. For example, if you plan to summarize a document, you may only be interested in the narrative of the document, and not care about footers and headers. You can easily filter out the elements you don't need using their type. Here are some examples of the element types your document may contain: | Element type | Description | | ------------------- | -------------------------------------------------------------------------------------------------------------------------------------------------- | | `Formula` | An element containing formulas in a document. | | `FigureCaption` | An element for capturing text associated with figure captions. | | `NarrativeText` | NarrativeText is an element consisting of multiple, well-formulated sentences. This excludes elements such titles, headers, footers, and captions. | | `ListItem` | ListItem is a NarrativeText element that is part of a list. | | `Title` | A text element for capturing titles. | | `Address` | A text element for capturing physical addresses. | | `EmailAddress` | A text element for capturing email addresses. | | `Image` | A text element for capturing image metadata. | | `PageBreak` | An element for capturing page breaks. | | `Table` | An element for capturing tables. | | `Header` | An element for capturing document headers. | | `Footer` | An element for capturing document footers. | | `CodeSnippet` | An element for capturing code snippets. | | `PageNumber` | An element for capturing page numbers. | | `UncategorizedText` | Base element for capturing free text from within document. | If you apply chunking during partitioning of a document or later, you will also see the `CompositeElement` type. `CompositeElement` is a chunk formed from text (non-Table) elements. It is only produced by chunking. A composite element may be formed by combining one or more sequential elements produced by partitioning. For example, several individual list items may be combined into a single chunk. ## Element ID By default, the element ID is a SHA-256 hash of the element's text, its position on the page, page number it's on, and the name of the document file - this is to ensure that the ID is deterministic and unique at the document level. To obtain globally unique IDs in the output (UUIDs), you can pass `unique_element_ids=True` into any of the partition functions. This can be helpful if you'd like to use the IDs as a primary key in a database, for example. ## Metadata Unstructured tracks a variety of metadata about the elements extracted from documents. Here are a couple of examples of what element metadata enables you to do: * filter document elements based on an element metadata value. For instance, you may want to limit your scope to elements from a certain page, or you may want to use only elements that have an email matching a regular expression in their metadata. * map an element to the document page where it occurred so that original page can be retrieved when that element matches search criteria. Metadata is tracked at the element level. You can access the metadata for a given document element with `element.metadata`. For a dictionary representation, use `element.metadata.to_dict()`. ### Common metadata fields All document types return the following metadata fields when the information is available from the source file: | Metadata field name | Description | | -------------------------- | ---------------------------------------------------------------------------------------------------------------------------------------------------------------------------------------------------------------------------------------------------------------------------------------------------------------------------------------------------------------------------------------------------------------------------------------------------------------------------------- | | `filename` | Filename | | `file_directory` | File directory | | `last_modified` | Last modified Date | | `filetype` | File type | | `coordinates` | XY Bounding Box Coordinates. See notes below for further details about the bounding box. | | `parent_id` | Element Hierarchy. `parent_id` may be used to infer where an element resides within the overall hierarchy of a document. For instance, a NarrativeText element may have a Title element as a parent (a “sub-title”), which in turn may have another Title element as its parent (a "title"). | | `category_depth` | Element depth relative to other elements of the same category. Category depth is the depth of an element relative to other elements of the same category. It’s set by a document partitioner and enables the hierarchy post-processor to compute more accurate hierarchies. Category depth may be set using native document hierarchies, e.g. reflecting \
, \

, or \

tags within an HTML document or the indentation level of a bulleted list item in a Word document. | | `text_as_html` | HTML representation of extracted tables. Only applicable to table elements. | | `languages` | Document Languages. At document level or element level. List is ordered by probability of being the primary language of the text. | | `emphasized_text_contents` | Emphasized text (bold or italic) in the original document. | | `emphasized_text_tags` | Tags on text that is emphasized in the original document. | | `is_continuation` | True if element is a continuation of a previous element. Only relevant for chunking, if an element was divided into two due to max\_characters. | | `detection_class_prob` | Detection model class probabilities. From unstructured-inference, hi-res strategy. | Notes on common metadata fields: #### Metadata for document hierarchy `parent_id` and `category_depth` enhance hierarchy detection to identify the document structure in various file formats by measuring relative depth of an element within its category. This is especially useful in documents with native hierarchies like HTML or Word files, where elements like headings or list items inherently define structure. #### Element's coordinates Some document types support location data for the elements, usually in the form of bounding boxes. If it exists, an element's location data is available with `element.metadata.coordinates`. The `coordinates` property of an `ElementMetadata` stores: * `points` : These specify the corners of the bounding box starting from the top left corner and proceeding counter-clockwise. The points represent pixels, the origin is in the top left and the `y` coordinate increases in the downward direction. * `system`: The points have an associated coordinate system. A typical example of a coordinate system is `PixelSpace`, which is used for representing the coordinates of images. The coordinate system has a name, orientation, layout width, and layout height. The Unstructured Open Source library offers a way to change the coordinates of an element to a new coordinate system by using the `Element.convert_coordinates_to_new_system` method. If the `in_place` flag is `True`, the coordinate system and points of the element are updated in place and the new coordinates are returned. If the `in_place` flag is `False`, only the altered coordinates are returned. ```python from unstructured.documents.elements import Element from unstructured.documents.coordinates import PixelSpace, RelativeCoordinateSystem coordinates = ((10, 10), (10, 100), (200, 100), (200, 10)) coordinate_system = PixelSpace(width=850, height=1100) element = Element(coordinates=coordinates, coordinate_system=coordinate_system) print(element.metadata.coordinates.to_dict()) print(element.metadata.coordinates.system.orientation) print(element.metadata.coordinates.system.width) print(element.metadata.coordinates.system.height) element.convert_coordinates_to_new_system(RelativeCoordinateSystem(), in_place=True) # Should now be in terms of new coordinate system print(element.metadata.coordinates.to_dict()) print(element.metadata.coordinates.system.orientation) print(element.metadata.coordinates.system.width) print(element.metadata.coordinates.system.height) ``` ### Additional metadata fields by document type | Field Name | Applicable Doc Types | Description | | ---------------------- | -------------------- | ------------------------------------------------------------------------------- | | `page_number` | DOCX, PDF, PPT, XLSX | Page number | | `page_name` | XLSX | Sheet name in an Excel document | | `sent_from` | EML | Email sender | | `sent_to` | EML | Email recipient | | `subject` | EML | Email subject | | `attached_to_filename` | MSG | filename that attachment file is attached to | | `header_footer_type` | Word Doc | Pages a header or footer applies to: "primary", "even\_only", and "first\_page" | | `link_urls` | HTML | The url associated with a link in a document. | | `link_texts` | HTML | The text associated with a link in a document. | | `section` | EPUB | Book section title corresponding to table of contents | Notes on additional metadata by document type: #### Email Emails will include `sent_from`, `sent_to`, and `subject` metadata. `sent_from` is a list of strings because the [RFC 822](https://www.rfc-editor.org/rfc/rfc822) spec for emails allows for multiple sent from email addresses. #### Microsoft Excel documents For Excel documents, `ElementMetadata` will contain a `page_name` element, which corresponds to the sheet name in the Excel document. #### Microsoft Word documents Headers and footers in Word documents include a `header_footer_type` indicating which page a header or footer applies to. Valid values are `"primary"`, `"even_only"`, and `"first_page"`. ### Table-specific metadata For `Table` elements, the raw text of the table will be stored in the `text` attribute for the Element, and HTML representation of the table will be available in the element metadata under `element.metadata.text_as_html`. By default, Unstructured will automatically extract all tables for all doc types unless you set `skip_infer_table_types` parameter. Here's an example of a table element. The `text` of the element will look like this: ``` Dataset Base Model1 Large Model Notes PubLayNet [38] F / M M Layouts of modern scientific documents PRImA [3] M - Layouts of scanned modern magazines and scientific reports Newspaper [17] F - Layouts of scanned US newspapers from the 20th century TableBank [18] F F Table region on modern scientific and business document HJDataset [31] F / M - Layouts of history Japanese documents ``` And the `text_as_html` metadata for the same element will look like this: ```py
Dataset| Base Model’| Notes
PubLayNet[38] F/MLayouts of modern scientific documents
PRImA [3]MLayouts of scanned modern magazines and scientific reports
NewspaperFLayouts of scanned US newspapers from the 20th century
TableBankFTable region on modern scientific and business document
HJDataset [31]F/MLayouts of history Japanese documents
``` ### Data connector metadata fields Documents processed through source connectors include additional document metadata. These additional fields only ever appear if the source document was processed by a connector. #### Common data connector metadata fields * Data Source metadata (on json output): * url * version * date created * date modified * date processed * record locator * Record locator is specific to each connector #### Additional metadata fields by connector type (via record locator) | Source connector | Additional metadata | | --------------------- | -------------------------------- | | airtable | base id, table id, view id | | azure (from fsspec) | protocol, remote file path | | box (from fsspec) | protocol, remote file path | | confluence | url, page id | | discord | channel | | dropbox (from fsspec) | protocol, remote file path | | elasticsearch | url, index name, document id | | fsspec | protocol, remote file path | | google drive | drive id, file id | | gcs (from fsspec) | protocol, remote file path | | jira | base url, issue key | | onedrive | user pname, server relative path | | outlook | message id, user email | | s3 (from fsspec) | protocol, remote file path | | sharepoint | server path, site url | | wikipedia | page title, age url | # Examples Source: https://docs.unstructured.io/api-reference/partition/examples This page provides some examples of accessing Unstructured Partition Endpoint via different methods. To use these examples, you'll first need to set an environment variable named `UNSTRUCTURED_API_KEY`, representing your Unstructured API key. [Get your API key](/api-reference/partition/overview). For the POST and Unstructured JavaScript/TypeScript SDK examples, you'll also need to set an environment variable named `UNSTRUCTURED_API_URL` to the value `https://api.unstructuredapp.io/general/v0/general` For the Unstructured Python SDK, you do not need to set an environment variable named `UNSTRUCTURED_API_URL`, as the Python SDK uses the API URL of `https://api.unstructuredapp.io/general/v0/general` by default. (The Unstructured JavaScript/TypeScript SDK does not have this feature yet; you must always specify the API URL.) ### Changing partition strategy for a PDF Here's how you can modify partition strategy for a PDF file, and select an alternative model to use with Unstructured API. ```bash POST curl -X 'POST' $UNSTRUCTURED_API_URL \ -H 'accept: application/json' \ -H 'Content-Type: multipart/form-data' \ -H 'unstructured-api-key: $UNSTRUCTURED_API_KEY' \ -F 'files=@sample-docs/layout-parser-paper.pdf' \ -F 'strategy=vlm' \ -F 'vlm_model_provider=openai' \ -F 'vlm_model=gpt-4o' ``` ```python Python import asyncio import os import json import unstructured_client from unstructured_client.models import shared client = unstructured_client.UnstructuredClient( api_key_auth=os.getenv("UNSTRUCTURED_API_KEY") ) async def call_api(filename, input_dir, output_dir): req = { "partition_parameters": { "files": { "content": open(filename, "rb"), "file_name": os.path.basename(filename), }, "strategy": shared.Strategy.VLM, "vlm_model": "gpt-4o", "vlm_model_provider": "openai", "split_pdf_page": True, "split_pdf_allow_failed": True, "split_pdf_concurrency_level": 15 } } try: res = await client.general.partition_async( request=req ) element_dicts = [element for element in res.elements] json_elements = json.dumps(element_dicts, indent=2) # Create the output directory structure. relative_path = os.path.relpath(os.path.dirname(filename), input_dir) output_subdir = os.path.join(output_dir, relative_path) os.makedirs(output_subdir, exist_ok=True) # Write the output file. output_filename = os.path.join(output_subdir, os.path.basename(filename) + ".json") with open(output_filename, "w") as file: file.write(json_elements) except Exception as e: print(f"Error processing {filename}: {e}") async def process_files(input_directory, output_directory): tasks = [] for root, _, files in os.walk(input_directory): for file in files: if not file.endswith('.json'): full_path = os.path.join(root, file) tasks.append(call_api(full_path, input_directory, output_directory)) await asyncio.gather(*tasks) if __name__ == "__main__": asyncio.run(process_files( input_directory=os.getenv("LOCAL_FILE_INPUT_DIR"), output_directory=os.getenv("LOCAL_FILE_OUTPUT_DIR") )) ``` ```typescript TypeScript import { UnstructuredClient } from "unstructured-client"; import * as fs from "fs"; import * as path from "path"; import { Strategy } from "unstructured-client/sdk/models/shared/index.js"; import { PartitionResponse } from "unstructured-client/sdk/models/operations"; // Send all files in the source path to Unstructured for processing. // Send the processed data to the destination path. function processFiles( client: UnstructuredClient, sourcePath: string, destinationPath: string ): void { // If an output directory does not exist for the corresponding input // directory, then create it. if (!fs.existsSync(destinationPath)) { fs.mkdirSync(destinationPath, { recursive: true }); } // Get all folders and files at the current level of the input directory. const items = fs.readdirSync(sourcePath); // For each folder and file in the input directory... for (const item of items) { const inputPath = path.join(sourcePath, item); const outputPath = path.join(destinationPath, item) // If it's a folder, call this function recursively. if (fs.statSync(inputPath).isDirectory()) { processFiles(client, inputPath, outputPath); } else { // If it's a file, send it to Unstructured for processing. const data = fs.readFileSync(inputPath); client.general.partition({ partitionParameters: { files: { content: data, fileName: inputPath }, strategy: Strategy.HiRes, hiResModelName: "layout_v1.1.0", splitPdfPage: true, splitPdfConcurrencyLevel: 15, splitPdfAllowFailed: true } }).then((res: PartitionResponse) => { // If successfully processed, write the processed data to // the destination directory. if (res.statusCode == 200) { const jsonElements = JSON.stringify(res, null, 2) fs.writeFileSync(outputPath + ".json", jsonElements) } }).catch((e) => { if (e.statusCode) { console.log(e.statusCode); console.log(e.body); } else { console.log(e); } }); } } } const client = new UnstructuredClient({ security: { apiKeyAuth: process.env.UNSTRUCTURED_API_KEY }, serverURL: process.env.UNSTRUCTURED_API_URL }); processFiles( client, process.env.LOCAL_FILE_INPUT_DIR, process.env.LOCAL_FILE_OUTPUT_DIR ); ``` If you have a local deployment of the Unstructured API, you can use other supported models, such as `yolox`. ### Specifying the language of a document for better OCR results For better OCR results, you can specify what languages your document is in using the `languages` parameter. [View the list of available languages](https://github.com/tesseract-ocr/tessdata). ```bash POST curl -X 'POST' $UNSTRUCTURED_API_URL \ -H 'accept: application/json' \ -H 'Content-Type: multipart/form-data' \ -H 'unstructured-api-key: $UNSTRUCTURED_API_KEY' \ -F 'files=@sample-docs/korean.png' \ -F 'strategy=vlm' \ -F 'vlm_model_provider=openai' \ -F 'vlm_model=gpt-4o' \-F 'languages=kor' ``` ```python Python import asyncio import os import json import unstructured_client from unstructured_client.models import shared client = unstructured_client.UnstructuredClient( api_key_auth=os.getenv("UNSTRUCTURED_API_KEY") ) async def call_api(filename, input_dir, output_dir): req = { "partition_parameters": { "files": { "content": open(filename, "rb"), "file_name": os.path.basename(filename), }, "strategy": shared.Strategy.OCR_ONLY, "languages": ["kor"], "split_pdf_page": True, "split_pdf_allow_failed": True, "split_pdf_concurrency_level": 15 } } try: res = await client.general.partition_async( request=req ) element_dicts = [element for element in res.elements] json_elements = json.dumps(element_dicts, indent=2) # Create the output directory structure. relative_path = os.path.relpath(os.path.dirname(filename), input_dir) output_subdir = os.path.join(output_dir, relative_path) os.makedirs(output_subdir, exist_ok=True) # Write the output file. output_filename = os.path.join(output_subdir, os.path.basename(filename) + ".json") with open(output_filename, "w") as file: file.write(json_elements) except Exception as e: print(f"Error processing {filename}: {e}") async def process_files(input_directory, output_directory): tasks = [] for root, _, files in os.walk(input_directory): for file in files: if not file.endswith('.json'): full_path = os.path.join(root, file) tasks.append(call_api(full_path, input_directory, output_directory)) await asyncio.gather(*tasks) if __name__ == "__main__": asyncio.run(process_files( input_directory=os.getenv("LOCAL_FILE_INPUT_DIR"), output_directory=os.getenv("LOCAL_FILE_OUTPUT_DIR") )) ``` ```typescript TypeScript import { UnstructuredClient } from "unstructured-client"; import * as fs from "fs"; import * as path from "path"; import { Strategy } from "unstructured-client/sdk/models/shared/index.js"; import { PartitionResponse } from "unstructured-client/sdk/models/operations"; // Send all files in the source path to Unstructured for processing. // Send the processed data to the destination path. function processFiles( client: UnstructuredClient, sourcePath: string, destinationPath: string ): void { // If an output directory does not exist for the corresponding input // directory, then create it. if (!fs.existsSync(destinationPath)) { fs.mkdirSync(destinationPath, { recursive: true }); } // Get all folders and files at the current level of the input directory. const items = fs.readdirSync(sourcePath); // For each folder and file in the input directory... for (const item of items) { const inputPath = path.join(sourcePath, item); const outputPath = path.join(destinationPath, item) // If it's a folder, call this function recursively. if (fs.statSync(inputPath).isDirectory()) { processFiles(client, inputPath, outputPath); } else { // If it's a file, send it to Unstructured for processing. const data = fs.readFileSync(inputPath); client.general.partition({ partitionParameters: { files: { content: data, fileName: inputPath }, strategy: Strategy.OcrOnly, languages: ["kor"], splitPdfPage: true, splitPdfConcurrencyLevel: 15, splitPdfAllowFailed: true } }).then((res: PartitionResponse) => { // If successfully processed, write the processed data to // the destination directory. if (res.statusCode == 200) { const jsonElements = JSON.stringify(res, null, 2) fs.writeFileSync(outputPath + ".json", jsonElements) } }).catch((e) => { if (e.statusCode) { console.log(e.statusCode); console.log(e.body); } else { console.log(e); } }); } } } const client = new UnstructuredClient({ security: { apiKeyAuth: process.env.UNSTRUCTURED_API_KEY }, serverURL: process.env.UNSTRUCTURED_API_URL }); processFiles( client, process.env.LOCAL_FILE_INPUT_DIR, process.env.LOCAL_FILE_OUTPUT_DIR ); ``` ### Saving bounding box coordinates When elements are extracted from PDFs or images, it may be useful to get their bounding boxes as well. Set the `coordinates` parameter to `true` to add this field to the elements in the response. ```bash POST curl -X 'POST' $UNSTRUCTURED_API_URL \ -H 'accept: application/json' \ -H 'Content-Type: multipart/form-data' \ -H 'unstructured-api-key: $UNSTRUCTURED_API_KEY' \ -F 'files=@sample-docs/layout-parser-paper.pdf' \ -F 'coordinates=true' \ -F 'strategy=hi_res' ``` ```python Python import asyncio import os import json import unstructured_client from unstructured_client.models import shared client = unstructured_client.UnstructuredClient( api_key_auth=os.getenv("UNSTRUCTURED_API_KEY") ) async def call_api(filename, input_dir, output_dir): req = { "partition_parameters": { "files": { "content": open(filename, "rb"), "file_name": os.path.basename(filename), }, "strategy": shared.Strategy.HI_RES, "coordinates": True, "split_pdf_page": True, "split_pdf_allow_failed": True, "split_pdf_concurrency_level": 15 } } try: res = await client.general.partition_async( request=req ) element_dicts = [element for element in res.elements] json_elements = json.dumps(element_dicts, indent=2) # Create the output directory structure. relative_path = os.path.relpath(os.path.dirname(filename), input_dir) output_subdir = os.path.join(output_dir, relative_path) os.makedirs(output_subdir, exist_ok=True) # Write the output file. output_filename = os.path.join(output_subdir, os.path.basename(filename) + ".json") with open(output_filename, "w") as file: file.write(json_elements) except Exception as e: print(f"Error processing {filename}: {e}") async def process_files(input_directory, output_directory): tasks = [] for root, _, files in os.walk(input_directory): for file in files: if not file.endswith('.json'): full_path = os.path.join(root, file) tasks.append(call_api(full_path, input_directory, output_directory)) await asyncio.gather(*tasks) if __name__ == "__main__": asyncio.run(process_files( input_directory=os.getenv("LOCAL_FILE_INPUT_DIR"), output_directory=os.getenv("LOCAL_FILE_OUTPUT_DIR") )) ``` ```typescript TypeScript import { UnstructuredClient } from "unstructured-client"; import * as fs from "fs"; import * as path from "path"; import { Strategy } from "unstructured-client/sdk/models/shared/index.js"; import { PartitionResponse } from "unstructured-client/sdk/models/operations"; // Send all files in the source path to Unstructured for processing. // Send the processed data to the destination path. function processFiles( client: UnstructuredClient, sourcePath: string, destinationPath: string ): void { // If an output directory does not exist for the corresponding input // directory, then create it. if (!fs.existsSync(destinationPath)) { fs.mkdirSync(destinationPath, { recursive: true }); } // Get all folders and files at the current level of the input directory. const items = fs.readdirSync(sourcePath); // For each folder and file in the input directory... for (const item of items) { const inputPath = path.join(sourcePath, item); const outputPath = path.join(destinationPath, item) // If it's a folder, call this function recursively. if (fs.statSync(inputPath).isDirectory()) { processFiles(client, inputPath, outputPath); } else { // If it's a file, send it to Unstructured for processing. const data = fs.readFileSync(inputPath); client.general.partition({ partitionParameters: { files: { content: data, fileName: inputPath }, strategy: Strategy.HiRes, coordinates: true, splitPdfPage: true, splitPdfConcurrencyLevel: 15, splitPdfAllowFailed: true } }).then((res: PartitionResponse) => { // If successfully processed, write the processed data to // the destination directory. if (res.statusCode == 200) { const jsonElements = JSON.stringify(res, null, 2) fs.writeFileSync(outputPath + ".json", jsonElements) } }).catch((e) => { if (e.statusCode) { console.log(e.statusCode); console.log(e.body); } else { console.log(e); } }); } } } const client = new UnstructuredClient({ security: { apiKeyAuth: process.env.UNSTRUCTURED_API_KEY }, serverURL: process.env.UNSTRUCTURED_API_URL }); processFiles( client, process.env.LOCAL_FILE_INPUT_DIR, process.env.LOCAL_FILE_OUTPUT_DIR ); ``` ### Returning unique element IDs By default, the element ID is a SHA-256 hash of the element text. This is to ensure that the ID is deterministic. One downside is that the ID is not guaranteed to be unique. Different elements with the same text will have the same ID, and there could also be hash collisions. To use UUIDs in the output instead, set `unique_element_ids=true`. Note: this means that the element IDs will be random, so with every partition of the same file, you will get different IDs. This can be helpful if you'd like to use the IDs as a primary key in a database, for example. ```bash POST curl -X 'POST' $UNSTRUCTURED_API_URL \ -H 'accept: application/json' \ -H 'Content-Type: multipart/form-data' \ -H 'unstructured-api-key: $UNSTRUCTURED_API_KEY' \ -F 'files=@sample-docs/layout-parser-paper-fast.pdf' \ -F 'unique_element_ids=true' \ -F 'strategy=vlm' \ -F 'vlm_model_provider=openai' \ -F 'vlm_model=gpt-4o' ``` ```python Python import asyncio import os import json import unstructured_client from unstructured_client.models import shared client = unstructured_client.UnstructuredClient( api_key_auth=os.getenv("UNSTRUCTURED_API_KEY") ) async def call_api(filename, input_dir, output_dir): req = { "partition_parameters": { "files": { "content": open(filename, "rb"), "file_name": os.path.basename(filename), }, "strategy": shared.Strategy.VLM, "vlm_model": "gpt-4o", "vlm_model_provider": "openai", "unique_element_ids": True, "split_pdf_page": True, "split_pdf_allow_failed": True, "split_pdf_concurrency_level": 15 } } try: res = await client.general.partition_async( request=req ) element_dicts = [element for element in res.elements] json_elements = json.dumps(element_dicts, indent=2) # Create the output directory structure. relative_path = os.path.relpath(os.path.dirname(filename), input_dir) output_subdir = os.path.join(output_dir, relative_path) os.makedirs(output_subdir, exist_ok=True) # Write the output file. output_filename = os.path.join(output_subdir, os.path.basename(filename) + ".json") with open(output_filename, "w") as file: file.write(json_elements) except Exception as e: print(f"Error processing {filename}: {e}") async def process_files(input_directory, output_directory): tasks = [] for root, _, files in os.walk(input_directory): for file in files: if not file.endswith('.json'): full_path = os.path.join(root, file) tasks.append(call_api(full_path, input_directory, output_directory)) await asyncio.gather(*tasks) if __name__ == "__main__": asyncio.run(process_files( input_directory=os.getenv("LOCAL_FILE_INPUT_DIR"), output_directory=os.getenv("LOCAL_FILE_OUTPUT_DIR") )) ``` ```typescript TypeScript import { UnstructuredClient } from "unstructured-client"; import * as fs from "fs"; import * as path from "path"; import { Strategy } from "unstructured-client/sdk/models/shared/index.js"; import { PartitionResponse } from "unstructured-client/sdk/models/operations"; // Send all files in the source path to Unstructured for processing. // Send the processed data to the destination path. function processFiles( client: UnstructuredClient, sourcePath: string, destinationPath: string ): void { // If an output directory does not exist for the corresponding input // directory, then create it. if (!fs.existsSync(destinationPath)) { fs.mkdirSync(destinationPath, { recursive: true }); } // Get all folders and files at the current level of the input directory. const items = fs.readdirSync(sourcePath); // For each folder and file in the input directory... for (const item of items) { const inputPath = path.join(sourcePath, item); const outputPath = path.join(destinationPath, item) // If it's a folder, call this function recursively. if (fs.statSync(inputPath).isDirectory()) { processFiles(client, inputPath, outputPath); } else { // If it's a file, send it to Unstructured for processing. const data = fs.readFileSync(inputPath); client.general.partition({ partitionParameters: { files: { content: data, fileName: inputPath }, uniqueElementIds: true, strategy: Strategy.HiRes, splitPdfPage: true, splitPdfConcurrencyLevel: 15, splitPdfAllowFailed: true } }).then((res: PartitionResponse) => { // If successfully processed, write the processed data to // the destination directory. if (res.statusCode == 200) { const jsonElements = JSON.stringify(res, null, 2) fs.writeFileSync(outputPath + ".json", jsonElements) } }).catch((e) => { if (e.statusCode) { console.log(e.statusCode); console.log(e.body); } else { console.log(e); } }); } } } const client = new UnstructuredClient({ security: { apiKeyAuth: process.env.UNSTRUCTURED_API_KEY }, serverURL: process.env.UNSTRUCTURED_API_URL }); processFiles( client, process.env.LOCAL_FILE_INPUT_DIR, process.env.LOCAL_FILE_OUTPUT_DIR ); ``` ### Adding the chunking step after partitioning You can combine partitioning and subsequent chunking in a single request by setting the `chunking_strategy` parameter. By default, the `chunking_strategy` is set to `None`, and no chunking is performed. [//]: # "TODO: add a link to the concepts section about chunking strategies. Need to create the shared Concepts section first" ```bash POST curl -X 'POST' $UNSTRUCTURED_API_URL \ -H 'accept: application/json' \ -H 'Content-Type: multipart/form-data' \ -H 'unstructured-api-key: $UNSTRUCTURED_API_KEY' \ -F 'files=@sample-docs/layout-parser-paper-fast.pdf' \ -F 'chunking_strategy=by_title' \ -F 'max_characters=1024' \ -F 'strategy=vlm' \ -F 'vlm_model_provider=openai' \ -F 'vlm_model=gpt-4o' ``` ```python Python import asyncio import os import json import unstructured_client from unstructured_client.models import shared client = unstructured_client.UnstructuredClient( api_key_auth=os.getenv("UNSTRUCTURED_API_KEY") ) async def call_api(filename, input_dir, output_dir): req = { "partition_parameters": { "files": { "content": open(filename, "rb"), "file_name": os.path.basename(filename), }, "chunking_strategy": "by_title", "max_characters": 1024, "strategy": shared.Strategy.VLM, "vlm_model": "gpt-4o", "vlm_model_provider": "openai", "split_pdf_page": True, "split_pdf_allow_failed": True, "split_pdf_concurrency_level": 15 } } try: res = await client.general.partition_async( request=req ) element_dicts = [element for element in res.elements] json_elements = json.dumps(element_dicts, indent=2) # Create the output directory structure. relative_path = os.path.relpath(os.path.dirname(filename), input_dir) output_subdir = os.path.join(output_dir, relative_path) os.makedirs(output_subdir, exist_ok=True) # Write the output file. output_filename = os.path.join(output_subdir, os.path.basename(filename) + ".json") with open(output_filename, "w") as file: file.write(json_elements) except Exception as e: print(f"Error processing {filename}: {e}") async def process_files(input_directory, output_directory): tasks = [] for root, _, files in os.walk(input_directory): for file in files: if not file.endswith('.json'): full_path = os.path.join(root, file) tasks.append(call_api(full_path, input_directory, output_directory)) await asyncio.gather(*tasks) if __name__ == "__main__": asyncio.run(process_files( input_directory=os.getenv("LOCAL_FILE_INPUT_DIR"), output_directory=os.getenv("LOCAL_FILE_OUTPUT_DIR") )) ``` ```typescript TypeScript import { UnstructuredClient } from "unstructured-client"; import * as fs from "fs"; import * as path from "path"; import { ChunkingStrategy, Strategy } from "unstructured-client/sdk/models/shared/index.js"; import { PartitionResponse } from "unstructured-client/sdk/models/operations"; // Send all files in the source path to Unstructured for processing. // Send the processed data to the destination path. function processFiles( client: UnstructuredClient, sourcePath: string, destinationPath: string ): void { // If an output directory does not exist for the corresponding input // directory, then create it. if (!fs.existsSync(destinationPath)) { fs.mkdirSync(destinationPath, { recursive: true }); } // Get all folders and files at the current level of the input directory. const items = fs.readdirSync(sourcePath); // For each folder and file in the input directory... for (const item of items) { const inputPath = path.join(sourcePath, item); const outputPath = path.join(destinationPath, item) // If it's a folder, call this function recursively. if (fs.statSync(inputPath).isDirectory()) { processFiles(client, inputPath, outputPath); } else { // If it's a file, send it to Unstructured for processing. const data = fs.readFileSync(inputPath); client.general.partition({ partitionParameters: { files: { content: data, fileName: inputPath }, strategy: Strategy.HiRes, chunkingStrategy: ChunkingStrategy.ByTitle, maxCharacters: 1024, splitPdfPage: true, splitPdfConcurrencyLevel: 15, splitPdfAllowFailed: true } }).then((res: PartitionResponse) => { // If successfully processed, write the processed data to // the destination directory. if (res.statusCode == 200) { const jsonElements = JSON.stringify(res, null, 2) fs.writeFileSync(outputPath + ".json", jsonElements) } }).catch((e) => { if (e.statusCode) { console.log(e.statusCode); console.log(e.body); } else { console.log(e); } }); } } } const client = new UnstructuredClient({ security: { apiKeyAuth: process.env.UNSTRUCTURED_API_KEY }, serverURL: process.env.UNSTRUCTURED_API_URL }); processFiles( client, process.env.LOCAL_FILE_INPUT_DIR, process.env.LOCAL_FILE_OUTPUT_DIR ); ``` # Extract images and tables from documents Source: https://docs.unstructured.io/api-reference/partition/extract-image-block-types ## Task You want to get, decode, and show elements, such as images and tables, that are embedded in a PDF document. ## Approach Extract the Base64-encoded representation of specific elements, such as images and tables, in the document. For each of these extracted elements, decode the Base64-encoded representation of the element into its original visual representation and then show it. ## To run this example You will need a document that is one of the document types supported by the `extract_image_block_types` argument. See the `extract_image_block_types` entry in [API Parameters](/api-reference/partition/api-parameters). This example uses a PDF file with embedded images and tables. ## Code For the [Unstructured Python SDK](/api-reference/partition/sdk-python), you'll need: These environment variables: * `UNSTRUCTURED_API_KEY` - Your Unstructured API key value. * `UNSTRUCTURED_API_URL` - Your Unstructured API URL. ```python Python SDK from unstructured_client import UnstructuredClient from unstructured_client.models import operations, shared from unstructured.staging.base import elements_from_dicts, elements_to_json import os import base64 from PIL import Image import io if __name__ == "__main__": client = UnstructuredClient( api_key_auth=os.getenv("UNSTRUCTURED_API_KEY") ) # Source: https://github.com/Unstructured-IO/unstructured/blob/main/example-docs/embedded-images-tables.pdf # Where to get the input file and store the processed data, relative to this .py file. local_input_filepath = "local-ingest-input-pdf/embedded-images-tables.pdf" local_output_filepath = "local-ingest-output/embedded-images-tables.json" with open(local_filepath, "rb") as f: files = shared.Files( content=f.read(), file_name=local_input_filepath ) request = operations.PartitionRequest( shared.PartitionParameters( files=files, strategy=shared.Strategy.HI_RES, split_pdf_page=True, split_pdf_allow_failed=True, split_pdf_concurrency_level=15, # Extract the Base64-encoded representation of each # processed "Image" and "Table" element. Extract each into # an "image_base64" object, as a child of the # "metadata" object, for that element in the result. # Element type names, such as "Image" and "Table" here, # are case-insensitive. # Any available Unstructured element type is allowed. extract_image_block_types=["Image", "Table"] ) ) try: result = await client.general.partition_async( request=request ) for element in result.elements: if "image_base64" in element["metadata"]: # Decode the Base64-encoded representation of the # processed "Image" or "Table" element into its original # visual representation, and then show it. image_data = base64.b64decode(element["metadata"]["image_base64"]) image = Image.open(io.BytesIO(image_data)) image.show() except Exception as e: print(e) ``` ## See also * [Extract text as HTML](/api-reference/partition/text-as-html) * [Table extraction from PDF](/examplecode/codesamples/apioss/table-extraction-from-pdf) # Generate a JSON schema for a file Source: https://docs.unstructured.io/api-reference/partition/generate-schema ## Task You want to generate a schema for a JSON file that Unstructured produces, so that you can validate, test, and document related JSON files across your systems. ## Approach Use a Python package such as [genson](https://pypi.org/project/genson/) to generate schemas for your JSON files. The `genson` package is not owned or supported by Unstructured. For questions and requests, see the [Issues](https://github.com/wolverdude/genson/issues) tab of the `genson` repository in GitHub. ## Generate a schema from the terminal Use [pip](https://pip.pypa.io/en/stable/installation/) to install the [genson](https://pypi.org/project/genson/) package. ```bash pip install genson ``` By default, `genson` generates the JSON schema as a single string without any line breaks or indented whitespace. To pretty-print the schema that `genson` produces, install the [jq](https://jqlang.github.io/jq/) utility. The `jq` utility is not owned or supported by Unstructured. For questions and requests, see the [Issues](https://github.com/jqlang/jq/issues) tab of the `jq` repository in GitHub. 1. Run the `genson` command, specifying the path to the input (source) JSON file, and the path to the output (target) JSON schema file to be generated. Use `jq` to pretty-print the schema's content into the file to be generated. ```bash genson "/path/to/input/file.json" | jq '.' > "/path/to/output/schema.json" ``` 2. You can find the generated JSON schema file in the output path that you specified. ## Generate a schema from Python code In your Python project, install the [genson](https://pypi.org/project/genson/) package. ```bash pip install genson ``` 1. Set the following local environment variables: * Set `LOCAL_FILE_INPUT_PATH` to the local path to the input (source) JSON file. * Set `LOCAL_FILE_OUTPUT_PATH` to the local path to the output (target) JSON schema file to be generated. 2. Add the following Python code file to your project: ```python import os, json from genson import SchemaBuilder def json_schema_from_file( input_file_path: str, output_schema_path: str ) -> None: try: with open(input_file_path, "r") as file: json_data = json.load(file) builder = SchemaBuilder() builder.add_object(json_data) schema = builder.to_schema() try: with open(output_schema_path, "w") as schema_file: json.dump(schema, schema_file, indent=2) except IOError as e: raise IOError(f"Error writing to output file: {e}") print(f"JSON schema successfully generated and saved to '{output_schema_path}'.") except FileNotFoundError: print(f"Error: Input file '{input_file_path}' not found.") except IOError as e: print(f"I/O error occurred: {e}") except Exception as e: print(f"An unexpected error occurred: {e}") if __name__ == "__main__": json_schema_from_file( input_file_path=os.getenv("LOCAL_FILE_INPUT_PATH"), output_schema_path=os.getenv("LOCAL_FILE_OUTPUT_PATH") ) ``` 3. Run the Python code file. 4. Check the path specified by `LOCAL_FILE_OUTPUT_PATH` for the generated JSON schema file. # Get chunked elements Source: https://docs.unstructured.io/api-reference/partition/get-chunked-elements ## Task You want to get, and print or save, the contents of elements that have been chunked. ## Approach Chunked elements are typically represented in this format: ```json { "type": "CompositeElement", "element_id": "3800f7ff047e97cbf0a5f7df7ad52c80", "text": "4,5 Exception noted in \u201cSpecial Considerations for Promotional Labeling and Advertising Material\u201d\n\n3", "metadata": { "filetype": "application/pdf", "languages": ["eng"], "page_number": 6, "orig_elements": "eJy ... Full content omitted for brevity ... x8=", "filename": "Portable-Document-Format-Specifications.pdf" } } ``` ```json { "type": "Table", "element_id": "758127b42c51b93b59abf08640d1ccab", "text": "Gels and karyotypes High pressure liquid chromatography 600 dpi (8 bit grayscale depth) 300 dpi", "metadata": { "text_as_html": "
Gels and karyotypes600 dpi (8 bit grayscale depth)
High pressure liquid chromatography300
", "filetype": "application/pdf", "languages": ["eng"], "page_number": 8, "orig_elements": "eJy ... Full content omitted for brevity ... MnD", "filename": "Portable-Document-Format-Specifications.pdf" } ``` To get the element's chunked content, extract the contents of the element's `text` field. The chunked content might not contain all of its associated content. To get all of the elements that were used to derive this chunked content, extract the contents of the element's `orig_elements` field, which is nested inside of its parent `metadata` field. The contents of the `orig_elements` field is in compressed Base64 gzipped format. To get the content, Base64-decode the bytes, decompress them, and then decode them using UTF-8. ## To run this example You will need to chunk a document during processing. This example uses a PDF file chunked into 200- to 300-character elements. ## Code For the [Unstructured Python SDK](/api-reference/partition/sdk-python), you'll need: These environment variables: * `UNSTRUCTURED_API_KEY` - Your Unstructured API key value. * `UNSTRUCTURED_API_URL` - Your Unstructured API URL. ```python from unstructured_client import UnstructuredClient from unstructured_client.models import operations, shared from unstructured.staging.base import elements_from_dicts, elements_to_json import os, base64, zlib from typing import List, Dict, Any # Extract the contents of an orig_elements field. def extract_orig_elements(orig_elements): decoded_orig_elements = base64.b64decode(orig_elements) decompressed_orig_elements = zlib.decompress(decoded_orig_elements) return decompressed_orig_elements.decode('utf-8') # Source file: https://www.fda.gov/files/drugs/published/Portable-Document-Format-Specifications.pdf input_filepath = "local-ingest-input-pdf/Portable-Document-Format-Specifications.pdf" output_filepath = "local-ingest-output-json/Portable-Document-Format-Specifications.json" client = UnstructuredClient( api_key_auth=os.getenv("UNSTRUCTURED_API_KEY") ) with open(input_filepath, "rb") as f: files = shared.Files( content=f.read(), file_name=input_filepath ) # Chunk the document with a basic chunking strategy. # Create chunks that are at least around 200 characters (soft limit) # but never more than 300 characters (hard maximum). req = operations.PartitionRequest( shared.PartitionParameters( files=files, strategy=shared.Strategy.VLM, vlm_model="gpt-4o", vlm_model_provider="openai", split_pdf_page=True, split_pdf_allow_failed=True, split_pdf_concurrency_level=15, chunking_strategy="basic", new_after_n_chars=200, max_characters=300 ) ) try: res = await client.general.partition_async( request=req ) # Create a dictionary that will hold only # a transposed version of the returned elements. # For instance, we just want to capture each element's ID, # the chunk's text, and the chunk's associated elements in context. orig_elements_dict: List[Dict[str, Any]] = [] for element in res.elements: # For each chunk that has an "orig_elements" field... if "orig_elements" in element["metadata"]: # ...get the chunk's associated elements in context... orig_elements = extract_orig_elements(element["metadata"]["orig_elements"]) # ...and then transpose it and other associated fields into a separate dictionary. orig_elements_dict.append({ "element_id": element["element_id"], "text": element["text"], "orig_elements": json.loads(orig_elements) }) # Convert the elements into a JSON object. orig_elements_json = json.dumps(orig_elements_dict, indent=2) # Write the JSON to a file. with open(output_filepath, "w") as file: file.write(orig_elements_json) except Exception as e: print(e) ``` ## See also * [Recovering chunk elements](/open-source/core-functionality/chunking#recovering-chunk-elements) * [Chunking strategies](/api-reference/partition/chunking) # Get element contents Source: https://docs.unstructured.io/api-reference/partition/get-elements ## Task You want to get, manipulate, and print or save, the contents of the [document elements and metadata](/api-reference/partition/document-elements) from the processed data that Unstructured returns. ## Approach Each element in the document elements contains fields for that element's type, its ID, the extracted text, and associated metadata. The programmatic approach you take to get these document elements will depend on which SDK you use: For the [Unstructured Python SDK](/api-reference/partition/sdk-python), calling an `UnstructuredClient` object's `general.partition_async` method returns a `PartitionResponse` object. This `PartitionResponse` object's `elements` variable contains a list of key-value dictionaries (`List[Dict[str, Any]]`). For example: ```python Python # ... res = await client.general.partition_async(request=req) # Do something with the elements, for example: save_elements_to_file(res.elements) # ... ``` You can use standard Python [list operations](https://docs.python.org/3/tutorial/datastructures.html#more-on-lists) on this list. You can also use standard Python [looping techniques](https://docs.python.org/3/tutorial/datastructures.html#looping-techniques) on this list to access each element in this list. To work with an individual element's contents, you can use standard [dictionary operations](https://docs.python.org/3/library/stdtypes.html#dict) on the element. For example: ```python Python # ... res = await client.general.partition_async(request=req) for element in res.elements: # Do something with each element, for example: save_element_to_database(f"{element["element_id"]}") save_element_to_database(f"{element["text"]}") save_element_to_database(f"{element["metadata"]["filename"]}\n") # ... ``` To serialize this list as JSON, you can: 1. Use the `elements_from_dicts` function to convert the list of key-value dictionaries (`Iterable[Dict[str, Any]]`) into a list of elements (`Iterable[Element]`). 2. Use the `elements_to_json` function to convert the list of elements into a JSON-formatted string and then print or save that string. For example: ```python Python from unstructured.staging.base import elements_from_dicts, elements_to_json # ... res = await client.general.partition_async(request=req) dict_elements = elements_from_dicts( element_dicts=res.elements ) elements_to_json( elements=dict_elements, indent=2, filename=output_filepath ) # ... ``` For the [Unstructured JavaScript/TypeScript SDK](/api-reference/partition/sdk-jsts), calling an `UnstructuredClient` object's `general.partition` method returns a `Promise` object. This `PartitionResponse` object's `elements` property contains an `Array` of string-value objects (`{ [k: string]: any; }[]`). For example: ```typescript TypeScript // ... client.general.partition({ partitionParameters: { files: { content: data, fileName: inputFilepath }, strategy: Strategy.HiRes, splitPdfPage: true, splitPdfAllowFailed: true, splitPdfConcurrencyLevel: 15 } }).then((res) => { if (res.statusCode == 200) { // Do something with the elements, for example: saveElementsToFile(res) } } // ... ``` You can use standard [Array operations](https://developer.mozilla.org/en-US/docs/Web/JavaScript/Reference/Global_Objects/Array) on this array. You can also use standard `Array` techniques such as [forEach](https://developer.mozilla.org/en-US/docs/Web/JavaScript/Reference/Global_Objects/Array/forEach) to access each object in this array. For example: ```typescript TypeScript // ... client.general.partition({ partitionParameters: { files: { content: data, fileName: inputFilepath }, strategy: Strategy.HiRes, splitPdfPage: true, splitPdfAllowFailed: true, splitPdfConcurrencyLevel: 15 } }).then((res) => { if (res.statusCode == 200) { res.forEach(element => { // Do something with each element, for example: saveElementToDatabase(`${element["element_id"]}`) saveElementToDatabase(`${element["text"]}`) saveElementToDatabase(`${element["metadata"]["filename"]}`) } } } // ... ``` To serialize this list as JSON, you can use the standard [JSON.stringify](https://developer.mozilla.org/en-US/docs/Web/JavaScript/Reference/Global_Objects/JSON/stringify) function to serialize it to JSON-formatted string and the Node.js [fs.WriteFileSync](https://nodejs.org/api/fs.html#fswritefilesyncfile-data-options) function to save it as a file. For example: ```typescript TypeScript // ... client.general.partition({ partitionParameters: { files: { content: data, fileName: inputFilepath }, strategy: Strategy.HiRes, splitPdfPage: true, splitPdfAllowFailed: true, splitPdfConcurrencyLevel: 15 } }).then((res) => { if (res.statusCode == 200) { const jsonElements = JSON.stringify(res, null, 2) fs.writeFileSync(outputFilepath, jsonElements) } } // ... ``` # Overview Source: https://docs.unstructured.io/api-reference/partition/overview The Unstructured Partition Endpoint, part of the [Unstructured API](/api-reference/overview), is intended for rapid prototyping of Unstructured's various partitioning strategies, with limited support for chunking. It is designed to work only with processing of local files, one file at a time. Use the [Unstructured Workflow Endpoint](/api-reference/workflow/overview) for production-level scenarios, file processing in batches, files and data in remote locations, generating embeddings, applying post-transform enrichments, using the latest and highest-performing models, and for the highest quality results at the lowest cost. ## Get started To call the Unstructured Partition Endpoint, you need an Unstructured account and an Unstructured API key: If you signed up for Unstructured through the [For Enterprise](https://unstructured.io/enterprise) page, or if you are using a [self-hosted](/self-hosted/overview) deployment of Unstructured, the following information about signing up, signing in, and getting your Unstructured API key might apply differently to you. For details, contact Unstructured Sales at [sales@unstructured.io](mailto:sales@unstructured.io). 1. Sign in to your Unstructured account: * If you do not already have an Unstructured account, go to [https://unstructured.io/contact](https://unstructured.io/contact) and fill out the online form to indicate your interest. * If you already have an Unstructured account, go to [https://platform.unstructured.io](https://platform.unstructured.io) and sign in by using the email address, Google account, or GitHub account that is associated with your Unstructured account. The Unstructured user interface (UI) then appears, and you can start using it right away. 2. Get your Unstructured API key: a. In the Unstructured UI, click **API Keys** on the sidebar.
b. Click **Generate API Key**.
c. Follow the on-screen instructions to finish generating the key.
d. Click the **Copy** icon next to your new key to add the key to your system's clipboard. If you lose this key, simply return and click the **Copy** icon again.
[Try the quickstart](#quickstart). ## Set up billing If you initially signed up for a subscribe-and-save plan instead, of if you signed up through the [For Enterprise](https://unstructured.io/enterprise) page instead, your billing setup and terms will be different. For billing guidance, contact Unstructured Sales at [sales@unstructured.io](mailto:sales@unstructured.io). You must set up your billing information to keep using the Unstructured Partition Endpoint: ![Unstructured account settings](https://mintlify.s3.us-west-1.amazonaws.com/unstructured-53/img/ui/AccountSettings.png) ![Unstructured account payment method](https://mintlify.s3.us-west-1.amazonaws.com/unstructured-53/img/ui/AccountBillingPaymentMethod.png) 1. Sign in to your Unstructured account, at [https://platform.unstructured.io](https://platform.unstructured.io). 2. At the bottom of the sidebar, click your user icon, and then click **Account Settings**. 3. Click the **Billing** tab. 4. Click **Manage Payment Method**, follow the on-screen instructions to enter or update your payment details, and then click **Save card**. Your card is billed monthly based on your usage. The **Billing** page shows a billing overview for the current month and a list of your billing invoices. You can save money by switching from a pay-per-page plan to a subscribe-and-save plan. To do this, go to the [Unstructured Subscribe & Save](https://unstructured.io/subscribeandsave) page and complete the on-screen instructions. We calculate a page as follows: * For these file types, a page is a page, slide, or image: .pdf, .pptx, and .tiff. * For .docx files that have page metadata, we calculate the number of pages based on that metadata. * For all other file types, we calculate the number of pages as the file's size divided by 100 KB. * For non-file data, we calculate a page as 100 KB of incoming data to be processed. ## Quickstart This example uses the [curl](https://curl.se/) utility on your local machine to call the Unstructured Partition Endpoint. It sends a source (input) file from your local machine to the Unstructured Partition Endpoint which then delivers the processed data to a destination (output) location, also on your local machine. Data is processed on Unstructured-hosted compute resources. If you do not have a source file readily available, you could use for example a sample PDF file containing the text of the United States Constitution, available for download from [https://constitutioncenter.org/media/files/constitution.pdf](https://constitutioncenter.org/media/files/constitution.pdf). From your terminal or Command Prompt, set the following two environment variables. * Replace `` with the Unstructured Partition Endpoint URL, which is `https://api.unstructuredapp.io/general/v0/general` * Replace `` with your Unstructured API key, which you generated earlier on this page. ```bash export UNSTRUCTURED_API_URL= export UNSTRUCTURED_API_KEY="" ``` Run the following `curl` command, replacing `` with the path to the source file on your local machine. If the source file is not a PDF file, then remove `;type=application/pdf` from the final `--form` option in this command. ```bash curl --request 'POST' \ "$UNSTRUCTURED_API_URL" \ --header 'accept: application/json' \ --header "unstructured-api-key: $UNSTRUCTURED_API_KEY" \ --header 'content-Type: multipart/form-data' \ --form 'content_type=string' \ --form 'strategy=vlm' \ --form 'vlm_model_provider=openai' \ --form 'vlm_model=gpt-4o' \ --form 'output_format=application/json' \ --form 'files=@;type=application/pdf' ``` After you run the `curl` command, the results are printed to your terminal or Command Prompt. The command might take several minutes to complete. By default, the JSON is printed without indenting or other whitespace. You can pretty-print the JSON output by using utilities such as [jq](https://jqlang.org/tutorial/) in future command runs. You can also pipe the JSON output to a local file by using the `curl` option [-o, --output \](https://curl.se/docs/manpage.html#-o) in future command runs. You can also call the Unstructured Partition Endpoint by using the [Unstructured Python SDK](/api-reference/partition/sdk-python) or the [Unstructured JavaScript/TypeScript SDK](/api-reference/partition/sdk-jsts). # Partitioning strategies Source: https://docs.unstructured.io/api-reference/partition/partitioning For certain document types, such as images and PDFs, for example, Unstructured products offer a variety of different ways to preprocess them, controlled by the `strategy` parameter. PDF documents, for example, vary in quality and complexity. In simple cases, traditional NLP extraction techniques may be enough to extract all the text out of a document. In other cases, advanced image-to-text models are required to process a PDF. You can think of the strategies as being "rule-based" workflows (thus they are "fast"), or "model-based" workflows (slower workflow because it requires model inference, but you get "higher resolution", thus "hi\_res"). When choosing a partitioning strategy for your files, you have to be mindful of the quality/speed trade-off. To give you an example, the `fast` strategy is roughly 100x faster than leading image-to-text models. **Available options:** * `auto` (default strategy): The "auto" strategy will choose the partitioning strategy based on document characteristics and the function kwargs. * `fast`: The "rule-based" strategy leverages traditional NLP extraction techniques to quickly pull all the text elements. "Fast" strategy is not recommended for image-based file types. * `hi_res`: The "model-based" strategy identifies the layout of the document. The advantage of "hi\_res" is that it uses the document layout to gain additional information about document elements. We recommend using this strategy if your use case is highly sensitive to correct classifications for document elements. * `ocr_only`: Another "model-based" strategy that leverages Optical Character Recognition to extract text from the image-based files. * `vlm`: Uses a vision language model (VLM) to extract text from these file types: `.bmp`, `.gif`, `.heic`, `.jpeg`, `.jpg`, `.pdf`, `.png`, `.tiff`, and `.webp`. # Pipeline Source: https://docs.unstructured.io/api-reference/partition/pipeline-1 post /general/v0/general Description # Process an individual file by making a direct POST request Source: https://docs.unstructured.io/api-reference/partition/post-requests Watch the following 4-minute video to learn how to make POST requests to the Unstructured Partition Endpoint to process individual files: