> ## Documentation Index
> Fetch the complete documentation index at: https://docs.unstructured.io/llms.txt
> Use this file to discover all available pages before exploring further.
# Unstructured Pipelines walkthrough
This walkthrough is a follow-up to the [Unstructured Pipelines quickstart](/welcome#unstructured-pipelines-quickstart).
However, you do not need to have completed the quickstart to start using this walkthrough.
This walkthrough provides you with deeper, hands-on experience with the [Unstructured Pipelines](/pipelines/overview) than what was
provided in the [Unstructured Pipelines quickstart](/welcome#unstructured-pipelines-quickstart). As you follow along, you will learn how to use many of Unstructured's
features for [partitioning](/concepts/partitioning), [enriching](/concepts/enriching/overview), [chunking](/concepts/chunking), and [embedding](/concepts/embedding). These features are optimized for turning
your source documents and data into information that is well-tuned for
[retrieval-augmented generation (RAG)](https://unstructured.io/blog/rag-whitepaper),
[agentic AI](https://unstructured.io/problems-we-solve#powering-agentic-ai),
and [model fine-tuning](https://www.geeksforgeeks.org/deep-learning/what-is-fine-tuning/).
This walkthrough uses a sample file to demonstrate how Unstructured identifies and processes content such as image, graphs, complex tables, and non-English characters.
This file, which is available for you to download to your local machine, is as follows:
* Wang, Z., Liu, X., & Zhang, M. (2022, November 23).
*Breaking the Representation Bottleneck of Chinese Characters: Neural Machine Translation with Stroke Sequence Modeling*.
arXiv.org. [https://arxiv.org/pdf/2211.12781](https://arxiv.org/pdf/2211.12781). This 12-page PDF file features English and non-English characters, images, graphs, and complex tables.
Throughout this walkthrough, this file's title is shortened to "Chinese Characters" for brevity.
This walkthrough focuses on a local file for ease-of-use demonstration purposes.
This walkthrough does not cover how to use
Unstructured to set up [connectors](/pipelines/connectors) to do large-scale batch processing of multiple files and semi-structured data that are stored in remote locations.
To learn how to set up connectors and do large-scale batch processing later, see the [next steps](#next-steps) after you finish this walkthrough.
If you are not able to complete any of the following steps, [request support](support/request).
*What are these green boxes?*
As you move through this walkthrough, you will notice tips like this one. These tips are designed to help expand
your knowledge about Unstructured as you go. Feel free to skip these tips for now if you are in a hurry. You can always return to them later to learn more.
## Step 1: Open the workflow editor
After you complete the [Unstructured Pipelines quickstart](/welcome#unstructured-pipelines-quickstart), the workflow editor
should now be visible in your Unstructured account. The workflow editor should look like this:
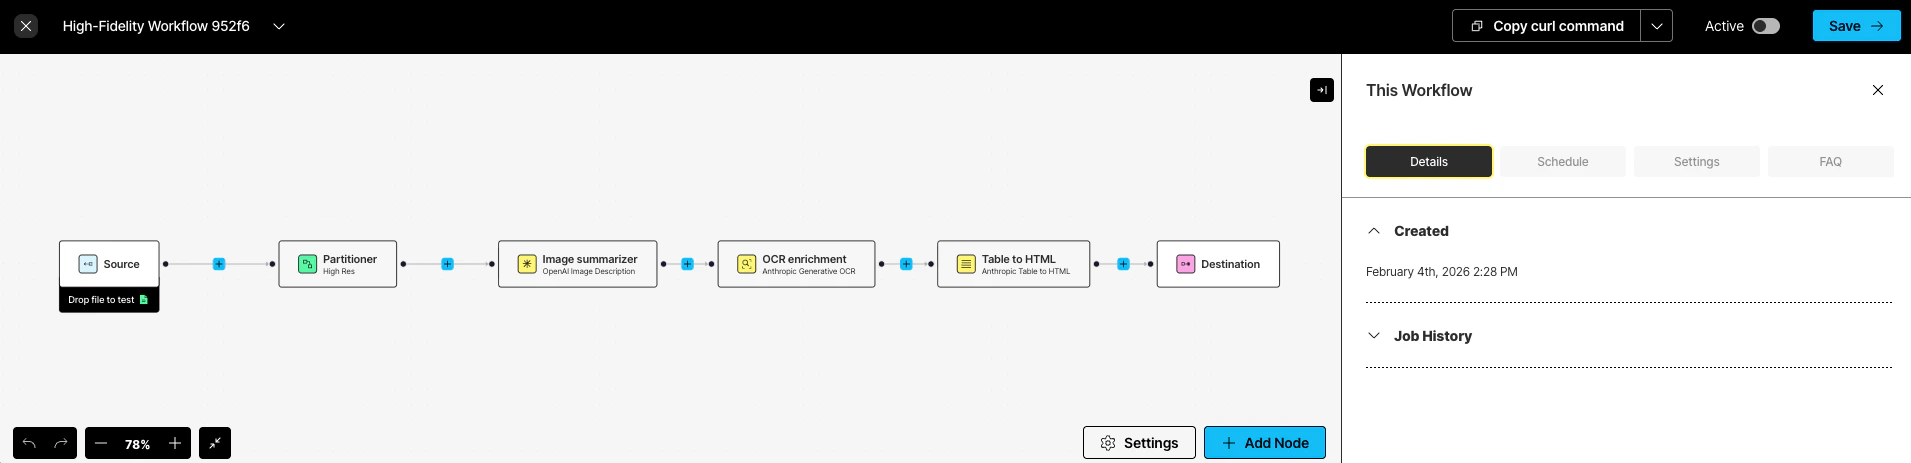 If the workflow editor is already visible, skip ahead to [Step 2](#step-2%3A-learn-about-workflows).
If the workflow editor is not yet visible, do the following to show it:
1. If you do not already have an Unstructured account, [sign up for free](https://unstructured.io/?modal=try-for-free).
After you sign up, you are automatically signed in to your new Unstructured **Let's Go** account at [https://platform.unstructured.io](https://platform.unstructured.io).
If you already have an Unstructured **Pay-As-You-Go** or **Business SaaS** account, you are already signed up for Unstructured.
Sign in to your existing Unstructured **Pay-As-You-Go** or **Business SaaS** account at [https://platform.unstructured.io](https://platform.unstructured.io).
If you already have an Unstructured **dedicated instance** or **in-VPC** deployment, your sign-in link will be unique to your deployment.
If you're not sure what your unique sign-in link is, see your Unstructured account administrator, or [request support](support/request).
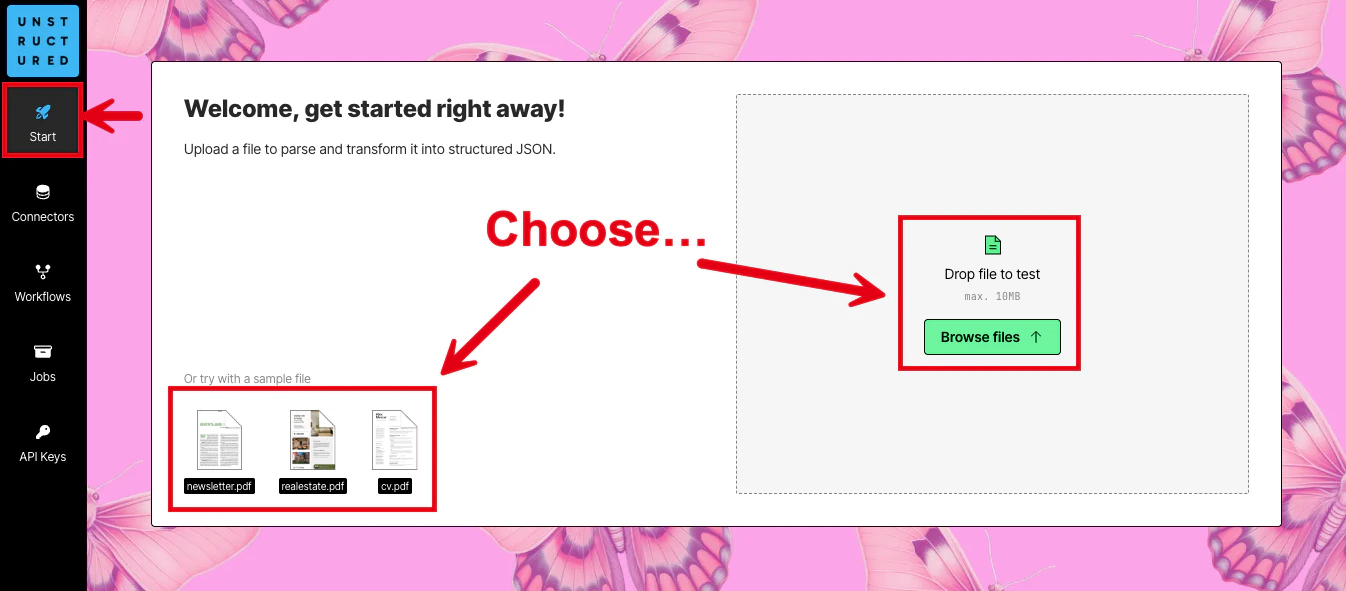
2. After you are signed in, the **Start** page appears.
3. In the **Welcome** area, do one of the following:
* Click one of the sample files, such as **realestate.pdf**, to have Unstructured parse and transform that sample file.
* Click **Browse files**, or drag and drop a file onto **Drop file to test**, to have Unstructured parse and transform your own file.
If you choose to use your own file, the file must be 50 MB or less in size.
If the workflow editor is already visible, skip ahead to [Step 2](#step-2%3A-learn-about-workflows).
If the workflow editor is not yet visible, do the following to show it:
1. If you do not already have an Unstructured account, [sign up for free](https://unstructured.io/?modal=try-for-free).
After you sign up, you are automatically signed in to your new Unstructured **Let's Go** account at [https://platform.unstructured.io](https://platform.unstructured.io).
If you already have an Unstructured **Pay-As-You-Go** or **Business SaaS** account, you are already signed up for Unstructured.
Sign in to your existing Unstructured **Pay-As-You-Go** or **Business SaaS** account at [https://platform.unstructured.io](https://platform.unstructured.io).
If you already have an Unstructured **dedicated instance** or **in-VPC** deployment, your sign-in link will be unique to your deployment.
If you're not sure what your unique sign-in link is, see your Unstructured account administrator, or [request support](support/request).
2. After you are signed in, the **Start** page appears.
3. In the **Welcome** area, do one of the following:
* Click one of the sample files, such as **realestate.pdf**, to have Unstructured parse and transform that sample file.
* Click **Browse files**, or drag and drop a file onto **Drop file to test**, to have Unstructured parse and transform your own file.
If you choose to use your own file, the file must be 50 MB or less in size.
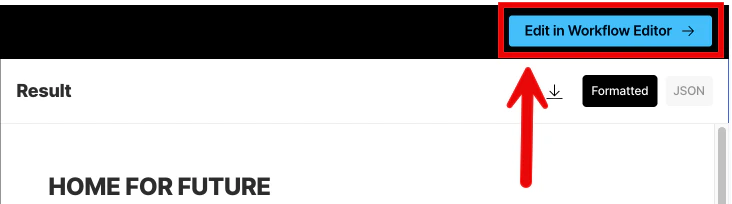
 4. Click **Edit in Workflow Editor** at the right on the title bar.
 ## Step 2: Learn about workflows
In this step, you learn about what [workflows](/pipelines/workflows) are and how they work in your Unstructured account.
Workflows are defined sequences of processes that automate the flow of data from your source documents and data into Unstructured for processing.
Unstructured then sends its processed data over into your destination file storage locations, databases, and vector stores. Your
RAG apps, agents, and models can then use this processed data in those destinations to do things more quickly and accurately such as
[answering users' questions](https://learn.microsoft.com/en-us/azure/developer/ai/advanced-retrieval-augmented-generation),
[automating business processes](https://unstructured.io/problems-we-solve#business-process-automation),
and [expanding your organization's available body of knowledge](http://knowledgemanagement.ie/the-critical-role-of-knowledge-management-as-a-foundation-for-llms-and-ai/).
***Which kinds of sources and destinations does Unstructured support?***
Unstructured can connect to many types of sources and destinations including file storage services such as Amazon S3 and Google Cloud Storage;
databases such as PostgreSQL; and vector storage and database services such as MongoDB Atlas and Pinecone.
See the full list of [supported source and destination connectors](/pipelines/connectors).
***Which kinds of files does Unstructured support?***
Unstructured can process a wide variety of file types including PDFs, word processing documents, spreadsheets, slide decks, HTML, image files, emails, and more.
See the full list of [supported file types](/pipelines/supported-file-types).
***How do I access my existing workflows and create new ones?***
To access your existing workflows, and to create new workflows, on the sidebar, click **Workflows**. (Don't click it right now,
though—you already have an existing workflow in progress!)
## Step 2: Learn about workflows
In this step, you learn about what [workflows](/pipelines/workflows) are and how they work in your Unstructured account.
Workflows are defined sequences of processes that automate the flow of data from your source documents and data into Unstructured for processing.
Unstructured then sends its processed data over into your destination file storage locations, databases, and vector stores. Your
RAG apps, agents, and models can then use this processed data in those destinations to do things more quickly and accurately such as
[answering users' questions](https://learn.microsoft.com/en-us/azure/developer/ai/advanced-retrieval-augmented-generation),
[automating business processes](https://unstructured.io/problems-we-solve#business-process-automation),
and [expanding your organization's available body of knowledge](http://knowledgemanagement.ie/the-critical-role-of-knowledge-management-as-a-foundation-for-llms-and-ai/).
***Which kinds of sources and destinations does Unstructured support?***
Unstructured can connect to many types of sources and destinations including file storage services such as Amazon S3 and Google Cloud Storage;
databases such as PostgreSQL; and vector storage and database services such as MongoDB Atlas and Pinecone.
See the full list of [supported source and destination connectors](/pipelines/connectors).
***Which kinds of files does Unstructured support?***
Unstructured can process a wide variety of file types including PDFs, word processing documents, spreadsheets, slide decks, HTML, image files, emails, and more.
See the full list of [supported file types](/pipelines/supported-file-types).
***How do I access my existing workflows and create new ones?***
To access your existing workflows, and to create new workflows, on the sidebar, click **Workflows**. (Don't click it right now,
though—you already have an existing workflow in progress!)
 ***What do the other buttons on the sidebar do?***
* **Start** takes you to the Pipelines home page. The home page features a simple way to process one local file at a time with limited default settings. [Learn how](/welcome#unstructured-pipelines-quickstart).
* **Connectors** allows you to create and manage your [source](/pipelines/sources/overview) and
[destination](/pipelines/destinations/overview) connectors.
* **Jobs** allows you to see the results of your workflows that are run manually (once) and automatically (on a regular time schedule). [Learn more](/pipelines/jobs).
* **API Keys** allows you to use code to create and manage connectors, workflows, and jobs programmatically instead of by using Pipelines. [Learn more](/pipelines/account/api-key-url).
* Your user icon at the bottom of the sidebar allows you to manage your Unstructured account. You can also sign out of your account from here. [Learn more](/pipelines/account/overview).
***What are all the parts of the workflow designer that I am looking at right now?***
The middle portion of the workflow designer is the workflow *directed acyclic graph* (DAG), which contains a
collection of *nodes* connected by *edges* that go in only one direction. You can think of the DAG similar to a flowchart
for a process. *Directed* means the arrows show the flow from one step to the next, and *acyclic* means you cannot
follow the arrows backward to get back to the starting point.
The workflow settings pane on the right includes the following tabs:
* The **Details** tab allows you to see when this workflow was created and which jobs were run for this workflow.
* **Schedule** allows you to set up a schedule for this workflow to run automatically (on a regular time schedule).
* **Settings** allows you to specify whether every time this workflow runs, that Unstructured's results will overwrite any previous results in the destination location.
To turn on this behavior, check the **Overwrite existing results** box. To turn it off, uncheck the box. Note that this setting works only
for blob storage destination connectors such as the ones for Amazon S3, Azure Blob Storage, and Google Cloud Storage.
* **FAQ** contains additional information about how to use the workflow designer.
If the workflow settings pane is not visible, click the **Settings** button near the bottom to show it.
There are also buttons near the bottom to undo or redo recent edits to the workflow DAG, zoom in and out of the workflow
designer, re-center the DAG within the designer, and add a new node to the DAG.
To change this workflow's name, click the workflow's name in the title bar, type a new name, and then press **Enter**.
## Step 3: Learn more about partitioning
You already saw from the quickstart that Unstructured uses a process called
[partitioning](/concepts/partitioning) to identify and extract content from your source documents and semi-structured data and then
output this content as a series of contextually-rich [document elements and metadata](/concepts/document-elements), which are
well-tuned for RAG, agentic AI, and model fine-tuning.
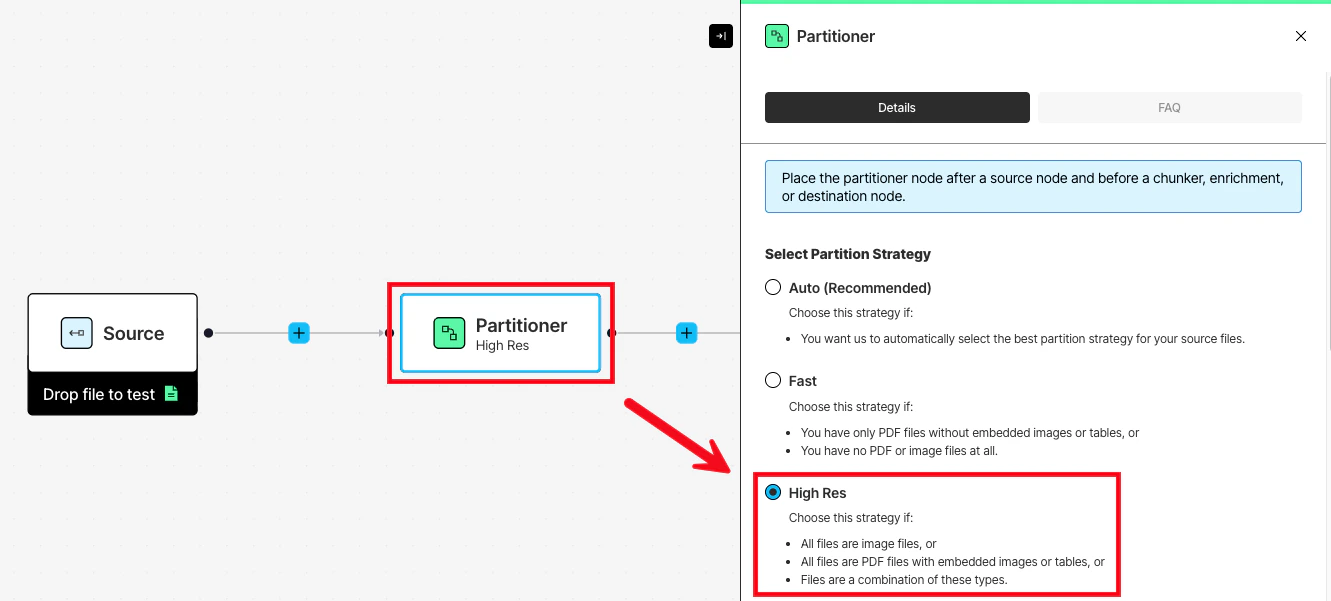
Your existing workflow already has a **Partitioner** node that uses the **High Res** partitioning strategy. To see the other
kinds of partitioning strategies that are available, click the **Partitioner** node, and then look in the node's settings pane
that appears.
***What do the other buttons on the sidebar do?***
* **Start** takes you to the Pipelines home page. The home page features a simple way to process one local file at a time with limited default settings. [Learn how](/welcome#unstructured-pipelines-quickstart).
* **Connectors** allows you to create and manage your [source](/pipelines/sources/overview) and
[destination](/pipelines/destinations/overview) connectors.
* **Jobs** allows you to see the results of your workflows that are run manually (once) and automatically (on a regular time schedule). [Learn more](/pipelines/jobs).
* **API Keys** allows you to use code to create and manage connectors, workflows, and jobs programmatically instead of by using Pipelines. [Learn more](/pipelines/account/api-key-url).
* Your user icon at the bottom of the sidebar allows you to manage your Unstructured account. You can also sign out of your account from here. [Learn more](/pipelines/account/overview).
***What are all the parts of the workflow designer that I am looking at right now?***
The middle portion of the workflow designer is the workflow *directed acyclic graph* (DAG), which contains a
collection of *nodes* connected by *edges* that go in only one direction. You can think of the DAG similar to a flowchart
for a process. *Directed* means the arrows show the flow from one step to the next, and *acyclic* means you cannot
follow the arrows backward to get back to the starting point.
The workflow settings pane on the right includes the following tabs:
* The **Details** tab allows you to see when this workflow was created and which jobs were run for this workflow.
* **Schedule** allows you to set up a schedule for this workflow to run automatically (on a regular time schedule).
* **Settings** allows you to specify whether every time this workflow runs, that Unstructured's results will overwrite any previous results in the destination location.
To turn on this behavior, check the **Overwrite existing results** box. To turn it off, uncheck the box. Note that this setting works only
for blob storage destination connectors such as the ones for Amazon S3, Azure Blob Storage, and Google Cloud Storage.
* **FAQ** contains additional information about how to use the workflow designer.
If the workflow settings pane is not visible, click the **Settings** button near the bottom to show it.
There are also buttons near the bottom to undo or redo recent edits to the workflow DAG, zoom in and out of the workflow
designer, re-center the DAG within the designer, and add a new node to the DAG.
To change this workflow's name, click the workflow's name in the title bar, type a new name, and then press **Enter**.
## Step 3: Learn more about partitioning
You already saw from the quickstart that Unstructured uses a process called
[partitioning](/concepts/partitioning) to identify and extract content from your source documents and semi-structured data and then
output this content as a series of contextually-rich [document elements and metadata](/concepts/document-elements), which are
well-tuned for RAG, agentic AI, and model fine-tuning.
Your existing workflow already has a **Partitioner** node that uses the **High Res** partitioning strategy. To see the other
kinds of partitioning strategies that are available, click the **Partitioner** node, and then look in the node's settings pane
that appears.
 *When would I choose **Auto**, **Fast**, **High Res**, or **VLM**?*
* **Auto** is recommended in most cases. It lets Unstructured figure out the best strategy to switch over to for each incoming file (and even for each page if the incoming file is a PDF), so you don't have to!
* **Fast** is only for when you know for certain that none of your files have tables, images, or multilanguage, scanned, or handwritten content in them. It's optimized for partitioning text-only content and is the fastest of all the strategies. It can recognize the text for only a few languages other than English.
* **High Res** is only for when you know for certain that at least one of your files has images or simple tables in them, and that none of your files also have scanned or handwritten content in them. It can recognize the text for more languages than **Fast** but not as many as **VLM**.
* **VLM** is great for any file, but it is best when you know for certain that some of your files have a combination of tables (especially complex ones), images, and multilanguage, scanned, or handwritten content. It's the highest quality but slowest of all the strategies.
In this step, you will test the **High Res** partitioning strategy on the "Chinese Characters" file that you downloaded earlier.
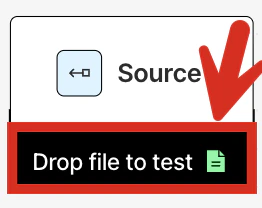
1. In the workflow designer, at the bottom of the **Source** node, click **Drop file to test**.
*When would I choose **Auto**, **Fast**, **High Res**, or **VLM**?*
* **Auto** is recommended in most cases. It lets Unstructured figure out the best strategy to switch over to for each incoming file (and even for each page if the incoming file is a PDF), so you don't have to!
* **Fast** is only for when you know for certain that none of your files have tables, images, or multilanguage, scanned, or handwritten content in them. It's optimized for partitioning text-only content and is the fastest of all the strategies. It can recognize the text for only a few languages other than English.
* **High Res** is only for when you know for certain that at least one of your files has images or simple tables in them, and that none of your files also have scanned or handwritten content in them. It can recognize the text for more languages than **Fast** but not as many as **VLM**.
* **VLM** is great for any file, but it is best when you know for certain that some of your files have a combination of tables (especially complex ones), images, and multilanguage, scanned, or handwritten content. It's the highest quality but slowest of all the strategies.
In this step, you will test the **High Res** partitioning strategy on the "Chinese Characters" file that you downloaded earlier.
1. In the workflow designer, at the bottom of the **Source** node, click **Drop file to test**.
 2. Browse to and select the "Chinese Characters" PDF file that you downloaded earlier.
3. Immediately above the **Source** node, click **Test**.
2. Browse to and select the "Chinese Characters" PDF file that you downloaded earlier.
3. Immediately above the **Source** node, click **Test**.
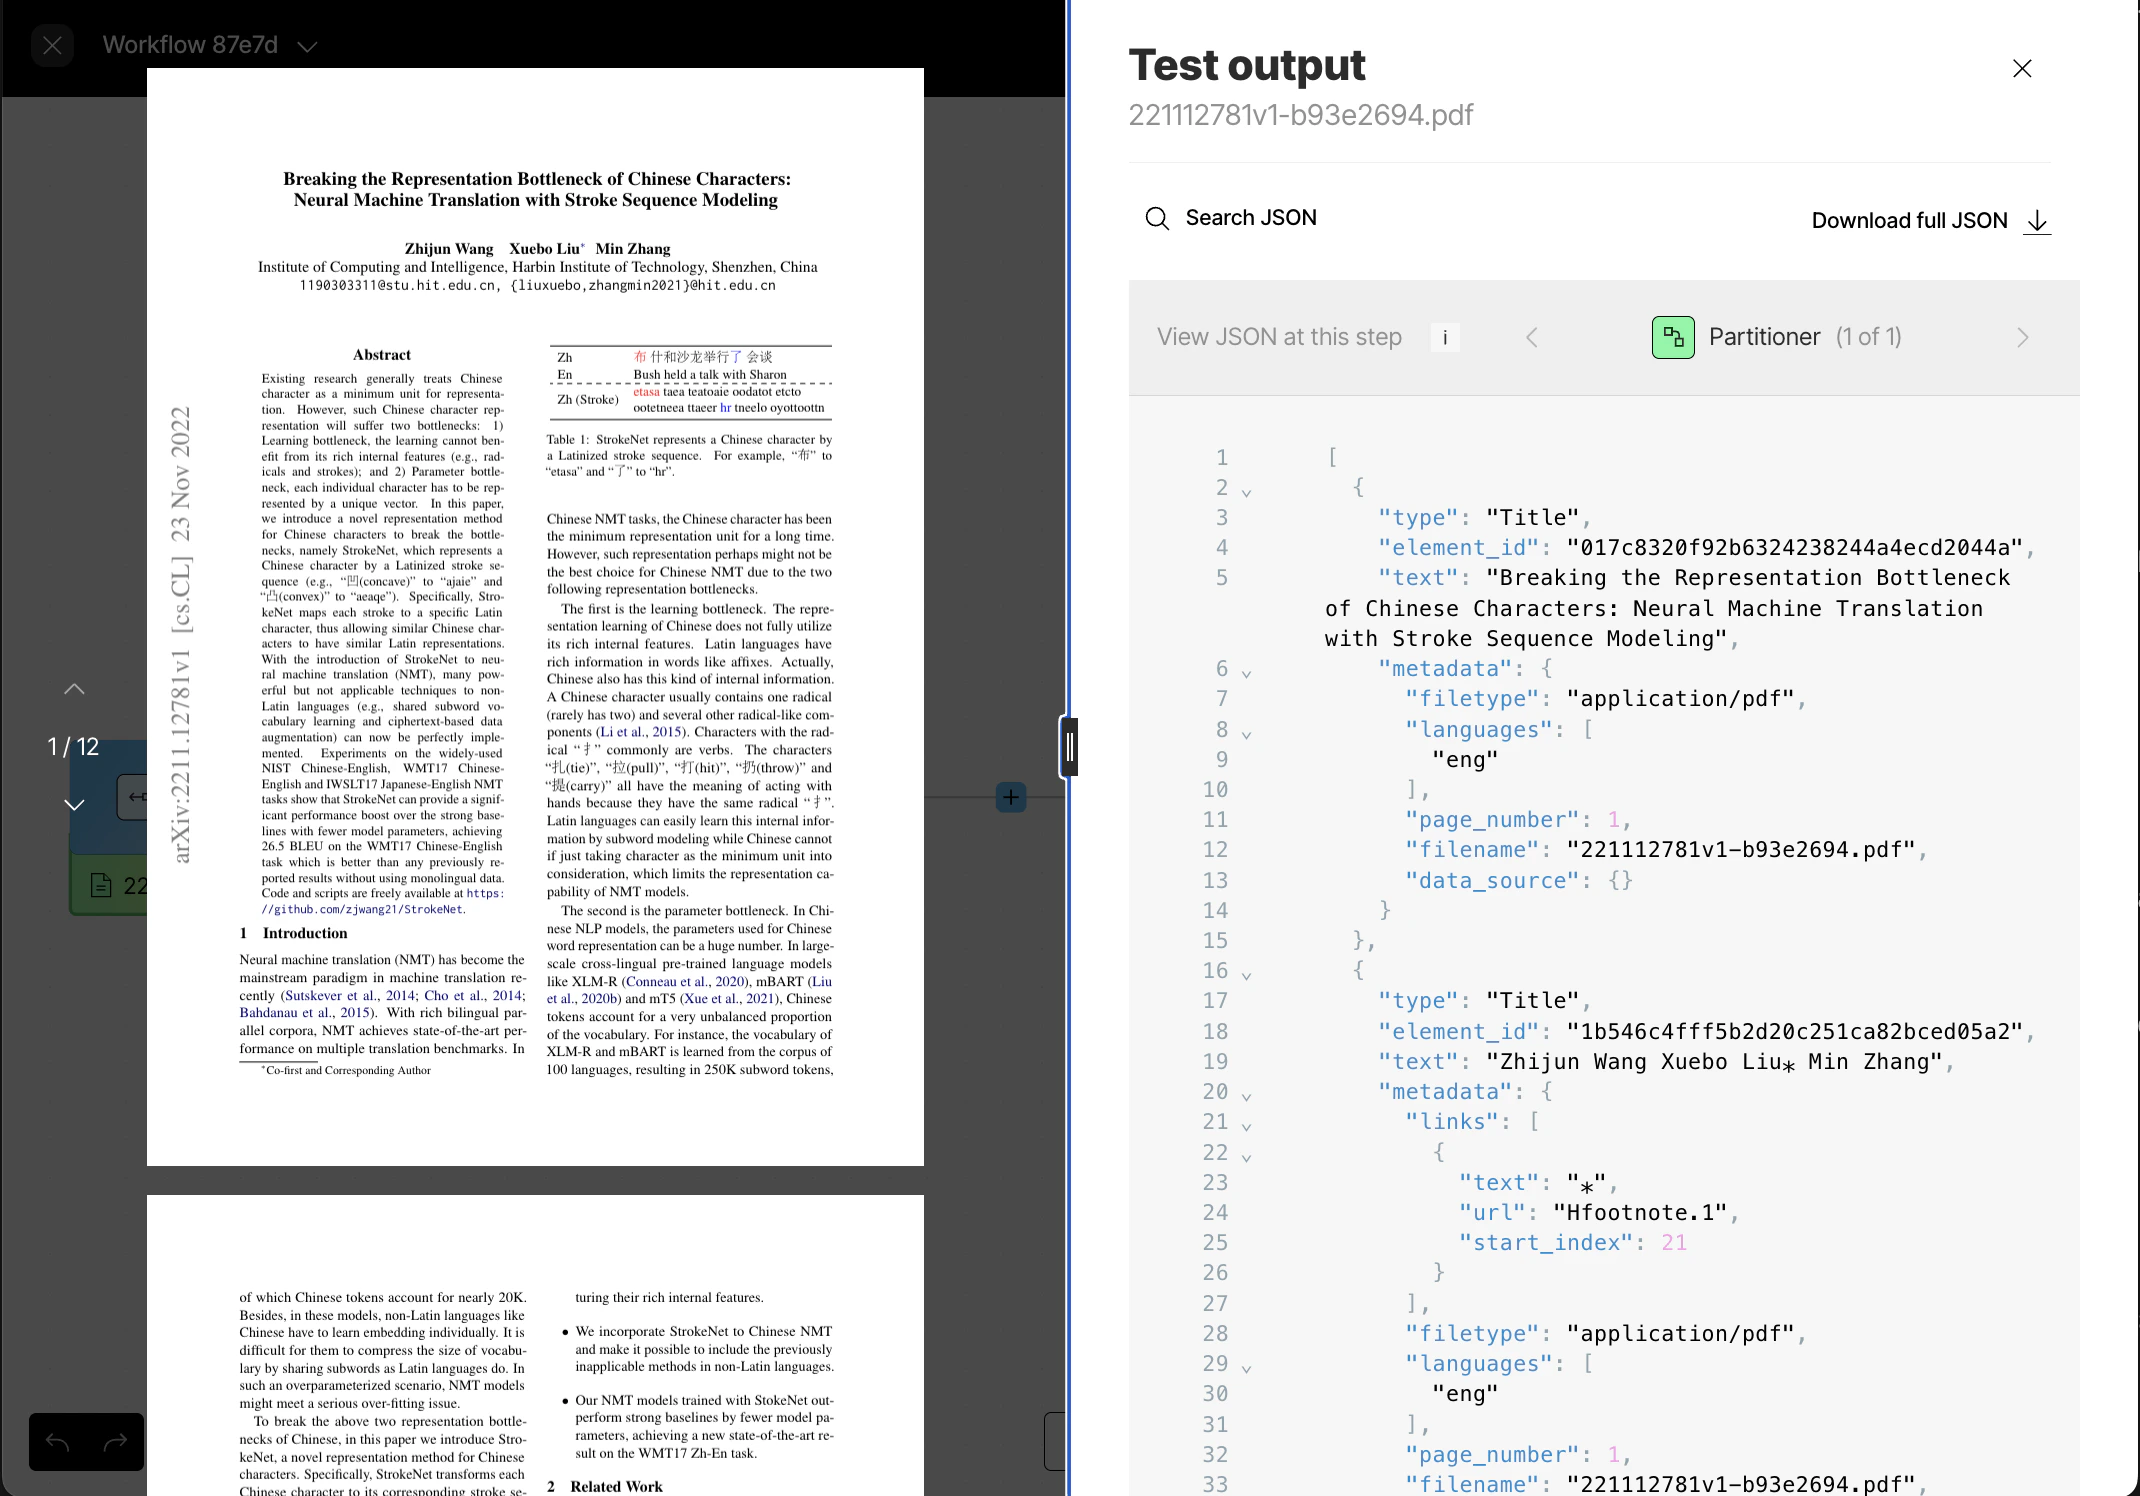
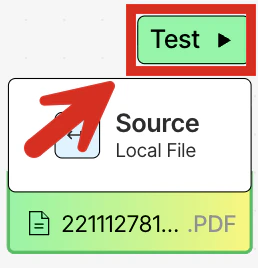 4. The PDF file appears in a pane on the left side of the screen, and Unstructured's output appears in a **Test output** pane on the right side of the screen.
 *What am I looking at in the output here?*
* Unstructured outputs its results in industry-standard [JSON](https://www.json.org) format, which is ideal for RAG, agentic AI, and model fine-tuning.
* Each object in the JSON is called a [document element](/concepts/document-elements) and contains a `text` representation of the content that Unstructured detected for the particular portion of the document that was analyzed.
* The `type` is the kind of document element that Unstructured categorizes it as, such as whether it is a title (`Title`), a table (`Table`), an image (`Image`), a series of well-formulated sentences
(`NarrativeText`), some kind of free text (`UncategorizedText`), a part of a list (`ListItem`), and so on. [Learn more](/concepts/document-elements#element-type).
* The `element_id` is a unique identifier that Unstructured generates to refer to each document element. [Learn more](/concepts/document-elements#element-id).
* `metadata` contains supporting details about each document element, such as the page number it occurred on, the file it occurred in, and so on. [Learn more](/concepts/document-elements#metadata).
*What else can I do here?*
* You can scroll through the original file on the left or, where supported for a given file type, click the up and down arrows to page through the file one page at a time.
* You can scroll through Unstructured's JSON output on the right, and you can click **Search JSON** to search for specific text in the JSON output. You will do this next.
* **Download Full JSON** allows you to download the full output to your local machine as a JSON file.
* **View JSON at this step** allows you to view the JSON output at each step in the workflow as it is further processed.
* The close (**X**) button returns you to the workflow designer.
5. In the **Test output** pane, make sure that **Table to HTML (4 of 4)** is showing. If not, click the right arrow (**>**) until **Table to HTML (4 of 4)** appears, which will show the output from the last node in the workflow.
*What am I looking at in the output here?*
* Unstructured outputs its results in industry-standard [JSON](https://www.json.org) format, which is ideal for RAG, agentic AI, and model fine-tuning.
* Each object in the JSON is called a [document element](/concepts/document-elements) and contains a `text` representation of the content that Unstructured detected for the particular portion of the document that was analyzed.
* The `type` is the kind of document element that Unstructured categorizes it as, such as whether it is a title (`Title`), a table (`Table`), an image (`Image`), a series of well-formulated sentences
(`NarrativeText`), some kind of free text (`UncategorizedText`), a part of a list (`ListItem`), and so on. [Learn more](/concepts/document-elements#element-type).
* The `element_id` is a unique identifier that Unstructured generates to refer to each document element. [Learn more](/concepts/document-elements#element-id).
* `metadata` contains supporting details about each document element, such as the page number it occurred on, the file it occurred in, and so on. [Learn more](/concepts/document-elements#metadata).
*What else can I do here?*
* You can scroll through the original file on the left or, where supported for a given file type, click the up and down arrows to page through the file one page at a time.
* You can scroll through Unstructured's JSON output on the right, and you can click **Search JSON** to search for specific text in the JSON output. You will do this next.
* **Download Full JSON** allows you to download the full output to your local machine as a JSON file.
* **View JSON at this step** allows you to view the JSON output at each step in the workflow as it is further processed.
* The close (**X**) button returns you to the workflow designer.
5. In the **Test output** pane, make sure that **Table to HTML (4 of 4)** is showing. If not, click the right arrow (**>**) until **Table to HTML (4 of 4)** appears, which will show the output from the last node in the workflow.
 6. Some interesting portions of the output include the following, which you can get to by clicking **Search JSON** above the output:
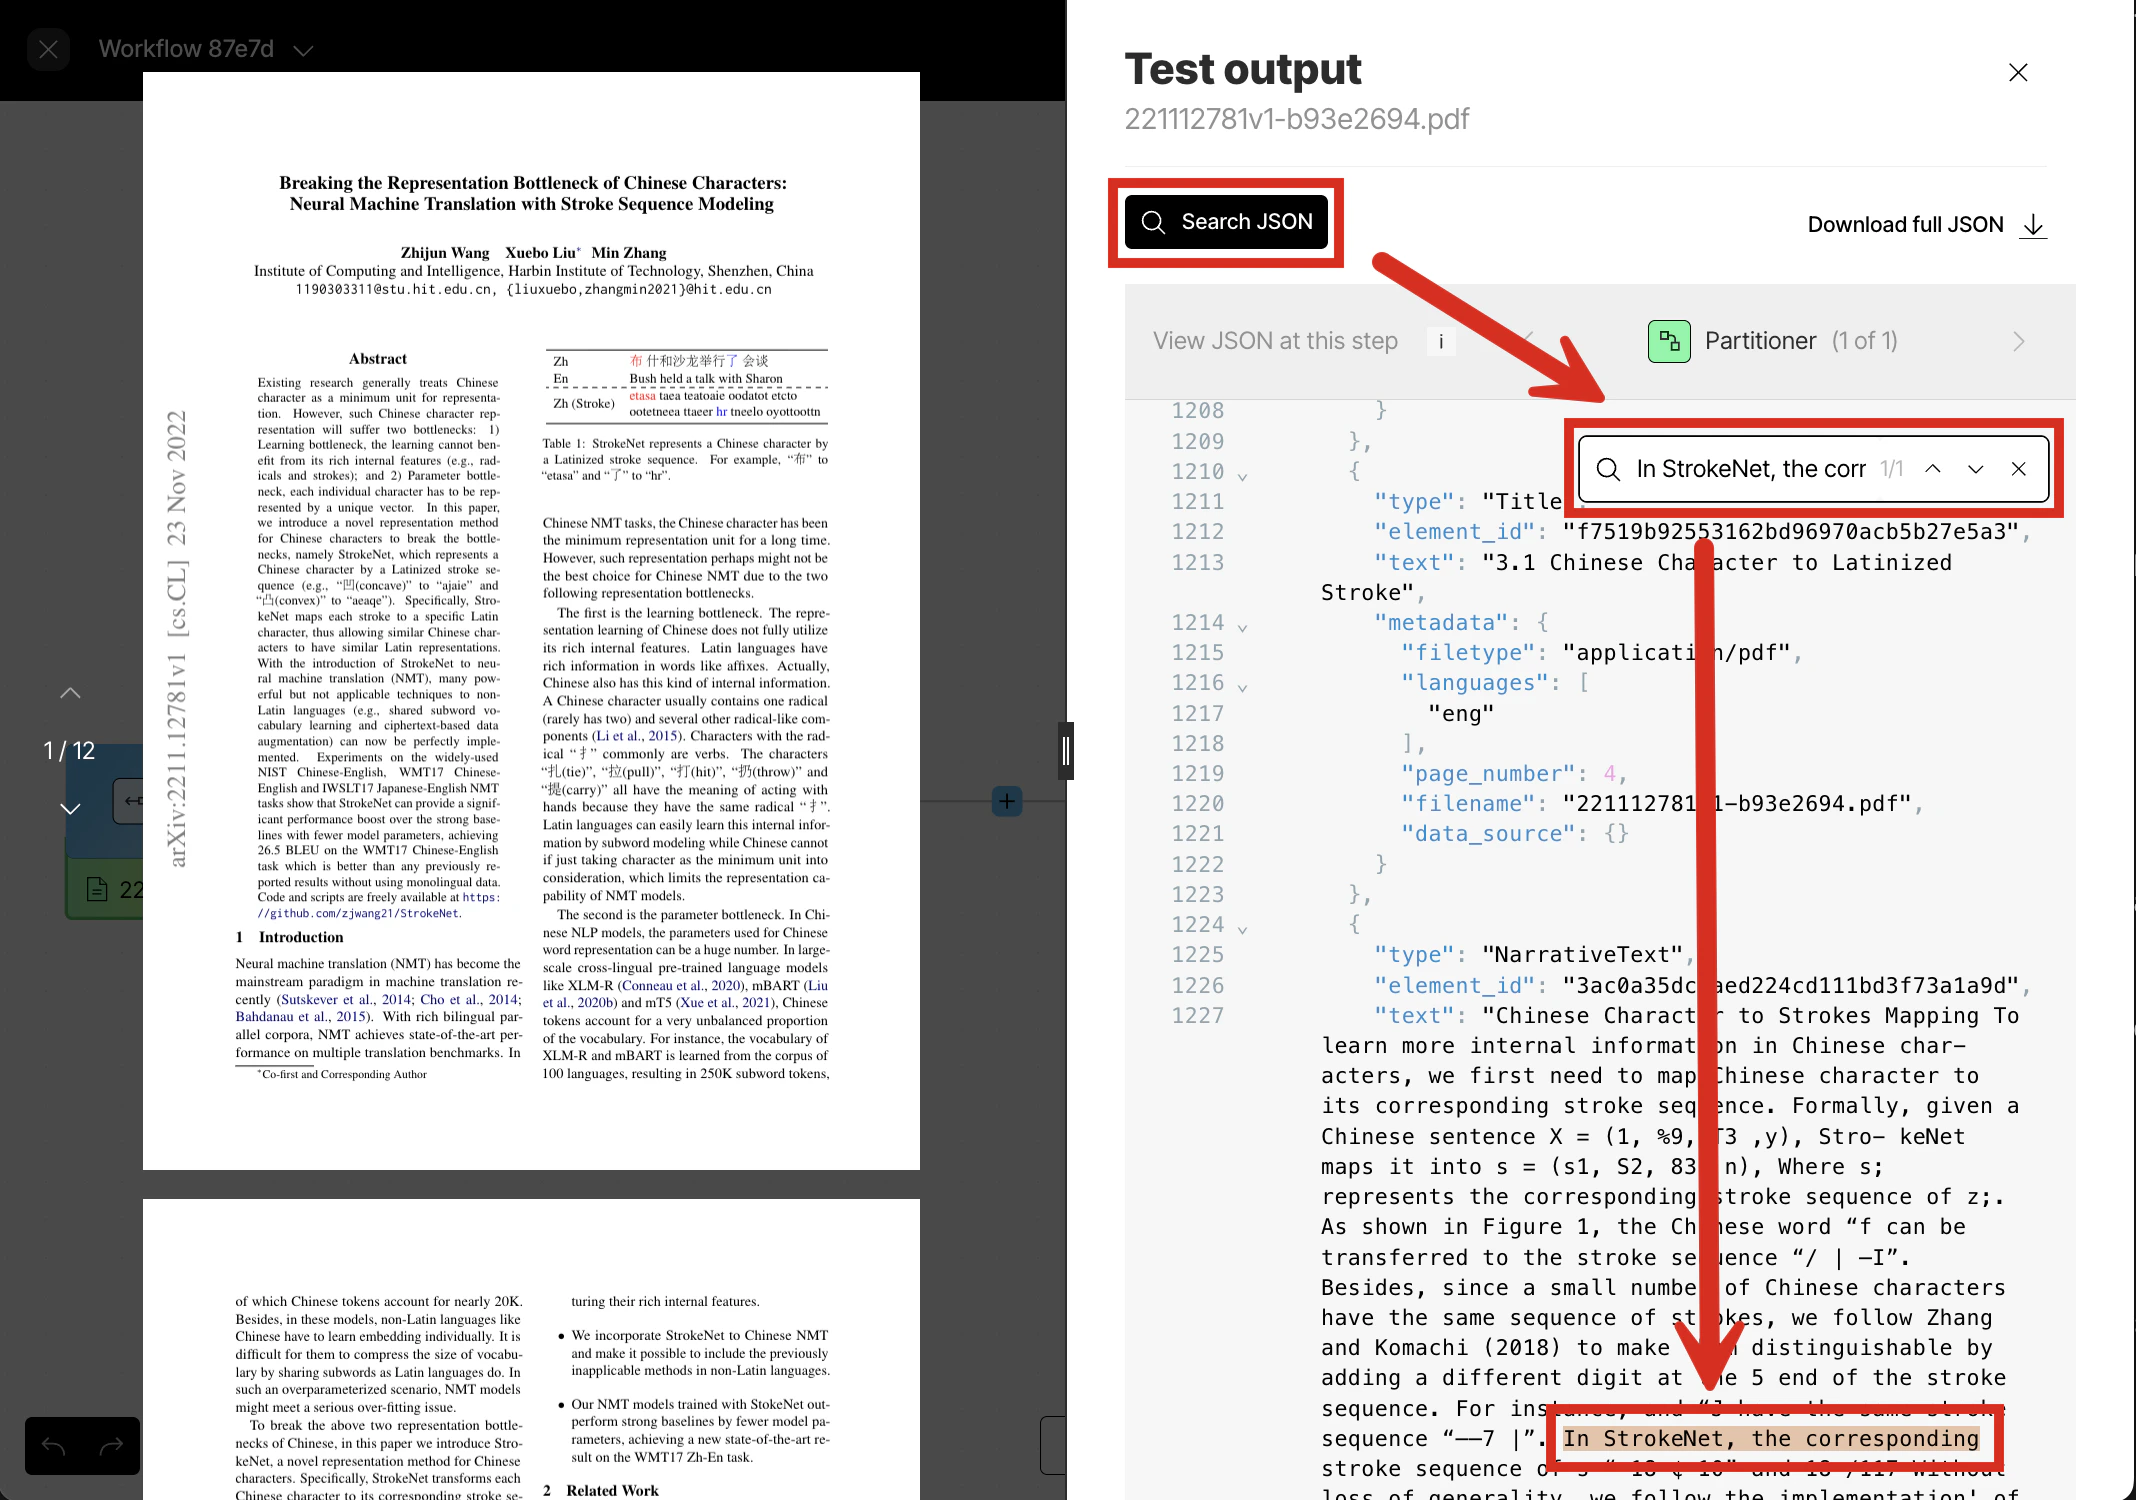 * The Chinese characters on page 1. Search for the text `verbs. The characters`. Notice how the Chinese characters are captured correctly.
* The HTML representations of the seven tables on pages 6-9 and 12. Search for the text `text_as_html`.
* The descriptions of the four diagrams on page 3. Search for the text `"diagram` (including the opening quotation mark).
* The descriptions of the three graphs on pages 7-8. Search for the text `"graph` (including the opening quotation mark).
If **Search JSON** is not clickable, this is probably because the JSON output is too large for the online viewer.
Click **Download full JSON** and open the downloaded JSON file in an offline text editor (such as Visual Studio Code).
[Learn more](/examplecode/tools/json-tools#visual-studio-code).
7. When you are done, be sure to click the close (**X**) button above the output on the right side of the screen, to return to
the workflow designer for the next step.
## Step 4: Add more enrichments
Your existing workflow already has three enrichment nodes. Recall that these nodes perform the following enrichments:
* An [image description](ui/enriching/image-descriptions) enrichment, which uses a vision language model (VLM) to provide a text-based summary of the contents of each detected image.
* A [generative OCR](/concepts/enriching/generative-ocr) enrichment, which uses a VLM to improve the accuracy of each block of initially-processed text, as needed.
* A [table to HTML](/concepts/enriching/table-to-html) enrichment, which uses a VLM to provide an HTML-structured representation of each detected table.
In this step, you add a few more [enrichments](/concepts/enriching/overview) to your workflow, such as generating summary descriptions of detected tables,
and generating detected entities (such as people and organizations) and the inferred relationships among these entities.
1. Add a table description node: in the workflow designer, just before the **Destination** node, click the add (+) icon, and then click **Enrich > Table Description**.
* The Chinese characters on page 1. Search for the text `verbs. The characters`. Notice how the Chinese characters are captured correctly.
* The HTML representations of the seven tables on pages 6-9 and 12. Search for the text `text_as_html`.
* The descriptions of the four diagrams on page 3. Search for the text `"diagram` (including the opening quotation mark).
* The descriptions of the three graphs on pages 7-8. Search for the text `"graph` (including the opening quotation mark).
If **Search JSON** is not clickable, this is probably because the JSON output is too large for the online viewer.
Click **Download full JSON** and open the downloaded JSON file in an offline text editor (such as Visual Studio Code).
[Learn more](/examplecode/tools/json-tools#visual-studio-code).
7. When you are done, be sure to click the close (**X**) button above the output on the right side of the screen, to return to
the workflow designer for the next step.
## Step 4: Add more enrichments
Your existing workflow already has three enrichment nodes. Recall that these nodes perform the following enrichments:
* An [image description](ui/enriching/image-descriptions) enrichment, which uses a vision language model (VLM) to provide a text-based summary of the contents of each detected image.
* A [generative OCR](/concepts/enriching/generative-ocr) enrichment, which uses a VLM to improve the accuracy of each block of initially-processed text, as needed.
* A [table to HTML](/concepts/enriching/table-to-html) enrichment, which uses a VLM to provide an HTML-structured representation of each detected table.
In this step, you add a few more [enrichments](/concepts/enriching/overview) to your workflow, such as generating summary descriptions of detected tables,
and generating detected entities (such as people and organizations) and the inferred relationships among these entities.
1. Add a table description node: in the workflow designer, just before the **Destination** node, click the add (+) icon, and then click **Enrich > Table Description**.
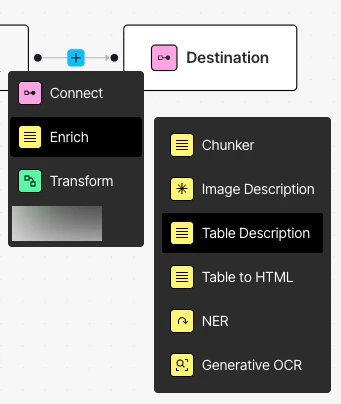 2. In the node's settings pane's **Details** tab, click:
* Any available choice under **Provider** (for example, **Anthropic**).
* Any available choice under **Model** (for example, **Claude Sonnet 4.5** if you chose **Anthropic** for **Provider**).
The lists of available models for these enrichments are constantly being updated. Your lists might also differ from these instructions, depending on your Unstructured
account type. If the suggested model for an enrichment is not available, choose another available model from the list.
If you have an Unstructured **Business** account and want to add more models to these lists, contact your
Unstructured account administrator or Unstructured sales representative, or [request support](support/request).
The table description enrichment generates a summary description of each detected table. This can help you to more quickly and easily understand
what each table is all about without having to stop to manually read through the table's content yourself. This also provides additional helpful context about the table for your RAG apps, agents, and models. [Learn more](/concepts/enriching/table-descriptions).
3. Add a named entity recognition enrichment node: click the add (**+**) icon to the right of the preceding node, and then click **Enrich > NER**.
In the node's settings pane's **Details** tab, click:
* Any available choice under **Provider** (for example, **Anthropic**).
* Any available choice under **Model** (for example, **Claude Sonnet 4.5** if you chose **Anthropic** for **Provider**).
The named entity recognition (NER) enrichment generates a list of detected entities (such as people and organizations) and the inferred relationships among these entities. This provides additional context about these entities' types and their relationships for your graph databases, RAG apps, agents, and models. [Learn more](/concepts/enriching/ner).
The workflow designer should now look similar to this:
2. In the node's settings pane's **Details** tab, click:
* Any available choice under **Provider** (for example, **Anthropic**).
* Any available choice under **Model** (for example, **Claude Sonnet 4.5** if you chose **Anthropic** for **Provider**).
The lists of available models for these enrichments are constantly being updated. Your lists might also differ from these instructions, depending on your Unstructured
account type. If the suggested model for an enrichment is not available, choose another available model from the list.
If you have an Unstructured **Business** account and want to add more models to these lists, contact your
Unstructured account administrator or Unstructured sales representative, or [request support](support/request).
The table description enrichment generates a summary description of each detected table. This can help you to more quickly and easily understand
what each table is all about without having to stop to manually read through the table's content yourself. This also provides additional helpful context about the table for your RAG apps, agents, and models. [Learn more](/concepts/enriching/table-descriptions).
3. Add a named entity recognition enrichment node: click the add (**+**) icon to the right of the preceding node, and then click **Enrich > NER**.
In the node's settings pane's **Details** tab, click:
* Any available choice under **Provider** (for example, **Anthropic**).
* Any available choice under **Model** (for example, **Claude Sonnet 4.5** if you chose **Anthropic** for **Provider**).
The named entity recognition (NER) enrichment generates a list of detected entities (such as people and organizations) and the inferred relationships among these entities. This provides additional context about these entities' types and their relationships for your graph databases, RAG apps, agents, and models. [Learn more](/concepts/enriching/ner).
The workflow designer should now look similar to this:
 4. Immediately above the **Source** node, click **Test**.
5. In the **Test output** pane, make sure that **NER (6 of 6)** is showing. If not, click the right arrow (**>**) until **NER (6 of 6)** appears, which will show the output from the last node in the workflow.
6. Some interesting portions of the output include the following:
* The descriptions of the seven tables on pages 6-9 and 12. Search for the text `"Table"` (including the quotation marks).
* The identified entities and inferred relationships among them. For example, search for the text `Zhijun Wang`. Of the nine instances of this name, notice
the author's identification as a `PERSON` three times, the author's `published` relationship twice, and the author's `affiliated_with` relationship twice.
7. When you are done, be sure to click the close (**X**) button above the output on the right side of the screen, to return to
the workflow designer for the next step.
## Step 5: Experiment with chunking
In this step, you apply [chunking](/concepts/chunking) to your workflow. Chunking is the process where Unstructured rearranges
the resulting document elements' `text` content into manageable "chunks" to stay within the limits of an AI model and to improve retrieval precision.
*What kind of chunking strategy should I use, and how big should my chunks be?*
Unfortunately, there is no one-size-fits-all answer to this question. However, there are some general considerations and guidelines that can help you to determine
the best chunking strategy and chunk size for your specific use case. Be sure of course to also consult the documentation for your target AI model and downstream application toolsets.
Is your content primarily organized by title, by page, by interrelated subject matter, or none of these? This can help you determine whether a
by-title, by-page, by-similarity, or basic (by-character) chunking strategy is best. (You'll experiment with each of these strategies here later.)
If your chunks are too small, they might lose necessary context, leading to the model providing inaccurate, irrelevant, or hallucinated results.
On the other hand, if your chunks are too large, the model can struggle with the sheer volume of information, leading to information overload, diluted meaning, and potentially higher processing costs.
You should aim to find a balance between chunks that are big enough to contain meaningful information, while small enough to enable performant applications and low latency responses.
For example, smaller chunks of 128 or 256 tokens might be sufficient for capturing more granular semantic information, while larger chunks of 512 or 1024 tokens might be better for retaining more context.
It's important here to note that *tokens* and *characters* are not the same thing! In terms of
characters, for English text, a common approximation is 1 token being equal to about 3 or 4 characters or three-quarters of a word. Many AI model providers publish their own token-to-character calculators online that you can use for estimation purposes.
You should experiment with a variety of chunk sizes, taking into account the kinds of content, the length and complexity of user queries and agent tasks,
the intended end use, and of course the limits of the models you are using. Try different chunking strategies and sizes with your models and evaluate the results for yourself.
1. In the workflow designer, just before the **Destination** node, click the add (**+**) icon, and then click **Enrich > Chunker**.
4. Immediately above the **Source** node, click **Test**.
5. In the **Test output** pane, make sure that **NER (6 of 6)** is showing. If not, click the right arrow (**>**) until **NER (6 of 6)** appears, which will show the output from the last node in the workflow.
6. Some interesting portions of the output include the following:
* The descriptions of the seven tables on pages 6-9 and 12. Search for the text `"Table"` (including the quotation marks).
* The identified entities and inferred relationships among them. For example, search for the text `Zhijun Wang`. Of the nine instances of this name, notice
the author's identification as a `PERSON` three times, the author's `published` relationship twice, and the author's `affiliated_with` relationship twice.
7. When you are done, be sure to click the close (**X**) button above the output on the right side of the screen, to return to
the workflow designer for the next step.
## Step 5: Experiment with chunking
In this step, you apply [chunking](/concepts/chunking) to your workflow. Chunking is the process where Unstructured rearranges
the resulting document elements' `text` content into manageable "chunks" to stay within the limits of an AI model and to improve retrieval precision.
*What kind of chunking strategy should I use, and how big should my chunks be?*
Unfortunately, there is no one-size-fits-all answer to this question. However, there are some general considerations and guidelines that can help you to determine
the best chunking strategy and chunk size for your specific use case. Be sure of course to also consult the documentation for your target AI model and downstream application toolsets.
Is your content primarily organized by title, by page, by interrelated subject matter, or none of these? This can help you determine whether a
by-title, by-page, by-similarity, or basic (by-character) chunking strategy is best. (You'll experiment with each of these strategies here later.)
If your chunks are too small, they might lose necessary context, leading to the model providing inaccurate, irrelevant, or hallucinated results.
On the other hand, if your chunks are too large, the model can struggle with the sheer volume of information, leading to information overload, diluted meaning, and potentially higher processing costs.
You should aim to find a balance between chunks that are big enough to contain meaningful information, while small enough to enable performant applications and low latency responses.
For example, smaller chunks of 128 or 256 tokens might be sufficient for capturing more granular semantic information, while larger chunks of 512 or 1024 tokens might be better for retaining more context.
It's important here to note that *tokens* and *characters* are not the same thing! In terms of
characters, for English text, a common approximation is 1 token being equal to about 3 or 4 characters or three-quarters of a word. Many AI model providers publish their own token-to-character calculators online that you can use for estimation purposes.
You should experiment with a variety of chunk sizes, taking into account the kinds of content, the length and complexity of user queries and agent tasks,
the intended end use, and of course the limits of the models you are using. Try different chunking strategies and sizes with your models and evaluate the results for yourself.
1. In the workflow designer, just before the **Destination** node, click the add (**+**) icon, and then click **Enrich > Chunker**.
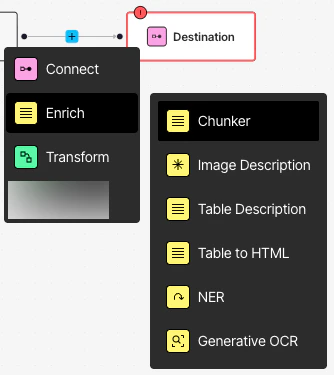 2. In the node's settings pane's **Details** tab, select **Chunk by Character**.
3. Under **Chunk by Character**, specify the following settings:
* Check the box labelled **Include Original Elements**.
* Set **Max Characters** to **500**.
* Set **New After N Characters** to **400**.
* Set **Overlap** to **50**.
* Leave **Overlap All** unchecked.
2. In the node's settings pane's **Details** tab, select **Chunk by Character**.
3. Under **Chunk by Character**, specify the following settings:
* Check the box labelled **Include Original Elements**.
* Set **Max Characters** to **500**.
* Set **New After N Characters** to **400**.
* Set **Overlap** to **50**.
* Leave **Overlap All** unchecked.
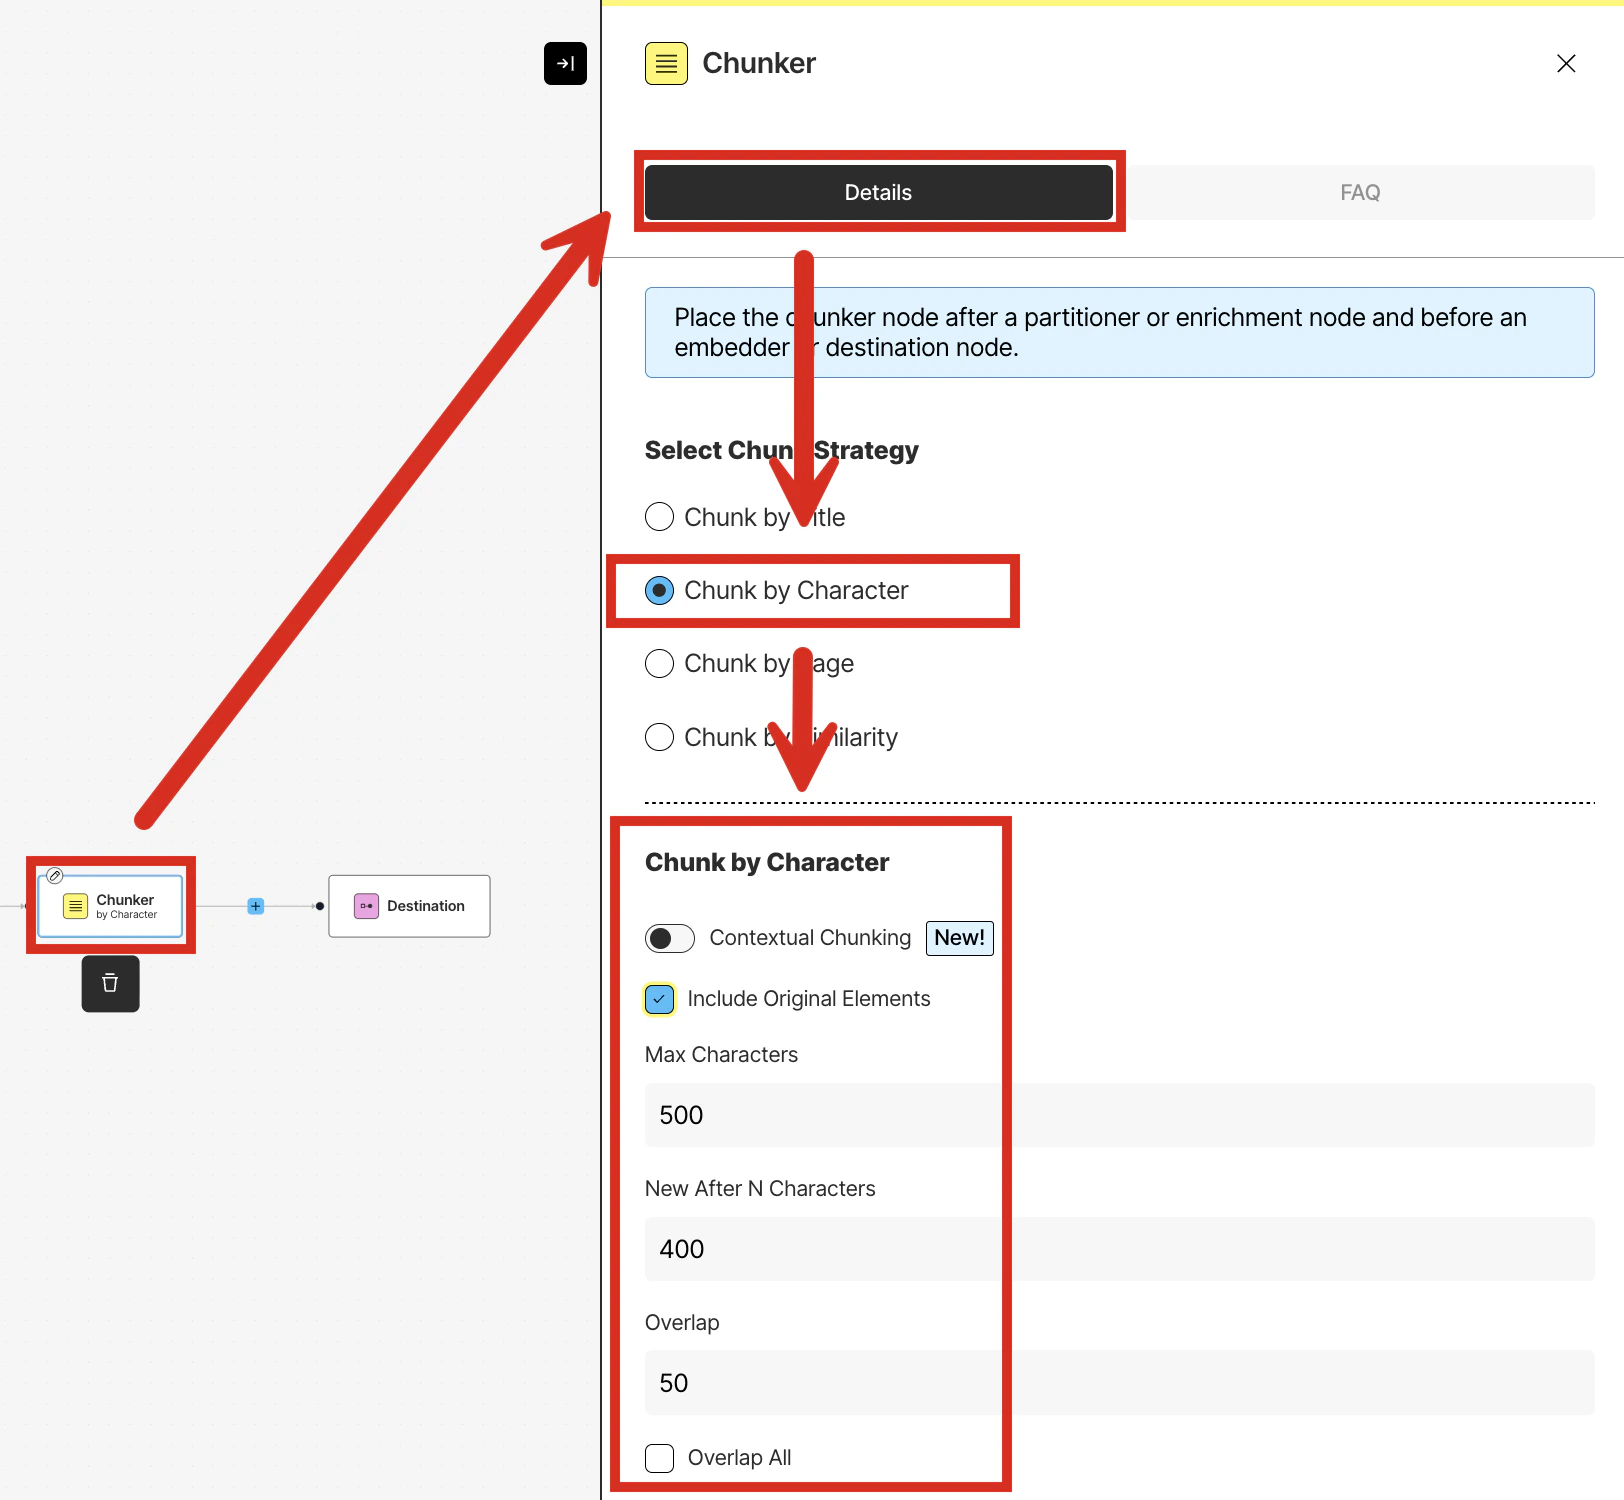 *What do each of these chunking settings do?*
* **Contextual chunking** prepends chunk-specific explanatory context to each chunk, which has been shown to yield significant improvements in downstream retrieval accuracy. Apply it by adding a separate Contextual Chunker node after this chunker. [Learn more](/concepts/chunking#contextual-chunking).
* **Include Original Elements** outputs into each chunk's `metadata` field's `orig_elements` value the elements that were used to form that particular chunk. These elements are output in gzip compressed, Base64 encoded format. To get back to the original content, Base64 decode and then gzip decompress the bytes as UTF-8. [Learn more](/concepts/chunking#include-original-elements-setting).
* **Max Characters** is the "hard" or maximum number of characters that any one chunk can contain. Unstructured cannot exceed this number when forming chunks. [Learn more](/concepts/chunking#max-characters-setting).
* **New After N Characters**: is the "soft" or approximate number of characters that any one chunk can contain. Unstructured can exceed this number if needed when forming chunks (but still cannot exceed the **Max Characters** setting). [Learn more](/concepts/chunking#new-after-n-characters-setting).
* **Overlap**, when applied (see **Overlap All**), prepends to the current chunk the specified number of characters from the previous chunk, which can help provide additional context about this chunk relative to the previous chunk. [Learn more](/concepts/chunking#overlap-setting)
* **Overlap All** applies the **Overlap** setting (if greater than zero) to all chunks. Otherwise, unchecking this box means that the **Overlap** setting (if greater than zero) is applied only in edge cases where "normal" chunks cannot be formed by combining whole elements. Check this box with caution as it can introduce noise into otherwise clean semantic units. [Learn more](/concepts/chunking#overlap-all-setting).
4. Immediately above the **Source** node, click **Test**.
5. In the **Test output** pane, make sure that **Chunker (7 of 7)** is showing. If not, click the right arrow (**>**) until **Chunker (7 of 7)** appears, which will show the output from the last node in the workflow.
6. To explore the chunker's results, search for the text `"type": "CompositeElement"`.
*In the chunked output, where did all of the document elements I saw before, such as `Title`, `Image`, and `Table`, go?*
During chunking, the document elements that were generated during partitioning are now chunked. Because some of these document elements can be split into multiple chunks
or combined with other chunks, these chunked document elements are now of type `CompositeElement` and `TableChunk`.
You can have Unstructured also output the original document elements that
these chunks were derived from by putting them into each chunk's `metadata`. To have Unstructured do this, use the **Include Original Elements** setting, as described in the preceding tip.
7. Optionally, you can try running this workflow again with the **Chunk by Title** strategy, as follows:
a. Click the close (**X**) button above the output on the right side of the screen.
*What do each of these chunking settings do?*
* **Contextual chunking** prepends chunk-specific explanatory context to each chunk, which has been shown to yield significant improvements in downstream retrieval accuracy. Apply it by adding a separate Contextual Chunker node after this chunker. [Learn more](/concepts/chunking#contextual-chunking).
* **Include Original Elements** outputs into each chunk's `metadata` field's `orig_elements` value the elements that were used to form that particular chunk. These elements are output in gzip compressed, Base64 encoded format. To get back to the original content, Base64 decode and then gzip decompress the bytes as UTF-8. [Learn more](/concepts/chunking#include-original-elements-setting).
* **Max Characters** is the "hard" or maximum number of characters that any one chunk can contain. Unstructured cannot exceed this number when forming chunks. [Learn more](/concepts/chunking#max-characters-setting).
* **New After N Characters**: is the "soft" or approximate number of characters that any one chunk can contain. Unstructured can exceed this number if needed when forming chunks (but still cannot exceed the **Max Characters** setting). [Learn more](/concepts/chunking#new-after-n-characters-setting).
* **Overlap**, when applied (see **Overlap All**), prepends to the current chunk the specified number of characters from the previous chunk, which can help provide additional context about this chunk relative to the previous chunk. [Learn more](/concepts/chunking#overlap-setting)
* **Overlap All** applies the **Overlap** setting (if greater than zero) to all chunks. Otherwise, unchecking this box means that the **Overlap** setting (if greater than zero) is applied only in edge cases where "normal" chunks cannot be formed by combining whole elements. Check this box with caution as it can introduce noise into otherwise clean semantic units. [Learn more](/concepts/chunking#overlap-all-setting).
4. Immediately above the **Source** node, click **Test**.
5. In the **Test output** pane, make sure that **Chunker (7 of 7)** is showing. If not, click the right arrow (**>**) until **Chunker (7 of 7)** appears, which will show the output from the last node in the workflow.
6. To explore the chunker's results, search for the text `"type": "CompositeElement"`.
*In the chunked output, where did all of the document elements I saw before, such as `Title`, `Image`, and `Table`, go?*
During chunking, the document elements that were generated during partitioning are now chunked. Because some of these document elements can be split into multiple chunks
or combined with other chunks, these chunked document elements are now of type `CompositeElement` and `TableChunk`.
You can have Unstructured also output the original document elements that
these chunks were derived from by putting them into each chunk's `metadata`. To have Unstructured do this, use the **Include Original Elements** setting, as described in the preceding tip.
7. Optionally, you can try running this workflow again with the **Chunk by Title** strategy, as follows:
a. Click the close (**X**) button above the output on the right side of the screen.
b. In the workflow designer, click the **Chunker** node and then, in the node's settings pane's **Details** tab, select **Chunk by Title**.
c. Under **Chunk by Title**, specify the following settings:
* Check the box labelled **Include Original Elements**.
* Set **Max Characters** to **500**.
* Set **New After N Characters** to **400**.
* Set **Overlap** to **50**.
* Leave **Combine Text Under N Characters** blank, and leave **Multipage Sections** and **Overlap All** unchecked.
*What do each of the chunking settings here that were not already described in the preceding tip do?*
* **Combine Text Under N Characters** combines elements from a section into a chunk until a section reaches a length of this many characters. [Learn more](/concepts/chunking#combine-text-under-n-characters-setting).
* **Multipage Sections** when checked, allows sections to span multiple pages. [Learn more](/concepts/chunking#multipage-sections-setting).
d. Immediately above the **Source** node, click **Test**.
e. In the **Test output** pane, make sure that **Chunker (7 of 7)** is showing. If not, click the right arrow (**>**) until **Chunker (7 of 7)** appears, which will show the output from the last node in the workflow.
f. To explore the chunker's results, search for the text `"type": "CompositeElement"`. Notice that the lengths of some of the chunks that immediately
precede titles might be shortened due to the presence of the title impacting the chunk's size.
8. Optionally, you can try running this workflow again with the **Chunk by Page** strategy, as follows:
a. Click the close (**X**) button above the output on the right side of the screen.
b. In the workflow designer, click the **Chunker** node and then, in the node's settings pane's **Details** tab, select **Chunk by Page**.
c. Under **Chunk by Page**, specify the following settings:
* Check the box labelled **Include Original Elements**.
* Set **Max Characters** to **500**.
* Set **New After N Characters** to **400**.
* Set **Overlap** to **50**.
* Leave **Overlap All** unchecked.
d. Immediately above the **Source** node, click **Test**.
e. In the **Test output** pane, make sure that **Chunker (7 of 7)** is showing. If not, click the right arrow (**>**) until **Chunker (7 of 7)** appears, which will show the output from the last node in the workflow.
f. To explore the chunker's results, search for the text `"type": "CompositeElement"`. Notice that the lengths of some of the chunks that immediately
precede page breaks might be shortened due to the presence of the page break impacting the chunk's size.
9. Optionally, you can try running this workflow again with the **Chunk by Similarity** strategy, as follows:
a. Click the close (**X**) button above the output on the right side of the screen.
b. In the workflow designer, click the **Chunker** node and then, in the node's settings pane's **Details** tab, select **Chunk by Similarity**.
c. Under **Chunk by Similarity**, specify the following settings:
* Check the box labelled **Include Original Elements**.
* Set **Max Characters** to **500**.
* Set **Similarity Threshold** to **0.99**.
*What does **Similarity Threshold** mean?*
* The **Similarity Threshold** is a number between 0 and 1 exclusive (**0.01** to **0.99** inclusive).
* **0.01** means that any two segments of text that are being compared to each other and are considered least identical in semantic meaning to each other are more likely to be combined into the same chunk together, when such combining must occur.
* **0.99** means that any two segments of text that are being compared to each other and are considered almost identical in semantic meaning to each other are more likely to be combined into the same chunk together, when such combining must occur.
* Numbers toward **0.01** bias toward least-identical semantic matches, while numbers toward **0.99** bias toward near-identical semantic matches.
d. Immediately above the **Source** node, click **Test**.
e. In the **Test output** pane, make sure that **Chunker (7 of 7)** is showing. If not, click the right arrow (**>**) until **Chunker (7 of 7)** appears, which will show the output from the last node in the workflow.
f. To explore the chunker's results, search for the text `"type": "CompositeElement"`. Notice that the lengths of many of the chunks fall well short of the **Max Characters** limit. This is because a similarity threshold
of **0.99** means that only sentences or text segments with a near-perfect semantic match will be grouped together into the same chunk. This is an extremely high threshold, resulting in very short, highly specific chunks of text.
g. If you change **Similarity Threshold** to **0.01** and run the workflow again, searching for the text `"type": "CompositeElement"`, many of the chunks will now come closer to the **Max Characters** limit. This is because a similarity threshold
of **0.01** provides an extreme tolerance of differences between pieces of text, grouping almost anything together.
10. When you are done, be sure to click the close (**X**) button above the output on the right side of the screen, to return to
the workflow designer for the next step.
## Step 6 (Optional): Experiment with embedding
In this step, you generate [embeddings](/concepts/embedding) for your workflow. Embeddings are vectors of numbers that represent various aspects of the text that is extracted by Unstructured.
These vectors are stored or "embedded" next to the text itself in a vector store or vector database. Chatbots, agents, and other AI solutions can use
these vector embeddings to more efficiently and effectively find, analyze, and use the associated text. These vector embeddings are generated by an
embedding model that is provided by an embedding provider. For the best embedding model to apply to your use case, see the documentation for your target downstream application toolsets.
1. With the workflow designer active from the previous step, just before the **Destination** node, click the add (**+**) icon, and then click **Transform > Embedder**.
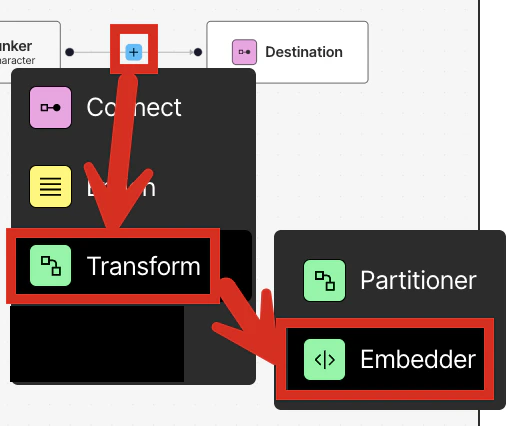 2. In the node's settings pane's **Details** tab, under **Select Embedding Model**, for **Azure OpenAI**, select **Text Embedding 3 Small \[dim 1536]**.
The list of available embedding models is constantly being updated. Your list might also be different, depending on your Unstructured
account type. If **Azure OpenAI** and **Text Embedding 3 Small \[dim 1536]** is not available, choose another available model from the list.
If you have an Unstructured **Business** account and want to add more models to this list, contact your
Unstructured account administrator or Unstructured sales representative, or [request support](support/request).
3. Immediately above the **Source** node, click **Test**.
4. In the **Test output** pane, make sure that **Embedder (8 of 8)** is showing. If not, click the right arrow (**>**) until **Embedder (8 of 8)** appears, which will show the output from the last node in the workflow.
5. To explore the embeddings, search for the text `"embeddings"` (including the quotation marks).
*What do all of these numbers mean?*
All by themselves, the numbers in the `embeddings` field of the output have no human-interpretable meaning on their own.
However, when combined with the specific text that these numbers are associated with, and the embedding model's
logic that was used to generate these numbers, the numbers in the `embeddings` field are extremely powerful when leveraged by
downstream chatbots, agents, and other AI solutions.
These numbers typically represent complex, abstract attributes about the text that are known only to the embedding model that generated these numbers. These
attributes can be about the text's overall sentiment, intent, subject, semantic meaning, grammatical function, relationships between words, or any number of other things that the model is good at figuring out. This
is why the embedding model you choose here must be the exact same embedding model that you use in any related chatbot, agent, or other
AI solution that relies on these numbers. Otherwise, the numbers that are generated here will not have the same meaning
downstream as well. Also, the number of *dimensions* (or the number of numbers in the `embeddings` field)
you choose here must also be the exact same number of dimensions downstream as well.
To repeat, the name and number of dimensions
for the embedding model you choose here must be the exact same name and number of dimensions for the embedding model you use in your
related downstream chatbots, agents, and other AI solutions that rely on this particular text and its associated embeddings that were generated here.
6. When you are done, be sure to click the close (**X**) button above the output on the right side of the screen, to return to
the workflow designer so that you can continue designing things later as you see fit.
## Step 7: Experiment with structured data extraction
In this step, you apply custom [structured data extraction](/concepts/structured-data-extractor/data-extractor) to your workflow. Structured data extraction is the process where Unstructured
automatically extracts the data from your source documents into a format that you define up front. For example, in addition to Unstructured
partitioning your source documents into elements with types such as `NarrativeText`, `UncategorizedText`, and so on, you can have Unstructured
output key information from the source documents in a custom structured data format, appearing within a `DocumentData` element that contains a JSON object with custom fields such as `name`, `address`, `phone`, `email`, and so on.
1. With the workflow designer active from the previous step, just before the **Destination** node, click the add (**+**) icon, and then click **Enrich > Extract**.
2. In the node's settings pane's **Details** tab, under **Select Embedding Model**, for **Azure OpenAI**, select **Text Embedding 3 Small \[dim 1536]**.
The list of available embedding models is constantly being updated. Your list might also be different, depending on your Unstructured
account type. If **Azure OpenAI** and **Text Embedding 3 Small \[dim 1536]** is not available, choose another available model from the list.
If you have an Unstructured **Business** account and want to add more models to this list, contact your
Unstructured account administrator or Unstructured sales representative, or [request support](support/request).
3. Immediately above the **Source** node, click **Test**.
4. In the **Test output** pane, make sure that **Embedder (8 of 8)** is showing. If not, click the right arrow (**>**) until **Embedder (8 of 8)** appears, which will show the output from the last node in the workflow.
5. To explore the embeddings, search for the text `"embeddings"` (including the quotation marks).
*What do all of these numbers mean?*
All by themselves, the numbers in the `embeddings` field of the output have no human-interpretable meaning on their own.
However, when combined with the specific text that these numbers are associated with, and the embedding model's
logic that was used to generate these numbers, the numbers in the `embeddings` field are extremely powerful when leveraged by
downstream chatbots, agents, and other AI solutions.
These numbers typically represent complex, abstract attributes about the text that are known only to the embedding model that generated these numbers. These
attributes can be about the text's overall sentiment, intent, subject, semantic meaning, grammatical function, relationships between words, or any number of other things that the model is good at figuring out. This
is why the embedding model you choose here must be the exact same embedding model that you use in any related chatbot, agent, or other
AI solution that relies on these numbers. Otherwise, the numbers that are generated here will not have the same meaning
downstream as well. Also, the number of *dimensions* (or the number of numbers in the `embeddings` field)
you choose here must also be the exact same number of dimensions downstream as well.
To repeat, the name and number of dimensions
for the embedding model you choose here must be the exact same name and number of dimensions for the embedding model you use in your
related downstream chatbots, agents, and other AI solutions that rely on this particular text and its associated embeddings that were generated here.
6. When you are done, be sure to click the close (**X**) button above the output on the right side of the screen, to return to
the workflow designer so that you can continue designing things later as you see fit.
## Step 7: Experiment with structured data extraction
In this step, you apply custom [structured data extraction](/concepts/structured-data-extractor/data-extractor) to your workflow. Structured data extraction is the process where Unstructured
automatically extracts the data from your source documents into a format that you define up front. For example, in addition to Unstructured
partitioning your source documents into elements with types such as `NarrativeText`, `UncategorizedText`, and so on, you can have Unstructured
output key information from the source documents in a custom structured data format, appearing within a `DocumentData` element that contains a JSON object with custom fields such as `name`, `address`, `phone`, `email`, and so on.
1. With the workflow designer active from the previous step, just before the **Destination** node, click the add (**+**) icon, and then click **Enrich > Extract**.
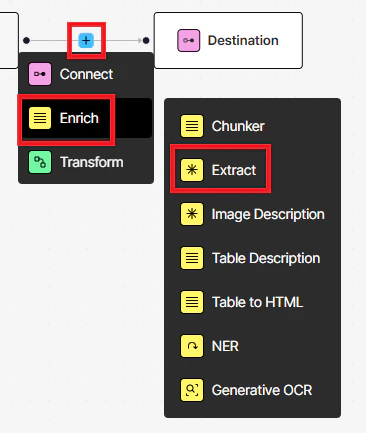 2. In the node's settings pane's **Details** tab, under **Provider**, select **Anthropic**. Under **Model**, select **Claude Sonnet 4.5**. This is the model that Unstructured will use to do the structured data extraction.
The list of available models for structured data extraction is constantly being updated. Your list might also be different, depending on your Unstructured
account type. If **Anthropic** and **Claude Sonnet 4.5** is not available, choose another available model from the list.
If you have an Unstructured **Business** account and want to add more models to this list, contact your
Unstructured account administrator or Unstructured sales representative, or [request support](support/request).
3. Click **Upload JSON**.
4. In the **JSON Schema** box, enter the following JSON schema, and then click **Use this Schema**:
```json theme={null}
{
"type": "object",
"properties": {
"title": {
"type": "string",
"description": "Full title of the research paper"
},
"authors": {
"type": "array",
"items": {
"type": "object",
"properties": {
"name": {
"type": "string",
"description": "Author's full name"
},
"affiliation": {
"type": "string",
"description": "Author's institutional affiliation"
},
"email": {
"type": "string",
"description": "Author's email address"
}
},
"required": [
"name",
"affiliation",
"email"
],
"additionalProperties": false
},
"description": "List of paper authors with their affiliations"
},
"abstract": {
"type": "string",
"description": "Paper abstract summarizing the research"
},
"introduction": {
"type": "string",
"description": "Introduction section describing the problem and motivation"
},
"methodology": {
"type": "object",
"properties": {
"approach_name": {
"type": "string",
"description": "Name of the proposed method (e.g., StrokeNet)"
},
"description": {
"type": "string",
"description": "Detailed description of the methodology"
},
"key_techniques": {
"type": "array",
"items": {
"type": "string"
},
"description": "List of key techniques used in the approach"
}
},
"required": [
"approach_name",
"description",
"key_techniques"
],
"additionalProperties": false
},
"experiments": {
"type": "object",
"properties": {
"datasets": {
"type": "array",
"items": {
"type": "object",
"properties": {
"name": {
"type": "string",
"description": "Dataset name"
},
"description": {
"type": "string",
"description": "Dataset description"
},
"size": {
"type": "string",
"description": "Dataset size (e.g., number of sentence pairs)"
}
},
"required": [
"name",
"description",
"size"
],
"additionalProperties": false
},
"description": "Datasets used for evaluation"
},
"baselines": {
"type": "array",
"items": {
"type": "string"
},
"description": "Baseline methods compared against"
},
"evaluation_metrics": {
"type": "array",
"items": {
"type": "string"
},
"description": "Metrics used for evaluation"
},
"experimental_setup": {
"type": "string",
"description": "Description of experimental configuration and hyperparameters"
}
},
"required": [
"datasets",
"baselines",
"evaluation_metrics",
"experimental_setup"
],
"additionalProperties": false
},
"results": {
"type": "object",
"properties": {
"main_findings": {
"type": "string",
"description": "Summary of main experimental findings"
},
"performance_improvements": {
"type": "array",
"items": {
"type": "object",
"properties": {
"dataset": {
"type": "string",
"description": "Dataset name"
},
"metric": {
"type": "string",
"description": "Evaluation metric (e.g., BLEU)"
},
"baseline_score": {
"type": "number",
"description": "Baseline method score"
},
"proposed_score": {
"type": "number",
"description": "Proposed method score"
},
"improvement": {
"type": "number",
"description": "Improvement over baseline"
}
},
"required": [
"dataset",
"metric",
"baseline_score",
"proposed_score",
"improvement"
],
"additionalProperties": false
},
"description": "Performance improvements over baselines"
},
"parameter_reduction": {
"type": "string",
"description": "Description of parameter reduction achieved"
}
},
"required": [
"main_findings",
"performance_improvements",
"parameter_reduction"
],
"additionalProperties": false
},
"related_work": {
"type": "string",
"description": "Summary of related work and prior research"
},
"conclusion": {
"type": "string",
"description": "Conclusion section summarizing contributions and findings"
},
"limitations": {
"type": "string",
"description": "Limitations and challenges discussed in the paper"
},
"acknowledgments": {
"type": "string",
"description": "Acknowledgments section"
},
"references": {
"type": "array",
"items": {
"type": "string"
},
"description": "List of cited references"
}
},
"additionalProperties": false,
"required": [
"title",
"authors",
"abstract",
"introduction",
"methodology",
"experiments",
"results",
"related_work",
"conclusion",
"limitations",
"acknowledgments",
"references"
]
}
```
5. Immediately above the **Source** node, click **Test**.
6. In the **Test output** pane, make sure that **Extract (9 of 9)** is showing. If not, click the right arrow (**>**) until **Extract (9 of 9)** appears, which will show the output from the last node in the workflow.
7. To explore the structured data extraction, search for the text `"extracted_data"` (including the quotation marks).
8. When you are done, be sure to click the close (**X**) button above the output on the right side of the screen, to return to
the workflow designer so that you can continue designing things later as you see fit.
## Next steps
Congratulations! You now have an Unstructured workflow that partitions, enriches, chunks, embeds, and extracts structured data from your source documents, producing
context-rich data that is ready for retrieval-augmented generation (RAG), agentic AI, and model fine-tuning.
Right now, your workflow only accepts one local file at a time for input. Your workflow also only sends Unstructured's processed data to your screen or to be saved locally as a JSON file.
You can modify your workflow to accept multiple files and data from—and send Unstructured's processed data to—one or more file storage
locations, databases, and vector stores. To learn how to do this, try one or more of the following quickstarts:
* [Remote quickstart](/pipelines/quickstart#remote-quickstart) - This quickstart shows you how to begin processing files and semi-structured data from remote source locations at scale, instead of just one local file at a time.
* [Dropbox source connector quickstart](/pipelines/sources/dropbox-source-quickstart) - If you don't have any remote source locations available for Unstructured to connect to, this quickstart shows you how to set up a Dropbox account to store your documents in, and then connect Unstructured to your Dropbox account.
* [Pinecone destination connector quickstart](/pipelines/destinations/pinecone-destination-quickstart) - If you don't have any remote destination locations available for Unstructured to send its processed data to, this quickstart shows you how to set up a Pinecone account to have Unstructured store its processed data in, and then connect Unstructured to your Pinecone account.
Unstructured also offers an API and SDKs, which allow you to use code to work with Unstructured programmatically instead of only with Pipelines. For details, see:
* [Unstructured API quickstart](/api-reference/workflow/overview#quickstart) - This quickstart uses the Unstructured API's workflow operations to programmatically create a Dropbox source connector and a Pinecone destination connector in your Unstructured account. You then programmatically add these connectors to a workflow in your Unstructured account, run that workflow as a job, and then explore the job's results.
* [Unstructured Python SDK](/api-reference/workflow/overview#unstructured-python-sdk) - This article provides an overview of the Unstructured Python SDK and how to use it.
* [Unstructured API overview](/api-reference/overview) - This article provides an overview of the Unstructured API and how to use it.
If you are not able to complete any of the preceding quickstarts, [request support](support/request).
2. In the node's settings pane's **Details** tab, under **Provider**, select **Anthropic**. Under **Model**, select **Claude Sonnet 4.5**. This is the model that Unstructured will use to do the structured data extraction.
The list of available models for structured data extraction is constantly being updated. Your list might also be different, depending on your Unstructured
account type. If **Anthropic** and **Claude Sonnet 4.5** is not available, choose another available model from the list.
If you have an Unstructured **Business** account and want to add more models to this list, contact your
Unstructured account administrator or Unstructured sales representative, or [request support](support/request).
3. Click **Upload JSON**.
4. In the **JSON Schema** box, enter the following JSON schema, and then click **Use this Schema**:
```json theme={null}
{
"type": "object",
"properties": {
"title": {
"type": "string",
"description": "Full title of the research paper"
},
"authors": {
"type": "array",
"items": {
"type": "object",
"properties": {
"name": {
"type": "string",
"description": "Author's full name"
},
"affiliation": {
"type": "string",
"description": "Author's institutional affiliation"
},
"email": {
"type": "string",
"description": "Author's email address"
}
},
"required": [
"name",
"affiliation",
"email"
],
"additionalProperties": false
},
"description": "List of paper authors with their affiliations"
},
"abstract": {
"type": "string",
"description": "Paper abstract summarizing the research"
},
"introduction": {
"type": "string",
"description": "Introduction section describing the problem and motivation"
},
"methodology": {
"type": "object",
"properties": {
"approach_name": {
"type": "string",
"description": "Name of the proposed method (e.g., StrokeNet)"
},
"description": {
"type": "string",
"description": "Detailed description of the methodology"
},
"key_techniques": {
"type": "array",
"items": {
"type": "string"
},
"description": "List of key techniques used in the approach"
}
},
"required": [
"approach_name",
"description",
"key_techniques"
],
"additionalProperties": false
},
"experiments": {
"type": "object",
"properties": {
"datasets": {
"type": "array",
"items": {
"type": "object",
"properties": {
"name": {
"type": "string",
"description": "Dataset name"
},
"description": {
"type": "string",
"description": "Dataset description"
},
"size": {
"type": "string",
"description": "Dataset size (e.g., number of sentence pairs)"
}
},
"required": [
"name",
"description",
"size"
],
"additionalProperties": false
},
"description": "Datasets used for evaluation"
},
"baselines": {
"type": "array",
"items": {
"type": "string"
},
"description": "Baseline methods compared against"
},
"evaluation_metrics": {
"type": "array",
"items": {
"type": "string"
},
"description": "Metrics used for evaluation"
},
"experimental_setup": {
"type": "string",
"description": "Description of experimental configuration and hyperparameters"
}
},
"required": [
"datasets",
"baselines",
"evaluation_metrics",
"experimental_setup"
],
"additionalProperties": false
},
"results": {
"type": "object",
"properties": {
"main_findings": {
"type": "string",
"description": "Summary of main experimental findings"
},
"performance_improvements": {
"type": "array",
"items": {
"type": "object",
"properties": {
"dataset": {
"type": "string",
"description": "Dataset name"
},
"metric": {
"type": "string",
"description": "Evaluation metric (e.g., BLEU)"
},
"baseline_score": {
"type": "number",
"description": "Baseline method score"
},
"proposed_score": {
"type": "number",
"description": "Proposed method score"
},
"improvement": {
"type": "number",
"description": "Improvement over baseline"
}
},
"required": [
"dataset",
"metric",
"baseline_score",
"proposed_score",
"improvement"
],
"additionalProperties": false
},
"description": "Performance improvements over baselines"
},
"parameter_reduction": {
"type": "string",
"description": "Description of parameter reduction achieved"
}
},
"required": [
"main_findings",
"performance_improvements",
"parameter_reduction"
],
"additionalProperties": false
},
"related_work": {
"type": "string",
"description": "Summary of related work and prior research"
},
"conclusion": {
"type": "string",
"description": "Conclusion section summarizing contributions and findings"
},
"limitations": {
"type": "string",
"description": "Limitations and challenges discussed in the paper"
},
"acknowledgments": {
"type": "string",
"description": "Acknowledgments section"
},
"references": {
"type": "array",
"items": {
"type": "string"
},
"description": "List of cited references"
}
},
"additionalProperties": false,
"required": [
"title",
"authors",
"abstract",
"introduction",
"methodology",
"experiments",
"results",
"related_work",
"conclusion",
"limitations",
"acknowledgments",
"references"
]
}
```
5. Immediately above the **Source** node, click **Test**.
6. In the **Test output** pane, make sure that **Extract (9 of 9)** is showing. If not, click the right arrow (**>**) until **Extract (9 of 9)** appears, which will show the output from the last node in the workflow.
7. To explore the structured data extraction, search for the text `"extracted_data"` (including the quotation marks).
8. When you are done, be sure to click the close (**X**) button above the output on the right side of the screen, to return to
the workflow designer so that you can continue designing things later as you see fit.
## Next steps
Congratulations! You now have an Unstructured workflow that partitions, enriches, chunks, embeds, and extracts structured data from your source documents, producing
context-rich data that is ready for retrieval-augmented generation (RAG), agentic AI, and model fine-tuning.
Right now, your workflow only accepts one local file at a time for input. Your workflow also only sends Unstructured's processed data to your screen or to be saved locally as a JSON file.
You can modify your workflow to accept multiple files and data from—and send Unstructured's processed data to—one or more file storage
locations, databases, and vector stores. To learn how to do this, try one or more of the following quickstarts:
* [Remote quickstart](/pipelines/quickstart#remote-quickstart) - This quickstart shows you how to begin processing files and semi-structured data from remote source locations at scale, instead of just one local file at a time.
* [Dropbox source connector quickstart](/pipelines/sources/dropbox-source-quickstart) - If you don't have any remote source locations available for Unstructured to connect to, this quickstart shows you how to set up a Dropbox account to store your documents in, and then connect Unstructured to your Dropbox account.
* [Pinecone destination connector quickstart](/pipelines/destinations/pinecone-destination-quickstart) - If you don't have any remote destination locations available for Unstructured to send its processed data to, this quickstart shows you how to set up a Pinecone account to have Unstructured store its processed data in, and then connect Unstructured to your Pinecone account.
Unstructured also offers an API and SDKs, which allow you to use code to work with Unstructured programmatically instead of only with Pipelines. For details, see:
* [Unstructured API quickstart](/api-reference/workflow/overview#quickstart) - This quickstart uses the Unstructured API's workflow operations to programmatically create a Dropbox source connector and a Pinecone destination connector in your Unstructured account. You then programmatically add these connectors to a workflow in your Unstructured account, run that workflow as a job, and then explore the job's results.
* [Unstructured Python SDK](/api-reference/workflow/overview#unstructured-python-sdk) - This article provides an overview of the Unstructured Python SDK and how to use it.
* [Unstructured API overview](/api-reference/overview) - This article provides an overview of the Unstructured API and how to use it.
If you are not able to complete any of the preceding quickstarts, [request support](support/request).