This example uses a custom Azure function that you create and maintain.
Any issues with file detection, timing, or function invocation could be related to your custom function,
rather than with Unstructured. If you are getting unexpected or no results, be sure to check your custom
function’s invocation traces first for any informational and error messages.
Requirements
To use this example, you will need the following:-
An Unstructured account, and an Unstructured API key for your account, as follows:
-
If you do not already have an Unstructured account, sign up for free.
After you sign up, you are automatically signed in to your new Unstructured Let’s Go account, at https://platform.unstructured.io.
To sign up for a Business account instead, contact Unstructured Sales, or learn more.
-
If you have an Unstructured Let’s Go, Pay-As-You-Go, or Business SaaS account and are not already signed in, sign in to your account at https://platform.unstructured.io.
For other types of Business accounts, see your Unstructured account administrator for sign-in instructions, or request support.
-
Get your Unstructured API key:
a. After you sign in to your Unstructured Let’s Go, Pay-As-You-Go, or Business account, click API Keys on the sidebar.
b. Click Generate API Key.For a Business account, before you click API Keys, make sure you have selected the organizational workspace you want to create an API key for. Each API key works with one and only one organizational workspace. Learn more.
c. Follow the on-screen instructions to finish generating the key.
d. Click the Copy icon next to your new key to add the key to your system’s clipboard. If you lose this key, simply return and click the Copy icon again.
-
If you do not already have an Unstructured account, sign up for free.
After you sign up, you are automatically signed in to your new Unstructured Let’s Go account, at https://platform.unstructured.io.
-
The Unstructured Pipeline API URL for your account, as follows:
- In Unstructured Pipelines, click API Keys on the sidebar.
- Note the value of the Pipeline API field.
- In Unstructured Pipelines, click API Keys on the sidebar.
Step 1: Create an Azure Function App
- Sign in to your Azure portal.
- Click + Create a resource. If Function App is not visible, in Search services and marketplace field, enter Function App.
- Next to Function App, click Create or Create > Function App.
- Under Select a hosting option, select the radio button next to Consumption to create an app that is most compatible with JavaScript.
- Click Select.
-
On the Basics tab, set the following function app settings:
Setting Suggested value Description Subscription Your subscription The Azure subscription within which to create your new function app. Resource Group Create new After you click Create new, enter some name for the new resource group within which to create your new function app. You should create a new resource group because there are known limitations when creating new function apps in an existing resource group. Learn more. Function App name Some globally unique name Some name that identifies your new function app. Valid characters are a-z(case insensitive),0-9, and-.Operating System Windows Choose the operating system for your function app. This example uses Windows. Runtime stack Node.js Choose a runtime that supports your favorite function programming language. This example uses JavaScript (Node.js). Version 20 LTS Choose the version of your selected runtime. This example uses Node.js 20 LTS. Region Your preferred region Select a region that’s near you or near other services that your function can access. - Click Review + create.
- Click Create, and wait for the deployment to complete.
- After the deployment is complete, click Go to resource.
Step 2: Create a function
- With the function app open from the previous step, on the sidebar, click Overview.
- On the Functions tab, under Create in Azure portal, click Create function.
- For Select a template, select Azure Blob Storage trigger, and then click Next.
-
For Template details, review the following values:
Setting Suggested value Description Function name BlobTrigger1The name of the function to create. You can leave the default function name. Path samples-workitems/{name}The path to the Azure Blob Storage account that the function will monitor. You can leave the default path. Storage account connection AzureWebJobsStorageYou can leave the default storage account connection name. 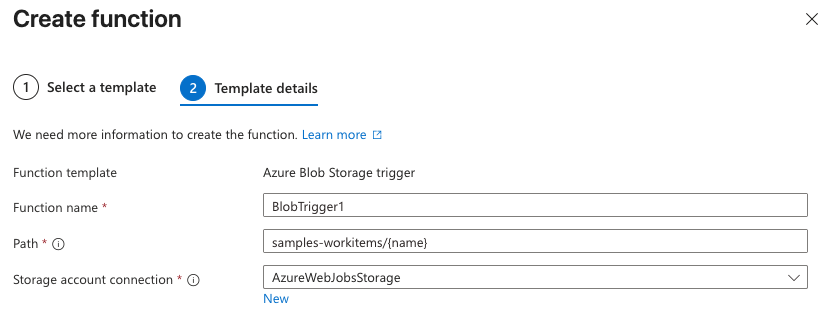
- Click Create. The function is created, and the Code + Test page appears.
Step 3: Customize the function for your workflow
-
With the Code + Test page open from the previous step, on the Code + Test tab, replace the content of the
index.jsfile with the following code: - Click Save.
- In the navigation breadcrumb toward the top of the page, click your function app’s name. The function app’s settings page appears.
- In the sidebar, expand Settings, and then click Environment variables.
- Click + Add.
-
For Name, enter
UNSTRUCTURED_API_URL. -
For Value, enter your
<unstructured-api-url>/workflows/<workflow-id>/run, and replace the following placeholders:- Replace
<unstructured-api-url>with your Unstructured Pipeline API URL value. - Replace
<workflow-id>with the ID of your Unstructured workflow. For now, because the workflow does not yet exist, enter some fictitious value, such as1234567890. You will update this value later in Step 6 after you create the workflow.
- Replace
- Click Apply.
- Click + Add again.
-
For Name, enter
UNSTRUCTURED_API_KEY. - For Value, enter your Unstructured API key value.
- Click Apply.
- Click Apply again, and then click Confirm.
Step 4: Create the Azure Storage container
- With the function app’s settings page open from the previous step, in the sidebar, click Overview.
- Expand Essentials.
- Next to Resource group, click the resource group link. The resource group’s settings page appears.
- In the sidebar, click Overview.
- On the Resources tab, click the link next to Storage account. The storage account’s settings page appears.
- In the sidebar, click Overview.
- On the Properties tab, click Blob service.
- Click Add container.
- For Name, enter
samples-workitems. This name must match the container name that you specified earlier in the Path field (not including/{name}) in Step 2. - Click Create.
Step 5: Create the Unstructured workflow
- Create an Azure Blob Storage source connector in your Unstructured account. Learn how. This source connector must reference the Azure Storage container that you created earlier in Step 4.
- Create a new—or identify an existing—destination connector in your Unstructured account.
- Create a workflow that uses the preceding source and destination connectors. Learn how.
Step 6: Add the workflow’s ID to the function’s environment variables
- Note the ID of the workflow that you created earlier in Step 5.
- In the Azure portal, with the storage account’s settings page open from Step 4, in the navigation breadcrumb toward the top of the page, click your resource group’s name. The resource group’s settings page appears.
- On the Resources tab, click the link next to Function App. The function app’s settings page appears.
- In the sidebar, expand Settings, and then click Environment variables.
- Click
UNSTRUCTURED_API_URL. - Click the eyball (Reveal password) icon.
- Replace the fictitious workflow ID from earlier in Step 3 with the ID of the workflow that you created earlier in Step 5.
- Click Apply.
- Click Apply again, and then click Confirm.
Step 7: Trigger the function
- With the function app’s settings page open from the previous step, in the navigation breadcrumb toward the top of the page, click your resource group’s name. The resource group’s settings page appears.
- On the Resources tab, click the link next to Storage account. The storage account’s settings page appears.
- In the sidebar, click Overview.
- On the Properties tab, click Blob service.
- Click the samples-workitems link.
-
Click Upload, and follow the on-screen instructions to upload a file to the container.
If you are unable to upload a file to the container, click Access Control (IAM) in the sidebar and add an appropriate role assignment that enables uploading files to the container, such as Storage Blob Data Owner. Learn how
Step 8: View trigger results
- In Unstructured Pipelines for your account, click Jobs on the sidebar.
- In the list of jobs, click the newly running job for your workflow.
- After the job status shows Finished, go to your destination location to see the results.
Step 9 (Optional): Delete the Azure resource group
If you are done with this example and do not want to keep the resource group in your account, you can permanently delete it as follows:- In the Azure portal, with the storage account’s settings page open from Step 7, in the navigation breadcrumb toward the top of the page, click your resource group’s name. The resource group’s settings page appears.
- Click Delete resource group.
- Enter the resource group’s name, and then click Delete. The resource group, along with the function app, storage account, and other related resources, are permanently deleted.