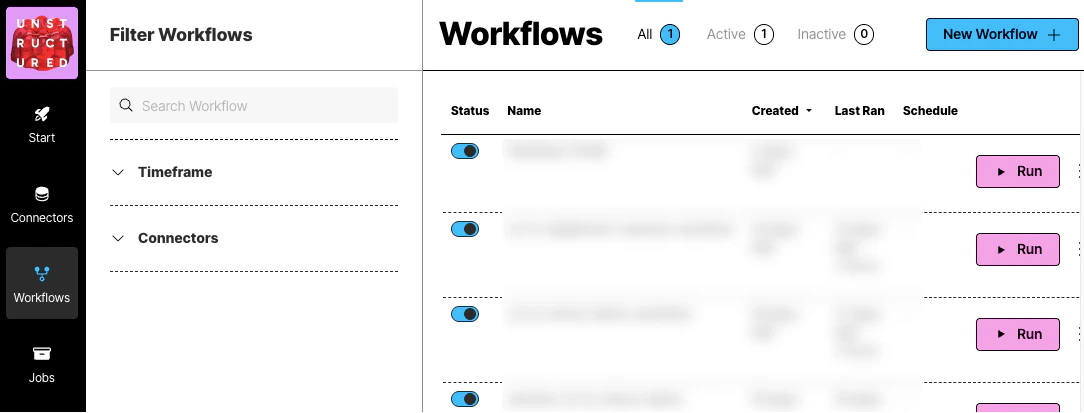
Workflows dashboard
Create a workflow
Unstructured provides two types of workflow builders:- Automatic or Build it For Me workflows, which use sensible default workflow settings to enable you to get good-quality results faster.
- Custom or Build it Myself workflows, which enable you to fine-tune the workflow settings behind the scenes to get very specific results.
Create an automatic workflow
To create an automatic workflow:- On the sidebar, click Workflows.
- Click New Workflow.
-
Next to Build it for Me, click Create Workflow.
If a radio button appears instead of Build it for Me, select it, and then click Continue.
- For Workflow Name, enter some unique name for this workflow.
- In the Sources dropdown list, select your source location.
-
In the Destinations dropdown list, select your destination location.
You can select multiple source and destination locations. Files will be ingested from all of the selected source locations, and the processed data will be delivered to all of the selected destination locations.
- Click Continue.
-
Check or uncheck the Reprocess All box:
- Checking this box reprocesses all documents in the source location on every workflow run.
- Unchecking this box excludes from future processing any files Unstructured determines are unchanged since the last time the workflow ran.
- A record ID derived from the document name and path.
- A record version derived from either the document Etag (if the source provider generates one) or the source provider’s native version identifier.
- If the record ID does not exist in the workflow records, Unstructured processes the document.
- If the record ID exists, but the record version has changed, or there is no record version, Unstructured processes the document.
The following table lists the source connectors that support the Reprocess All setting. The Record version base column specifies the versioning information Unstructured uses to generated the corresponding record version for each processed document. Source connectors that do not support Reprocess All reprocess every document in the source location each time the workflow runs.Renaming a document results in a new record ID; Unstructured will then reprocess the renamed document when the workflow runs.Additional considerations to take into account when unchecking Reprocess All:- Unstructured only adds document records for documents that it successfully processes. Documents that failed to process will be reprocessed the next time the workflow is run.
- Because S3 ETags are content-based, changing the metadata on an S3 object will not result in it being reprocessed.
- For source providers that support the S3 protocol, be aware that deleting an object and then reuploading it to the source location will maintain the same record ID, but may result in a different record version being generated. This is especially true of multipart uploads. This results in Unstructured reprocessing the document.
- For source providers that offer Key Management Services (KMS), be aware that server-side encryption can change document ETags. This results in the the record version of a document changing, and Unstructured reprocessing the document.
- If you clone or recreate a source connector, the resulting connector does not include the document processing history of the previous connector.
- Changing a workflow’s configuration does not automatically result in Unstructured reprocessing all documents. For example, changing chunker, embedder, enrichment, or partitioner settings may not result in reprocessing all document. To reprocess all documents using new workflow settings, check Reprocess All for at least the next workflow run.
- Click Continue.
- If you want this workflow to run on a schedule, in the Repeat Run dropdown list, select one of the scheduling options, and fill in the scheduling settings. Otherwise, select Don’t repeat.
- Click Complete.
-
Partitioner: Auto strategy
Unstructured automatically analyzes and processes files on a page-by-page basis (for PDF files) and on a document-by-document basis for everything else:
- If the page or document has no images and likely does not have tables, Fast partitioning is used, and the page or document is billed at the Fast rate for processing.
- If the page or document has only a few tables or images with standard layouts and languages, High Res partitioning is used, and the page or document is billed at the High Res rate for processing.
- If the page or document has more than a few tables or images, VLM partitioning is used, and the page or document is billed at the VLM rate for processing.
-
Chunker: Chunk by Title strategy
- Combine Text Under N Characters: 3000
- Include Original Elements: Yes (checked)
- Max Characters: 5500
- Multipage Sections: Yes (checked)
- New After N Characters: 3500
- Overlap: 350
- Overlap All: Yes (checked)
-
Embedder:
- Provider: Azure OpenAI
- Model: text-embedding-3-large, with 3072 dimensions
- Enrichments: This workflow contains no enrichments, other than a Chunker node. Learn about available enrichments.
- On the sidebar, click Workflows.
- In the list of available workflows, click the workflow that was just created. This opens a visual designer that shows your workflow as a directed acyclic graph (DAG). This DAG contains a node representing each step in the workflow. There is one node for the partitioning step, another node for the chunking step, and so on.
- To learn how to change a node’s settings or to add enrichment nodes, click the FAQ button in the flyout pane in the workflow DAG designer.
Create a custom workflow
- On the sidebar, click Workflows.
- Click New Workflow.
- Click the Build it Myself option, and then click Continue.
-
In the This workflow pane, click the Details button.
- Next to Name, click the pencil icon, enter some unique name for this workflow, and then click the check mark icon.
- If you want this workflow to run on a schedule, click the Schedule button. In the Repeat Run dropdown list, select one of the scheduling options, and fill in the scheduling settings.
-
To overwrite any previously processed files, or to retry any documents that fail to process, click the Settings button, and check either or both of the boxes.
Check or uncheck the Reprocess All box:
- Checking this box reprocesses all documents in the source location on every workflow run.
- Unchecking this box excludes from future processing any files Unstructured determines are unchanged since the last time the workflow ran.
- A record ID derived from the document name and path.
- A record version derived from either the document Etag (if the source provider generates one) or the source provider’s native version identifier.
- If the record ID does not exist in the workflow records, Unstructured processes the document.
- If the record ID exists, but the record version has changed, or there is no record version, Unstructured processes the document.
The following table lists the source connectors that support the Reprocess All setting. The Record version base column specifies the versioning information Unstructured uses to generated the corresponding record version for each processed document. Source connectors that do not support Reprocess All reprocess every document in the source location each time the workflow runs.Renaming a document results in a new record ID; Unstructured will then reprocess the renamed document when the workflow runs.Additional considerations to take into account when unchecking Reprocess All:- Unstructured only adds document records for documents that it successfully processes. Documents that failed to process will be reprocessed the next time the workflow is run.
- Because S3 ETags are content-based, changing the metadata on an S3 object will not result in it being reprocessed.
- For source providers that support the S3 protocol, be aware that deleting an object and then reuploading it to the source location will maintain the same record ID, but may result in a different record version being generated. This is especially true of multipart uploads. This results in Unstructured reprocessing the document.
- For source providers that offer Key Management Services (KMS), be aware that server-side encryption can change document ETags. This results in the the record version of a document changing, and Unstructured reprocessing the document.
- If you clone or recreate a source connector, the resulting connector does not include the document processing history of the previous connector.
- Changing a workflow’s configuration does not automatically result in Unstructured reprocessing all documents. For example, changing chunker, embedder, enrichment, or partitioner settings may not result in reprocessing all document. To reprocess all documents using new workflow settings, check Reprocess All for at least the next workflow run.
-
The workflow begins with the following layout:
The following workflow layouts are also valid:
For workflows that use Chunker and enrichment nodes together, the Chunker node should be placed after all enrichment nodes. Placing the Chunker node before any enrichment nodes could cause incomplete or no enrichment results to be generated.
-
In the pipeline designer, click the Source node. In the Source pane, select the source location. Then click Save.
 To use a local source location, do not choose a source connector.If the workflow uses a local source location, in the Source node, drag or click to specify a local file, and then click Test. The workflow’s results are displayed on-screen.A workflow that uses a local source location has the following limitations:
- You cannot save the workflow.
- You cannot send the results to a remote destination location, even if you have attached a destination connector to the workflow. However, you can save the results to a local JSON-formatted file.
- Click the Destination node. In the Destination pane, select the destination location. Then click Save.
-
As needed, add more nodes by clicking the plus icon (recommended) or Add Node button:
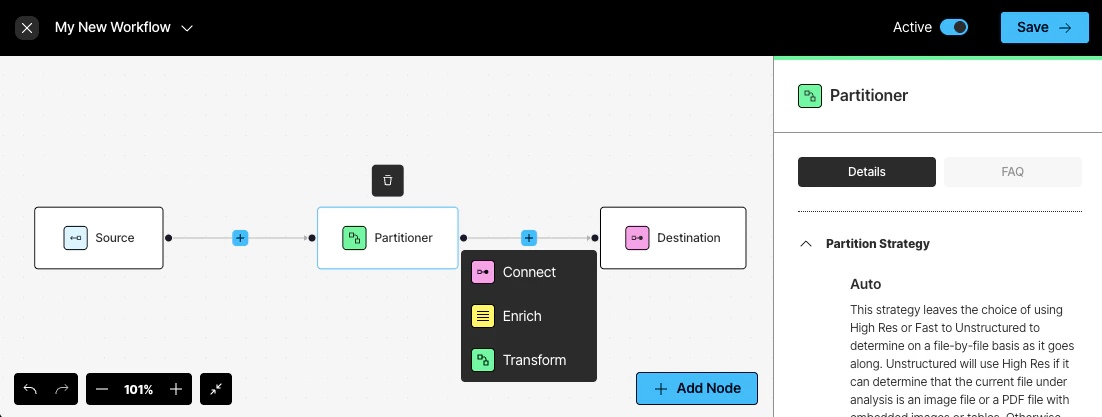
- Click Connect to add another Source or Destination node. You can add multiple source and destination locations. Files will be ingested from all of the source locations, and the processed data will be delivered to all of the destination locations. Learn more.
- Click Enrich to add a chunker or enrichment node. Learn more.
- Click Transform to add a Partitioner or Embedder node. Learn more.
To edit a node, click that node, and then change its settings. To delete a node, click that node, and then click the trash can icon above it.Make sure to add nodes in the correct order. If you are unsure, see the usage hints in the blue note that appears in the node’s settings pane.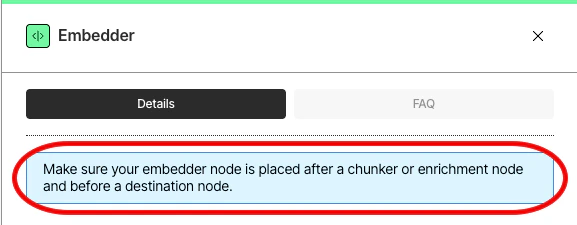
- Click Save.
- If you did not set the workflow to run on a schedule, you can run the workflow now.
Custom workflow node types
Partitioner node
Partitioner node
Choose from one of four available partitioning strategies.Unstructured recommends that you choose the Auto partitioning strategy in most cases. With Auto, Unstructured does all
the heavy lifting, optimizing at runtime for the highest quality at the lowest cost page-by-page.You should consider the following additional strategies only if you are absolutely sure that your documents are of the same
type. Each of the following strategies are best suited for specific situations. Choosing one of these
strategies other than Auto for sets of documents of different types could produce undesirable results,
including reduction in transformation quality.If you choose the Fast strategy, you can also choose from among the following additional settings:
- VLM: For the highest-quality transformation of these file types:
.bmp,.gif,.heic,.jpeg,.jpg,.pdf,.png,.tiff, and.webp. - High Res: For all other supported file types, and for the generation of bounding box coordinates.
- Fast: For text-only documents.
.pdf files, the Auto partitioning strategy routes these files’ pages
on a page-by-page basis, as follows:- A page is routed to Fast when it contains only embedded text and no images or tables are detected.
- All other kinds of pages are routed to VLM or High Res, depending on the complexity of a page’s content. Unstructured constantly optimizes its proprietary algorithm for routing to VLM or High Res in these cases.
When you use the VLM strategy with embeddings for PDF files of 200 or more pages, you might notice some errors when
these files are processed. These errors typically occur when these larger PDF files have lots of tables and high-resolution images.
- Include Page breaks: Check this box to include distinct
PageBreakdocument elements in the output, if the file type supports it. - Infer Table Structure: Check this box to add, for each table in a PDF file, a metadata field named
text_as_htmlto the output for that table’s document element. This field will contain an HTML representation of the table. - Elements to Exclude: Select the name of each available type of document element to exclude from the output.
- Include Page breaks: Check this box to include distinct
PageBreakdocument elements in the output, if the file type supports it. - Infer Table Structure: Check this box to add, for each table in a PDF file, a metadata field named
text_as_htmlto the output for that table’s document element. This field will contain an HTML representation of the table. - Include Coordinates: Check this box to add, for each document element in the output, a metadata field named
coordinatesto the output for that document element. This field will contain the bounding box coordinates of the document element’s content on the page, as well as the bounding box’s width and height in pixels. - Extract Image Block Types: Select the name of each available type of document element to add a metadata field named
image_base64to the output for that document element. This field will contain a Base64-encoded representation of the document element’s content. A Base64-to-image decoding of this field’s value will return an image representing the document element’s original content. - Elements to Exclude: Select the name of each available type of document element to exclude from the output.
Chunker node
Chunker node
For Chunkers, select one of the following:
-
Chunk by title: Preserve section boundaries and optionally page boundaries as well. A single chunk will never contain text that occurred in two different sections. When a new section starts, the existing chunk is closed and a new one is started, even if the next element would fit in the prior chunk. Also, specify the following:
- Contextual chunking: Apply by adding a separate Contextual Chunker node after this chunker. Learn more.
- Combine text under n chars: Combine elements until a section reaches a length of this many characters. The default is 0.
- Include original elements: Check this box to output the elements that were used to form a chunk, to appear in the
metadatafield’sorig_elementsfield for that chunk. By default, this box is unchecked. - Max characters: Cut off new sections after reaching a length of this many characters. This is a strict limit. The default is 2048.
- Multipage sections: Check this box to allow sections to span multiple pages. By default, this box is unchecked.
- New after n chars: Cut off new sections after reaching a length of this many characters. This is an approximate limit. The default is 1500.
- Overlap: Apply a prefix of this many trailing characters from the prior text-split chunk to second and later chunks formed from oversized elements by text-splitting. The default is 160.
- Overlap all: Check this box to apply overlap to “normal” chunks formed by combining whole elements. Use with caution as this can introduce noise into otherwise clean semantic units. By default, this box is unchecked.
-
Chunk by character (also known as basic chunking): Combine sequential elements to maximally fill each chunk. Also, specify the following:
- Contextual chunking: Apply by adding a separate Contextual Chunker node after this chunker. Learn more.
- Include original elements: Check this box to output the elements that were used to form a chunk, to appear in the
metadatafield’sorig_elementsfield for that chunk. By default, this box is unchecked. - Max characters: Cut off new sections after reaching a length of this many characters. The default is 2048.
- New after n chars: Cut off new sections after reaching a length of this many characters. This is an approximate limit. The default is 1500.
- Overlap: Apply a prefix of this many trailing characters from the prior text-split chunk to second and later chunks formed from oversized elements by text-splitting. The default is 160.
- Overlap All: Check this box to apply overlap to “normal” chunks formed by combining whole elements. Use with caution as this can introduce noise into otherwise clean semantic units. By default, this box is unchecked.
-
Chunk by page: Preserve page boundaries. When a new page is detected, the existing chunk is closed and a new one is started, even if the next element would fit in the prior chunk. Also, specify the following:
- Contextual chunking: Apply by adding a separate Contextual Chunker node after this chunker. Learn more.
- Include original elements: Check this box to output the elements that were used to form a chunk, to appear in the
metadatafield’sorig_elementsfield for that chunk. By default, this box is unchecked. - Max characters: Cut off new sections after reaching a length of this many characters. This is a strict limit. The default is 500.
- New after n chars: Cut off new sections after reaching a length of this many characters. This is an approximate limit. The default is 50.
- Overlap: Apply a prefix of this many trailing characters from the prior text-split chunk to second and later chunks formed from oversized elements by text-splitting. The default is 30.
- Overlap all: Check this box to apply overlap to “normal” chunks formed by combining whole elements. Use with caution as this can introduce noise into otherwise clean semantic units. By default, this box is unchecked.
-
Chunk by similarity: Use the sentence-transformers/multi-qa-mpnet-base-dot-v1 embedding model to identify topically similar sequential elements and combine them into chunks. Also, specify the following:
- Contextual chunking: Apply by adding a separate Contextual Chunker node after this chunker. Learn more.
- Include original elements: Check this box to output the elements that were used to form a chunk, to appear in the
metadatafield’sorig_elementsfield for that chunk. By default, this box is unchecked. - Max characters: Cut off new sections after reaching a length of this many characters. This is a strict limit. The default is 500.
- Similarity threshold: Specify a threshold between 0 and 1 exclusive (0.01 to 0.99 inclusive), where 0 indicates completely dissimilar vectors and 1 indicates identical vectors, taking into consideration the trade-offs between precision (a higher threshold) and recall (a lower threshold). The default is 0.5. Learn more.
Enrichment node
Enrichment node
Each enrichment node type has its own unique settings:For a full list of the models available in Unstructured, see Available models.
-
The Image Description node summarizes images. You must select one of the available provider (and model) combinations that are shown.
Learn more.For workflows that use chunking, the Chunker node should be placed after all enrichment nodes. Placing the Chunker node before an image description enrichment node could cause incomplete or no image descriptions to be generated.
-
The Table Description node summarizes tables. You must select one of the available provider (and model) combinations that are shown.
Learn more.For workflows that use chunking, the Chunker node should be placed after all enrichment nodes. Placing the Chunker node before a table description enrichment node could cause incomplete or no table descriptions to be generated.
-
The Table to HTML node generates HTML representations for tables. Also select the following:
- To use agentic AI to increase HTML accuracy for complex tables, select Agentic for Mode.
- To use a VLM for standard tables, select Standard for Mode. Then select one of the available Provider and Model combinations that are shown.
Learn more.For workflows that use chunking, the Chunker node should be placed after all enrichment nodes. Placing the Chunker node before a table-to-HTML output enrichment node could cause incomplete or no table-to-HTML output to be generated. -
The NER node generates a list of recognized entities and their relationships by using a technique called named entity recognition (NER).
You must select one of the available provider (and model) combinations that are shown.
You can also customize the prompt used to add or remove entities and relationships. In the Details tab, under Prompt, click Edit. Click Run Prompt in the
Edit & Test Prompt section to test the prompt.
-
The selected model will follow a default set of instructions (called a prompt) to perform NER using a set of predefined entity types and relationships. To experiment
with running the default prompt against some sample data, click Edit, and then click Run Prompt. The selected Model uses the
Prompt to run NER on the Input sample and shows the results in the Output. Look specifically at the
response_jsonfield for the entities that were recognized and their relationships. -
To customize the prompt, change the contents of Prompt.
For best results, Unstructured strongly recommends that you limit your changes only to certain portions of the default prompt, specifically:
-
Adding, renaming, or deleting items in the list of predefined types (such as
PERSON,ORGANIZATION,LOCATION, and so on). -
Adding, renaming, or deleting items in the list of predefined relationships (such as
works_for,based_in,has_role, and so on). -
As needed, adding any clarifying instructions only between these two lines:
- Changing any other portions of the default prompt could produce unexpected results.
-
Adding, renaming, or deleting items in the list of predefined types (such as
- To experiment with different data, change the contents of Input sample. For best results, Unstructured strongly recommends that the JSON structure in Input sample be preserved.
- When you are satisfied with the Model and Prompt that you want to use, click Save.
-
The selected model will follow a default set of instructions (called a prompt) to perform NER using a set of predefined entity types and relationships. To experiment
with running the default prompt against some sample data, click Edit, and then click Run Prompt. The selected Model uses the
Prompt to run NER on the Input sample and shows the results in the Output. Look specifically at the
-
The Generative OCR node optimizes the fidelity of text blocks that Unstructured initially processed during its partitioning phase.
You must select one of the available provider (and model) combinations that are shown.
Learn more.For workflows that use chunking, the Chunker node should be placed after all enrichment nodes. Placing the Chunker node before an image descriptions enrichment node could cause incomplete or no image descriptions to be generated.
Embedder node
Embedder node
For Select Embedding Model, select one of the available models that are shown. For a full list of the models available in Unstructured, see Available models.Learn more:
Extract node
Extract node
Do one of the following to define the custom schema for the structured data that you want to extract:
- To use a custom schema that conforms to the OpenAI Structured Outputs guidelines, click Upload JSON; enter your own custom schema or upload a JSON file that contains your custom schema; and then click Use this Schema. Learn about the OpenAI Structured Outputs format.
- To use a visual editor to define the schema, enter your own custom schema objects and their properties. To clear the current schema and start over, click the ellipses (three dots) icon, and then click Reset form. Learn about OpenAI Structured Outputs data types.
Edit, delete, or run a workflow
To run a workflow once, manually:- On the sidebar, click Workflows.
- In the list of workflows, click Run in the row for the workflow that you want to run.
- Edit via Form: Changes the existing configuration of your workflow.
- Delete: Removes the workflow from the platform. Use this action cautiously, as it will permanently delete the workflow and its configurations.
- Open: Opens the workflow’s settings page.
Pause a scheduled workflow
To stop running a workflow that is set to run on a repeating schedule:- On the sidebar, click Workflows.
- In the list of workflows, turn off the Status toggle in the row for the workflow that you want to stop running on a repeated schedule.
Duplicate a workflow
To duplicate (copy or clone) a workflow:- On the sidebar, click Workflows.
- In the list of workflows, click the ellipses (the three dots) in the row for the workflow that you want to duplicate.
- Click Duplicate. A duplicate of the workflow is created with the same configuration as the original workflow. The duplicate workflow has the same display name as the original workflow but with (Copy) at the end.